
Chapter 7
Clover & MacOS via MacOS
The steps to create a bootable installer using Clover on a Windows computer are different than that on a Mac computer, but if you've come to this page you already have a Mac and want to stick to the familiar OS you know, or use Windows and may just want to get a preview on how MacOS looks and feels.
The majority of this info was taken from the Hackintosh Vanilla Desktop Guide and was crucial in getting my previous systems working much better than before. While the vanilla process is more involved than the TonyMacx86.com techniques used in previous version of my eBook, it's also more open to learning how things work and gives the builder more control over their hardware and software. The vanilla install also results in a few slimmer files compared to somewhat bloated files from the TonyMacx86.com website. While the initial install does add extra lines of code in files, I'll go over ways to clean up the code. There's no reason to fear editing any files if you haven't done so before. I'll also cover preventative measures for protecting files so you'll have a working backup if things go wrong.
The majority of this info was taken from the Hackintosh Vanilla Desktop Guide and was crucial in getting my previous systems working much better than before. While the vanilla process is more involved than the TonyMacx86.com techniques used in previous version of my eBook, it's also more open to learning how things work and gives the builder more control over their hardware and software. The vanilla install also results in a few slimmer files compared to somewhat bloated files from the TonyMacx86.com website. While the initial install does add extra lines of code in files, I'll go over ways to clean up the code. There's no reason to fear editing any files if you haven't done so before. I'll also cover preventative measures for protecting files so you'll have a working backup if things go wrong.
Formatting the Flash Drive
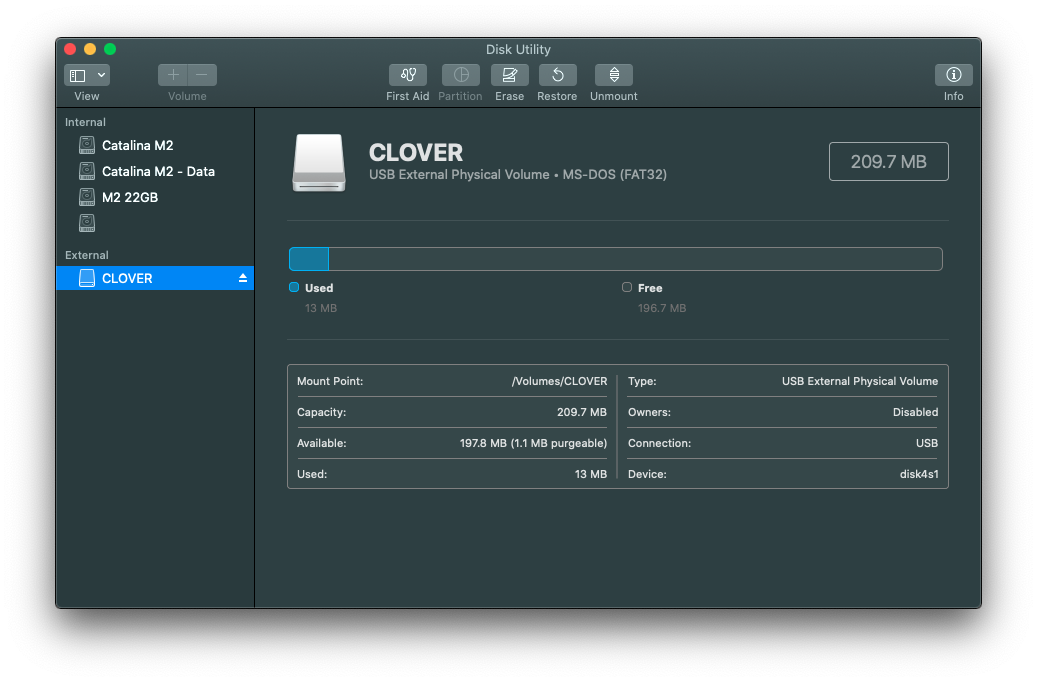
First we need to format the drive. In this example I'll be formatting a flash drive that I previously used for an install. I'm demonstrating this to show a hidden feature in the MacOS Disk Utility. Insert your flash drive, and go to Applications --> Utilities --> Disk Utility. The screenshot below shows the flash drive label as CLOVER and being formatted as MS-DOS (FAT32). What we want to do is format it for Mac instead. Even if your flash drive is formatted for a Mac, we'll reformat it completely in the next set of steps.
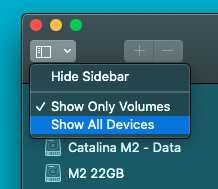
In the upper left corner, click the View icon, then select "Show All Devices":
Now the list of devices has expanded showing hidden volumes. Before the list was only displaying the names of the drives that were attached. Now the list shows the brand name and model for each drive in addition to the labels already assigned on the drives.
I've had issues not too long ago where I couldn't get my bootable flash drive to work properly. Later I discovered it was because when I was only reformatting one partition (part) of the drive instead of the whole drive. Using the above technique I was able to completely wipe the flash drive and start from scratch. This way there were no remnants of any old config.plist files.
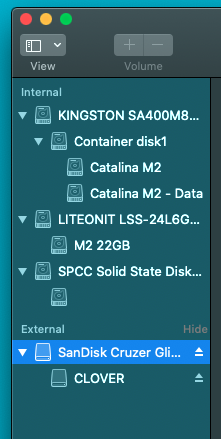
After you performed the action of showing all devices, click the leftmost label of your flash drive which should have the brand name (such as SanDisk Cruzer Glide, shown at left).
I've had issues not too long ago where I couldn't get my bootable flash drive to work properly. Later I discovered it was because when I was only reformatting one partition (part) of the drive instead of the whole drive. Using the above technique I was able to completely wipe the flash drive and start from scratch. This way there were no remnants of any old config.plist files.
After you performed the action of showing all devices, click the leftmost label of your flash drive which should have the brand name (such as SanDisk Cruzer Glide, shown at left).
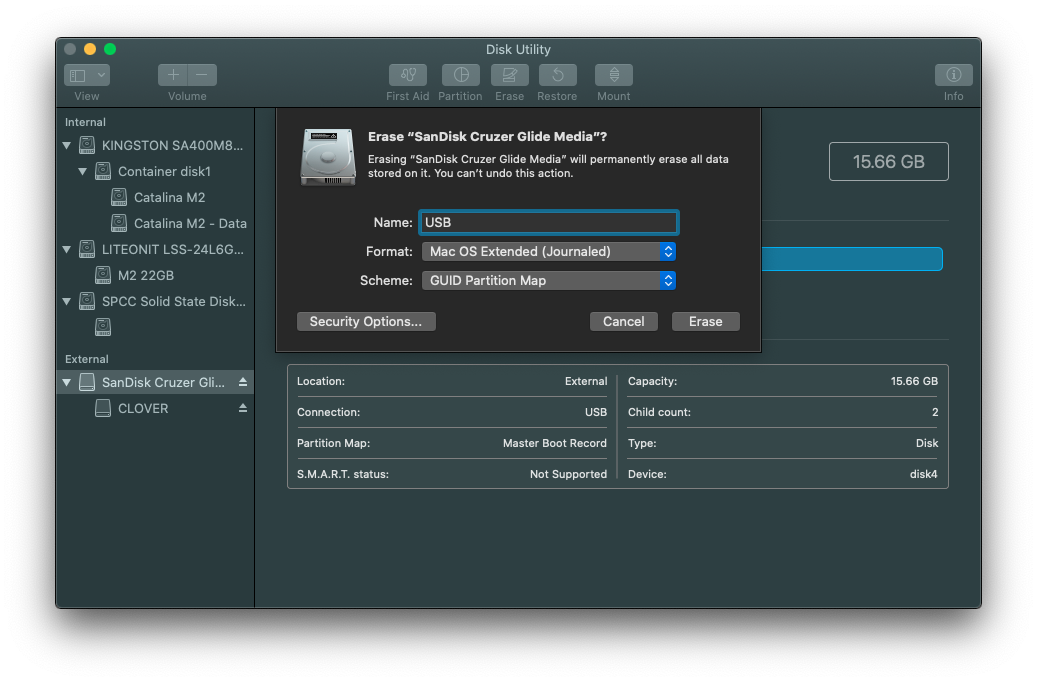
At the top section of the window, click the Erase icon. You'll see a pop-up window prompting you for more details regarding the settings of the drive.
Name the flash drive "USB" (no quotes), ensure the format is Mac OS Extended (Journaled), and that the scheme is GUID Partition Map as shown in the screenshot to the left.
Name the flash drive "USB" (no quotes), ensure the format is Mac OS Extended (Journaled), and that the scheme is GUID Partition Map as shown in the screenshot to the left.
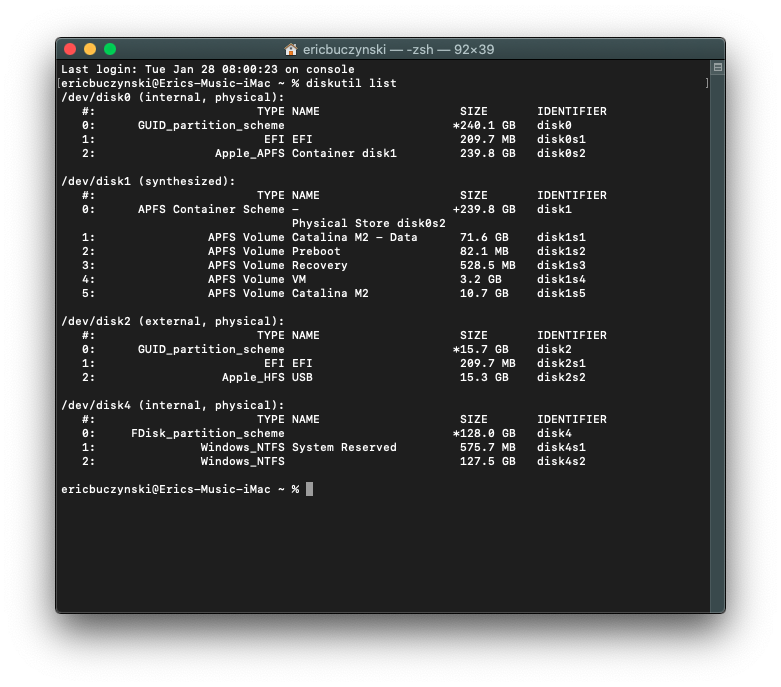
Now go to the Terminal by going to Applications --> Utilities --> Terminal.
HELPFUL HINT: In the Terminal, you can recall previously typed in commands by pressing the Up Arrow key on your keyboard. Even if you typed it in incorrectly, it will still be held in memory along with other entries in the Terminal that were typed in. If you scroll through and go too far, you can press the Down Arrow key to go forward instead. In the Terminal type in the following:
HELPFUL HINT: In the Terminal, you can recall previously typed in commands by pressing the Up Arrow key on your keyboard. Even if you typed it in incorrectly, it will still be held in memory along with other entries in the Terminal that were typed in. If you scroll through and go too far, you can press the Down Arrow key to go forward instead. In the Terminal type in the following:
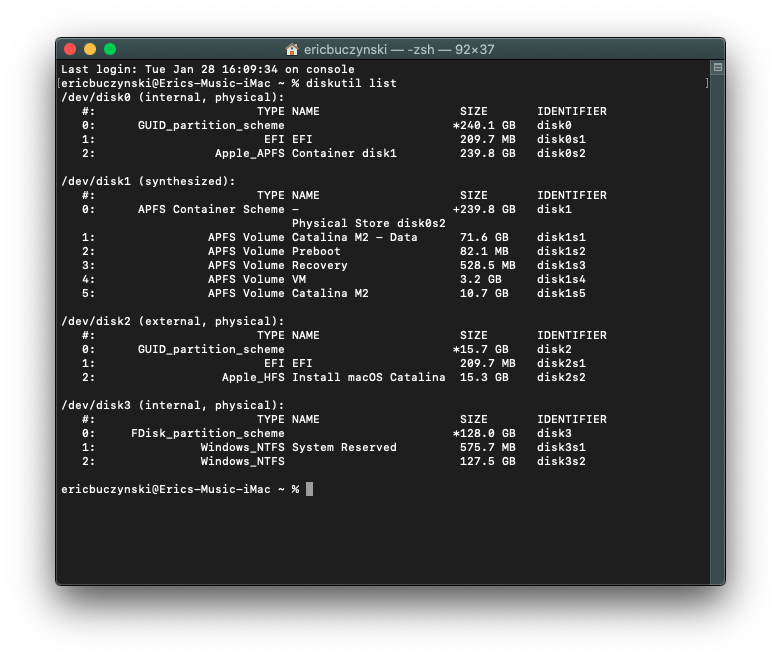
diskutil list...and you will see a list of connected drives. Since we named our flash drive "USB" we need to find it in the list:
In the Terminal type in the following:
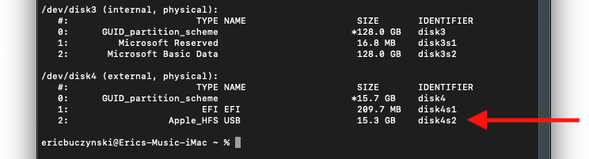
Here it appears as disk4s2. Your flash drive may appear elsewhere on the list.
The next step is to edit then type the following into the Terminal program:
diskutil partitionDisk /dev/disk# GPT JHFS+ "USB" 100%
The part of the string above that has /dev/disk# should be replaced with the disk #. In this example it is disk 4, so you would type in:
diskutil partitionDisk /dev/disk4 GPT JHFS+ "USB" 100%Note that there is a space between "partitionDisk" and "/dev/disk4", along with spaces between the rest of the words. Typically when formatting I simply highlight and copy the text, go into Terminal, then right-click at the cursor to paste it, then use the arrow keys to go back. After you typed in the command with your corresponding number for the flash drive, press Enter.
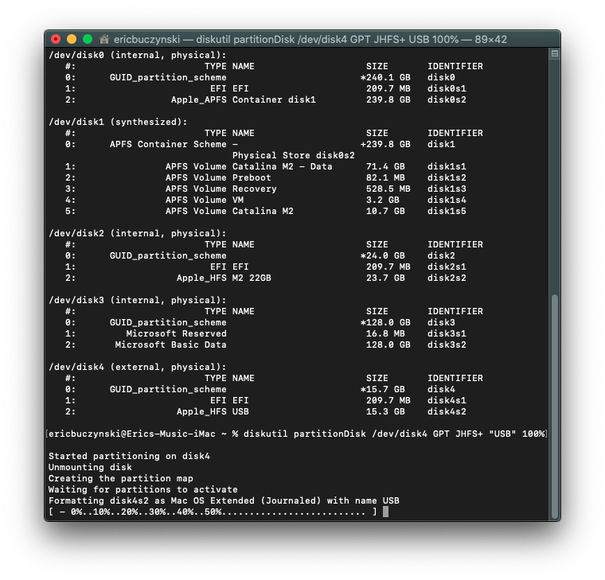
What this will do is partition the flash drive into two partitions: one reserved for the MacOS installer, the other an EFI partition. This process only takes 10 seconds or so.
Getting MacOS
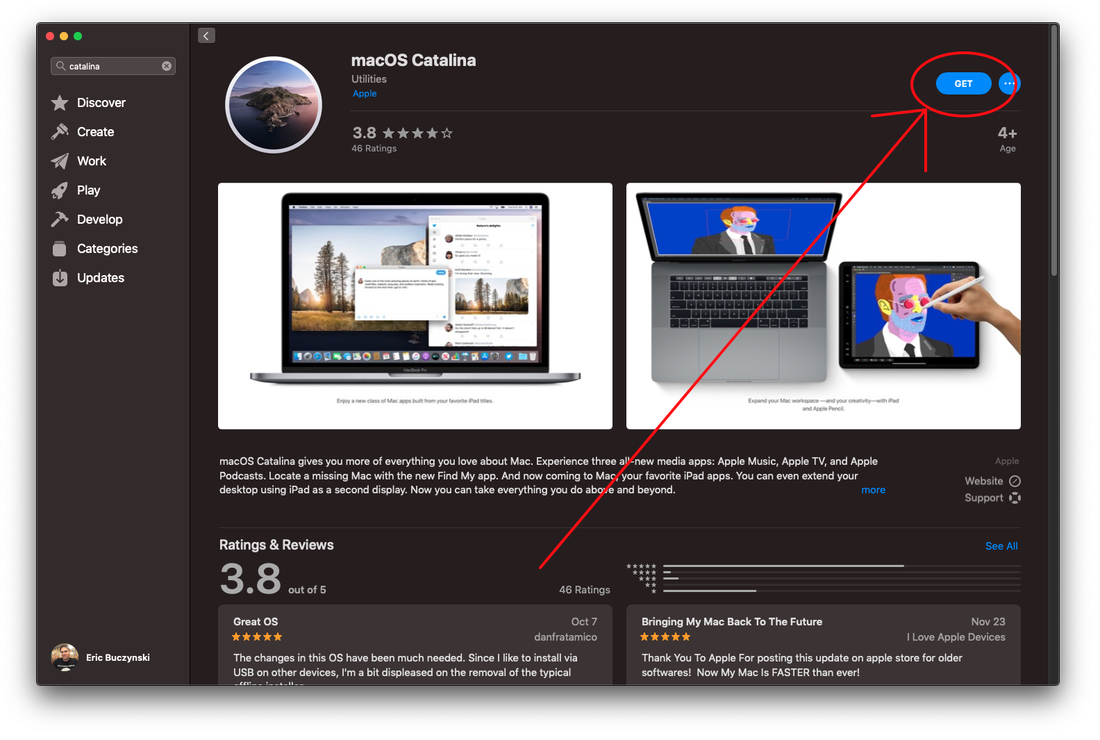
The next step involves downloading/copying the installer. Check the Applications folder and see if there is an app named "Install macOS (OS Name)". If there is, go to the next step. If not, go to the App Store (online). Do a search for the name of the current Mac OS version, click on the icon or "VIEW" above the entry for the OS, then on the next screen click on "GET":
It will download directly to the Applications folder or open up the System Preferences panel where you can then accept the download:
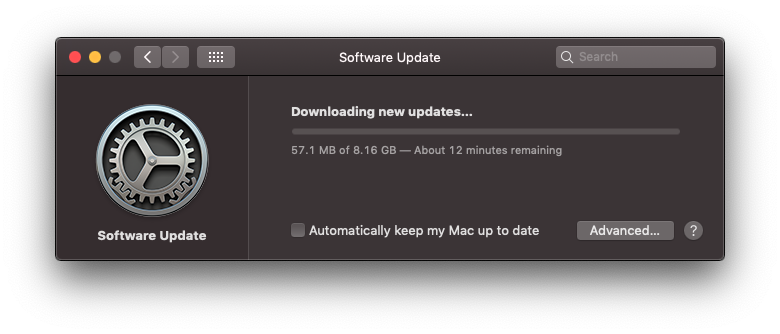
Downloading will take some time, but the App Store provides progress on the overall download. When it has finished it will open up the installer:
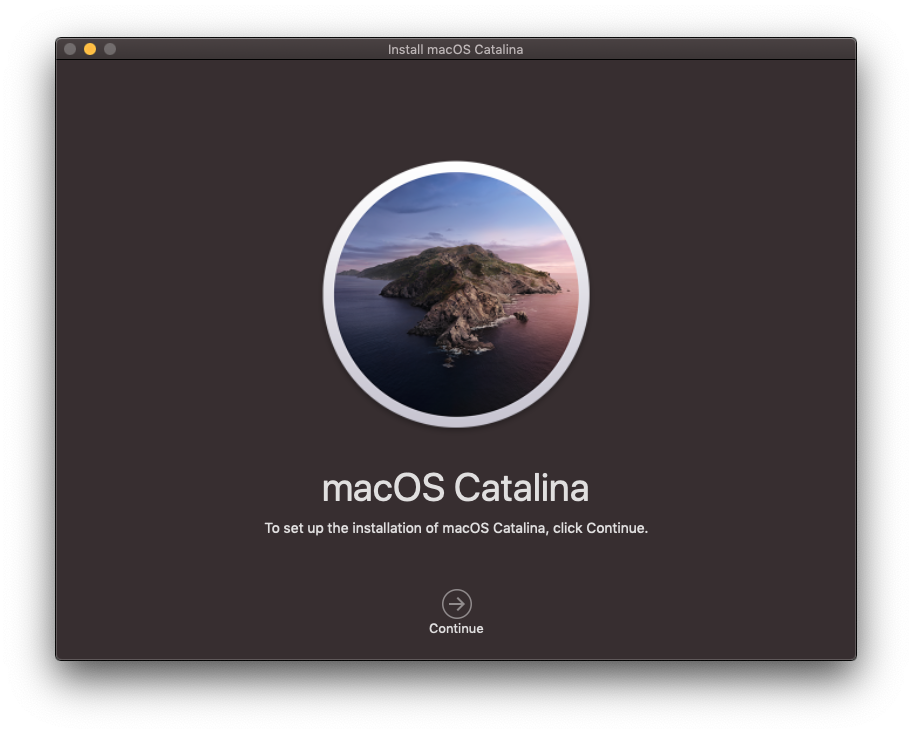

While this screen shows the beginning of the macOS installation, we're not going to use it. Instead we use Terminal commands to put this on to the flash drive. Click the red Close button in the upper left hand corner to close the window and quit the application. Check the Applications folder and you will find it listed:
Copying the Installer to the Flash Drive
Installing Clover

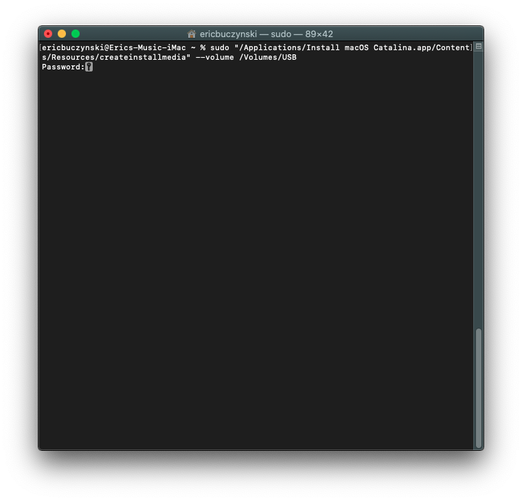
Like you did in the earlier step by copying and pasting the command into the Terminal, you'll want to do the same thing for the installer. Copy the code below, but note that the command below is for installing Catalina. Typically the App Store doesn't show any older OS versions available for download. But if you're on someone else's Mac and they still have the installer, chances are you should be able to install the older version if you choose to do so.
sudo "/Applications/Install macOS Catalina.app/Contents/Resources/createinstallmedia" --volume /Volumes/USBIf the name of the OS is different than what's displayed above, then replace the word "Catalina" with the name of the OS.

When you press Enter/Return you'll be prompted for your MacOS password. Type that in as well.

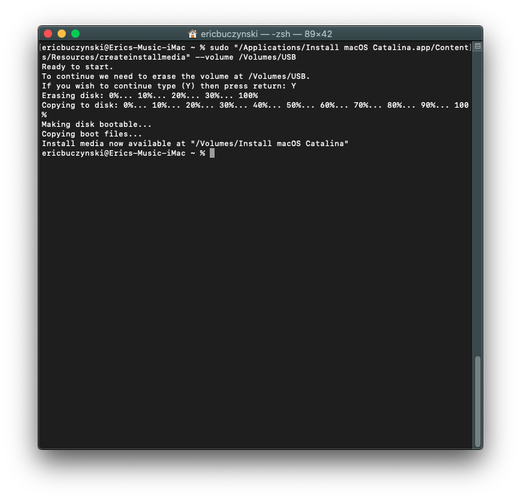
Now would be a good point to take a breather as the installation process will take some time. You'll have the status update in the terminal updating every 10 percent.
Based on the time stamp of the screenshots, my particular installation time took almost 30 minutes. Yours may vary based on computer speed and hard drive speed, but 30 minutes is a rough estimate.
The next steps will involve installing the Clover bootloader and modifying the config.plist file.
When the process has completed the Terminal will return to its ready state at which you can quit the terminal and move on to the next step.
The USB drive will now have the name "Install macOS Catalina", or the name of the OS you're installing.
Installing Clover
You'll need both Clover and Clover Configurator to start. Download them from the links shown below, but do not install them yet.
For Clover itself, the link is https://github.com/CloverHackyColor/CloverBootloader/releases. Here you can downloaded the latest version.
Clover Configurator can be downloaded from mackie100projects.altervista.org/download-clover-configurator/.
For Clover itself, the link is https://github.com/CloverHackyColor/CloverBootloader/releases. Here you can downloaded the latest version.
Clover Configurator can be downloaded from mackie100projects.altervista.org/download-clover-configurator/.
Download Clover next by going to the link. There you will see various entries:

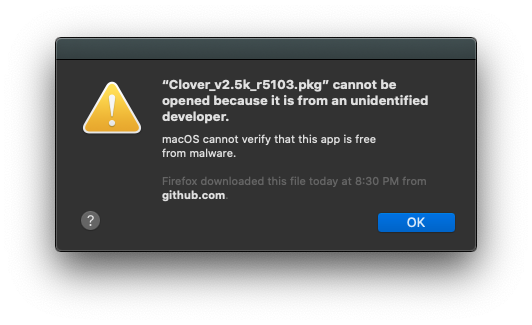
PC users and those new to Mac; note that where PC files come in .zip format, Mac files come in .pkg format. Once downloaded you can simply find the file in the Downloads folder, then double-click it to open it. In the above example you would click on Clover_v2.5k_r5103.pkg. If you use Firefox, it may prompt you as to what to do with the file, either open it automatically or save it. If you open it automatically.
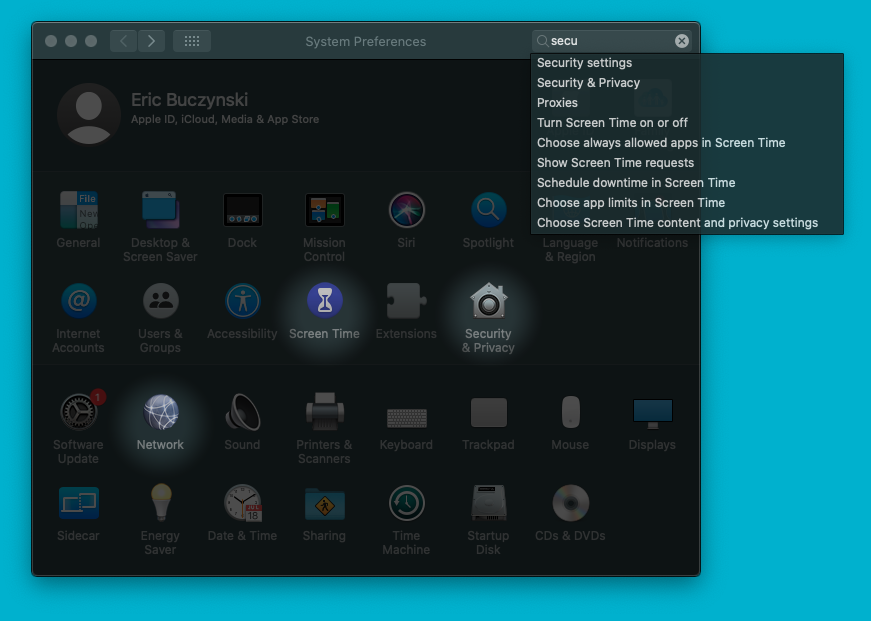
Most of the time when you download apps from the Internet compared to the app store, MacOS doesn't believe the download is safe, and for good reason. For the time being we'll take the long way around. When the pop up window such as the one above appears, click OK, and the box will disappear. Then click on System Preferences, then Security and Privacy. The example below shows what it looks like in Mojave, but High Sierra and Sierra may look different. You can also start to type the item you're looking for as shown below and the box will highlight items that may be what you're looking for.
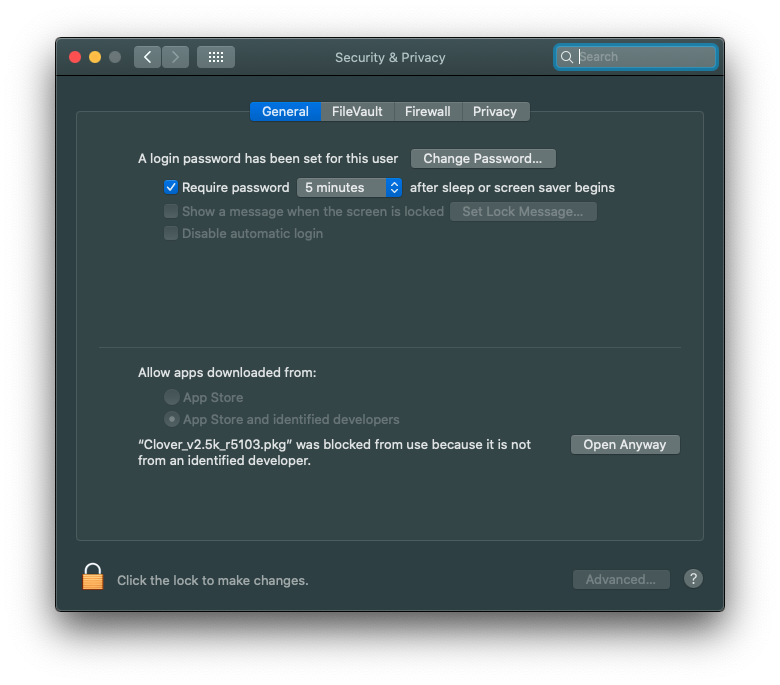
It knows the last item you tried opening and in the bottom part of the window it gives you the option to open it anyway. Click on Open Anyway:
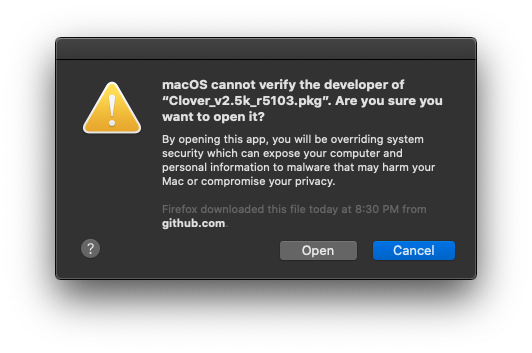
When you click it you'll receive yet another prompt:
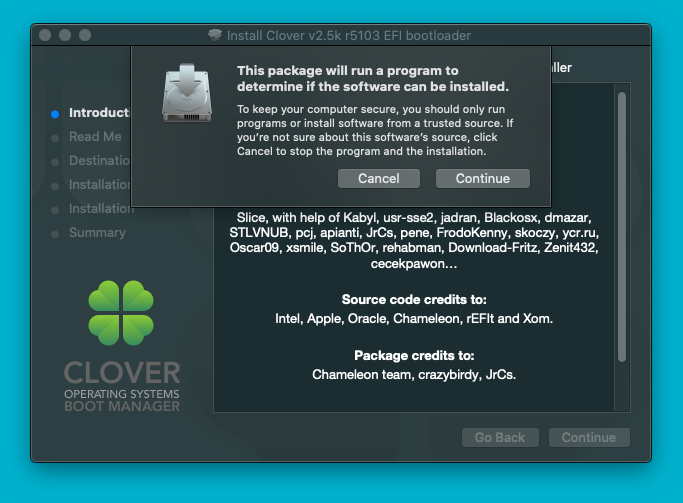
This is more of an "Are you sure?" message. Click on Open, and it will launch the Clover installer. Anytime you install software from an unknown source, you'll see this prompt. Click Continue to move forward. Rather than bring the new programs launched to the frontmost window, Clover stays in back. So you will have to close out the Security & Privacy Window from System Preferences by either quitting System Preferences, or clicking the red X in the upper left hand corner of the Security & Privacy window (not shown). then you'll get a prompt like the one shown below:
Click "Continue" through the prompts and enter your password when prompted for it. Eventually you'll arrive at this screen:
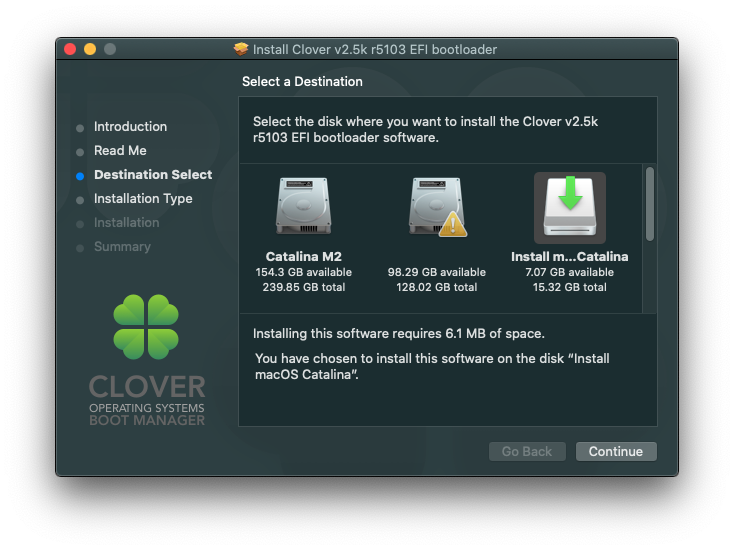
Here's where we need to do some custom work to start off right. Let's ensure the destination is the flash drive and click on "Change Install Location..."
Your original Mac's drive will be shown and any others that are connected. If you have a number of drives the flash drive may not appear in the small window. Scroll down the window until you find "Install MacOS (version)" and click on it, then click on Continue.
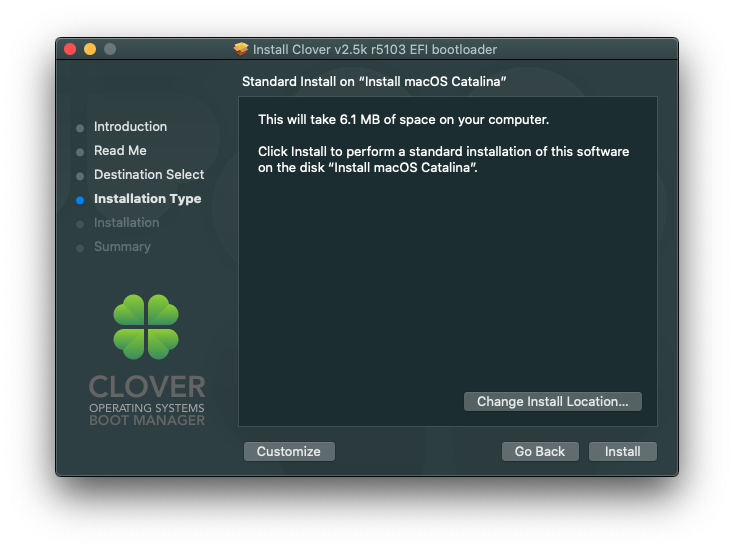
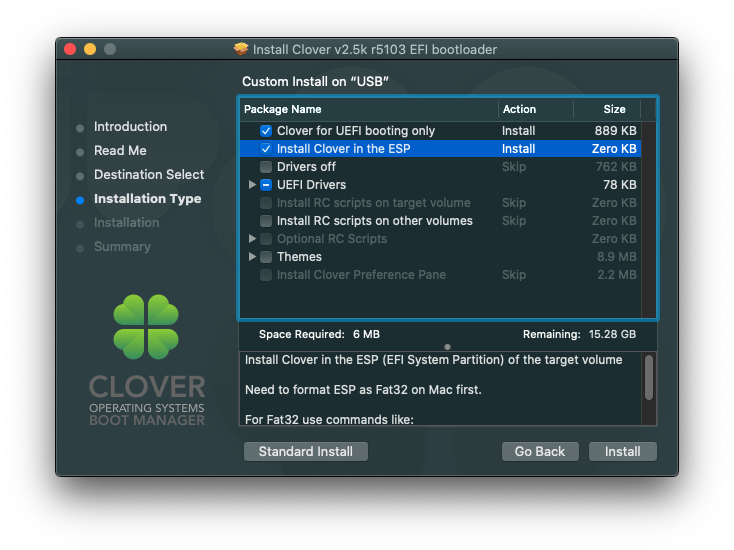
Click on "Customize" to select options.
Next to each section is a small arrow. Click the arrow to expand the list. If you want a summary of what each entry does, click the name instead of the box for each entry, and the text field below will provide a brief explanation of what each option does.
Next to each section is a small arrow. Click the arrow to expand the list. If you want a summary of what each entry does, click the name instead of the box for each entry, and the text field below will provide a brief explanation of what each option does.
Here's where there earlier research pays off a bit. If your computer or motherboard has UEFI, check the first box for "Clover for UEFI booting only", and "Install Clover in the ESP". Otherwise you can leave these unchecked and more options will appear for BIOS-based systems. If you haven't done so already, go to the manufacturer's product page for your desktop, laptop, or motherboard and see if it has a BIOS-based system or a UEFI-based system. All new motherboards should have a newer UEFI-based system, but some older boards initially had a BIOS but had UEFI upgrades available. The product support page should inform you of the latest BIOS upgrade and if a UEFI upgrade is available.
On this screen be sure to click the "Drivers off" selection. This will add all possible drivers you may or may not need later on, and will take up a very minimal amount of space on the flash drive.
On this screen be sure to click the "Drivers off" selection. This will add all possible drivers you may or may not need later on, and will take up a very minimal amount of space on the flash drive.
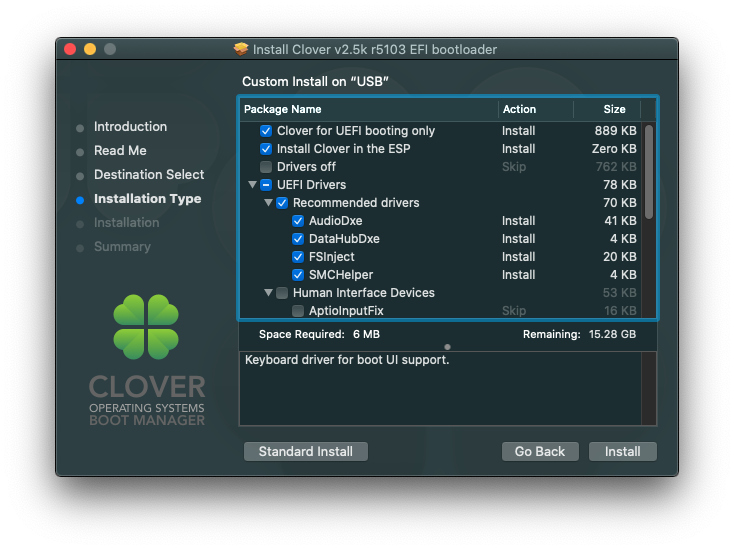
In the screenshot below the arrow next to UEFI Drivers is expanded showing the list of other entries such as Recommended drivers, Human Interface Devices (typically not required), and more. For the list of recommended drivers, you can leave all of those items checked.
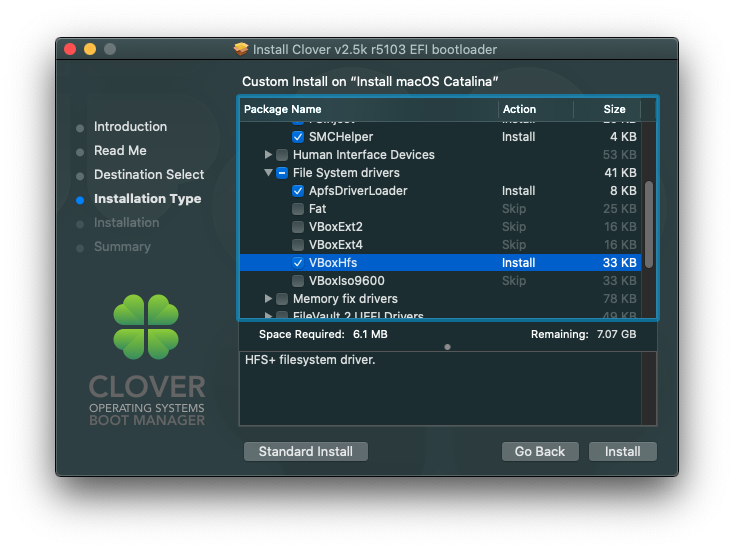
Here you have options for the system to read various file types. If you formatted your flash drive as APFS earlier, that box should already be checked. If not, check it now. The rest of the options provide file formats for other drives if you want MacOS to read and write to drives with those file types as well. If you have older drives like I do, be sure to check VBoxHfs:
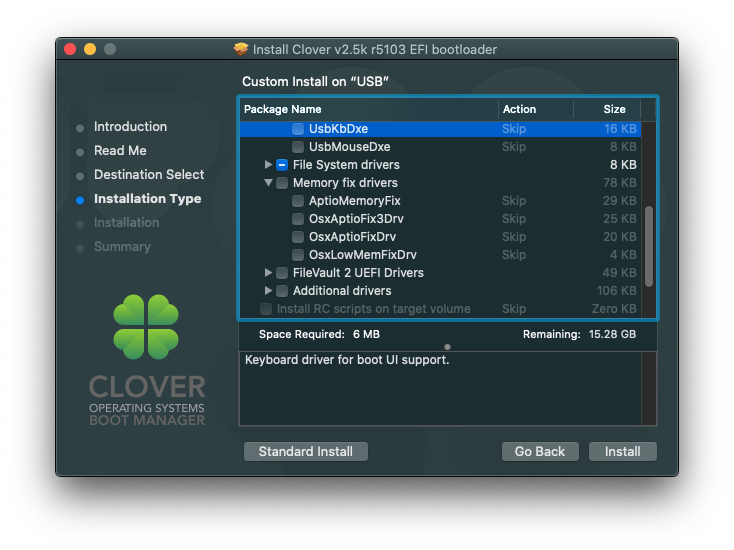
ROADBLOCK! The section for Memory fixes is tricky. When rewriting the book I was using my i5 Hackintosh on the Windows side to start from scratch, but using the kext and driver folders from the Hackintosh side as a starting point. My i5 section had a OsxAptoFix3Drv driver, but when I installed it to the booting flash drive using one method, I was getting memory issues when attempting to select my flash drive after booting. Somehow when I tried the OsxAptioFixDrv driver instead, that got me through to the MacOS screen where I could then install MacOS to my test hard drive. Yet later on it didn't work again, but the OsxAptioFix3Drv driver did work! What would happen is I would boot to the flash drive, see the options for loading, select my boot drive, see a bunch of text appear on the screen and scroll quickly (known as verbose mode, totally normal), but it would reboot instead of stopping showing me where the error was. Other times I would select my boot drive to install MacOS, then get a memory error right away.
More than likely there may already be a solution for your particular laptop, desktop, or motherboard. There's no harm in Googling your particular model and seeing if there are compatible settings, but the more viable solution would be to run through them one by one starting with OsxAptioFix3Drv, OsxAptioFixDrv, then AptioMemoryFix. What this involves is keeping only one of those three in the "drivers" folder and the other two in the "off" folder (shown once you have Clover installed), booting from the flash drive, selecting the flash drive to install MacOS, and seeing if you can get to the installation screen itself. If it freezes, gets stuck at a memory error or other error, or reboots; you'll have to do more investigating. Because of the various hardware out there and all the possible solutions, it's not possible for me to provide solutions for every error that can be. Some errors are fairly common no matter what hardware or configuration you have, and this could be due to a setting in the config.plist file instead of an issue with the wrong file in the drivers folder.
More than likely there may already be a solution for your particular laptop, desktop, or motherboard. There's no harm in Googling your particular model and seeing if there are compatible settings, but the more viable solution would be to run through them one by one starting with OsxAptioFix3Drv, OsxAptioFixDrv, then AptioMemoryFix. What this involves is keeping only one of those three in the "drivers" folder and the other two in the "off" folder (shown once you have Clover installed), booting from the flash drive, selecting the flash drive to install MacOS, and seeing if you can get to the installation screen itself. If it freezes, gets stuck at a memory error or other error, or reboots; you'll have to do more investigating. Because of the various hardware out there and all the possible solutions, it's not possible for me to provide solutions for every error that can be. Some errors are fairly common no matter what hardware or configuration you have, and this could be due to a setting in the config.plist file instead of an issue with the wrong file in the drivers folder.
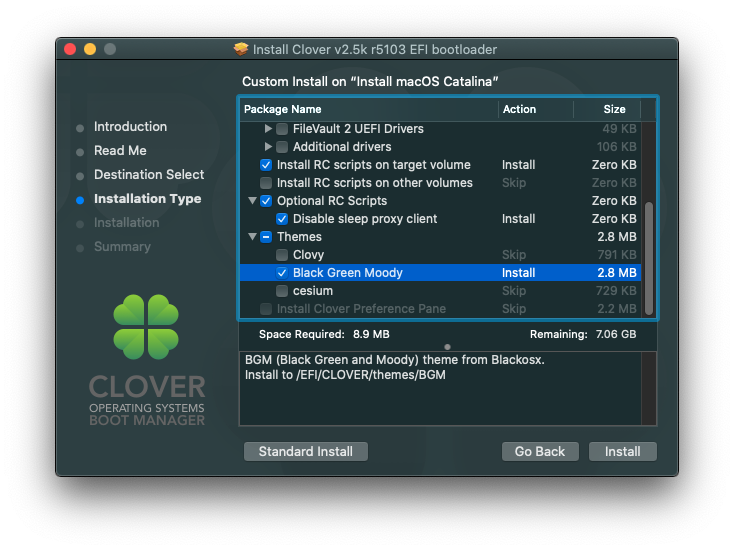
Here you'll want to check off "Install RC scripts on target volume" and the optional RC Script Disable sleep proxy client:
While not required for selection, you can choose an alternate Clover theme which applies to the icon appearance and layout. Here I chose "Black Green Moody". This is not really a personal choice, but rather an indicator to let me know that this particular installer uses that theme. This is also an indicator to let me know that I did boot from the flash drive as opposed to the internal hard drive.
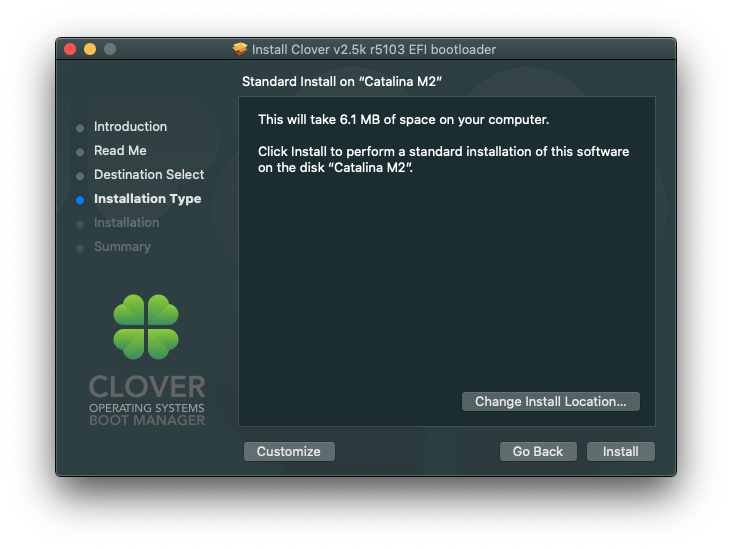
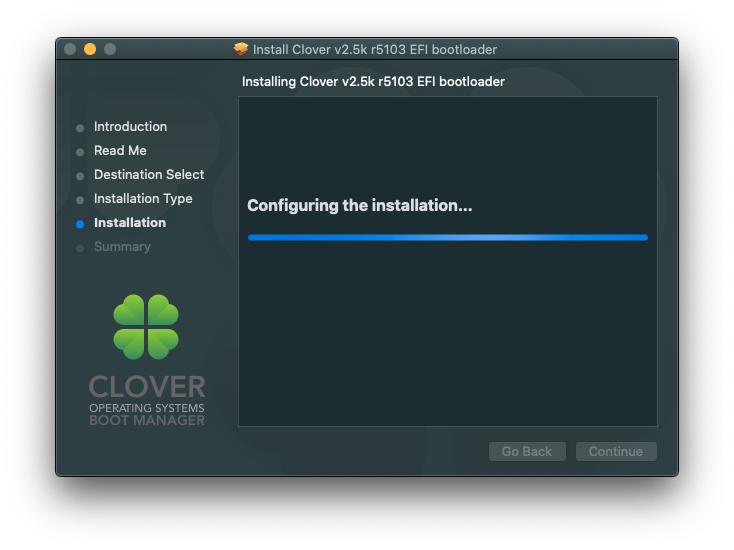
When finished, click "Install", enter your password, and the installation process should take less than 30 seconds.
When finished, click "Install", enter your password, and the installation process should take less than 30 seconds.
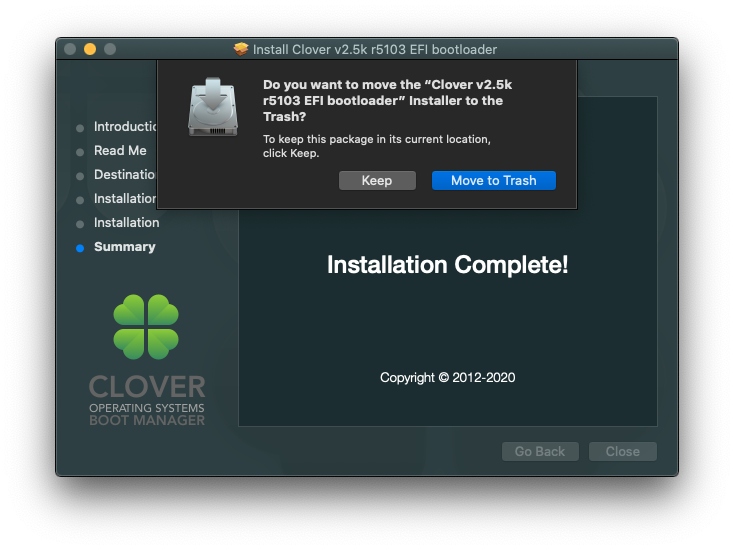
When completed the window will display "Installation Complete!". When you click on Close you'll receive another prompt to keep the installer or delete it by moving it to the trash. Just to prevent having to download it again I usually keep it.
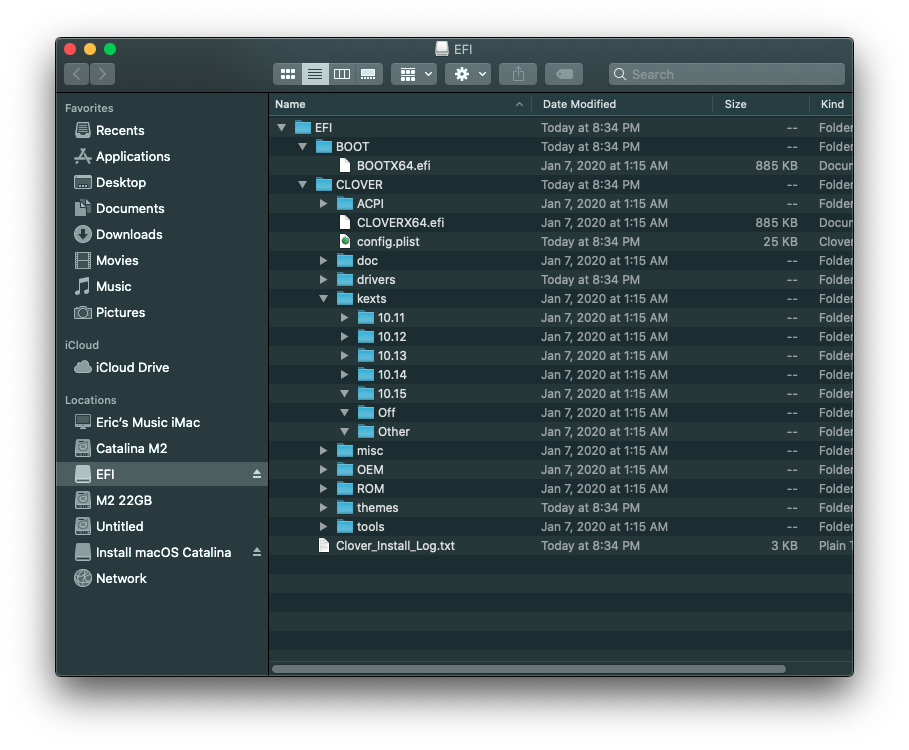
With that out of the way, you will see a new icon on the desktop for the EFI partition. Double-click it to open it and you will see the file structure for Clover. The structure in the EFI folder is about the same for Windows and Mac users, which we will be modifying in the next section.
Mac users should take notice that when Clover is done being installed, the EFI partition will appear on the desktop along with the separate partition for installing the MacOS copied to the flash drive. If you eject, remove, then reinsert the flash drive, the EFI partition will not appear. To unhide it you'll have to do one of two things:
- Launch Clover Configurator, click on Mount EFI, select the drive with the EFI partition you want to mount and click Mount EFI. Sounds complex but it's just faster for me.
- The alternative is to use the terminal and type in:
diskutil list ...and find the drive with the EFI partition:
This screenshot shows multiple drivers with EFI folders. We're looking for the EFI folder for the USB flash drive. Looking through the list, it is disk2 because of the drive size and the fact that there's the other label "Install macOS Catalina". More thorough, it is disk2s1 for EFI. In your case, the actual location may be different, but be sure to get the entire entry with the number after the lowercase "s".
Now type in:
Now type in:
sudo mkdir /Volumes/EFIand finally type in the following:
sudo mount -t msdos /dev/diskXsX /Volumes/efibut in /dev/diskXsX, replace the Xs with EFI disk and location. So if the EFI location on your boot flash drive is disk 4s1 you would type in:
sudo mount -t msdos /dev/disk4s1 /Volumes/efi