
Chapter 5 - PC Assembly - Part IV
BIOS/UEFI Settings
No matter if you're building a machine for Windows or macOS you'll need to access the motherboard's BIOS/ Settings in order to set boot order, the date and time, and familiarize yourself with the menus and other settings. Accessing the BIOS screen on most systems is done by holding down a specific key on the keyboard. Check your owner's manual to find out the key to do this. There may also be another key you can hold down to access the disk selection screen rather than having to go through the BIOS Screen. Discover and memorize that key as well as you will use it quite a few times later on.
Note that some laptops may use an assigned button to boot to the BIOS Screen. I used to own a Lenovo Y510P that had a small button on the side of the laptop that would boot to the BIOS screen when pressed. There was no key I could hold down on the keyboard to get to that screen. I had to use that side button.
The screenshots that follow are from the same Intel-based motherboard from the previous chapters, the Gigabyte GA-H270M-D3H. Consumer-level laptops and desktops will have similar-looking screens that enable you to change the date and time, set the boot order for various devices, and a few other basic options. Third-party motherboards sold by themselves, (with brand names such as ASUS, Gigabyte, AsRock and MSI), will have screens with more options that provide more control over CPU and RAM voltages. These are more for enthusiasts who overclock their processors to go beyond their advertised speeds, but not required for any builds whatsoever, including Hackintoshes.
Starting Fresh
As you boot your machine, hold down whatever key is necessary to get to the BIOS/UEFI screens. You can use the keyboard to navigate left and right, but go to the very last screen on your system. There should be an option there for "Load Optimized Defaults" or similar. Select that and the BIOS Screens will show optimized defaults. From there you can go back to the very beginning to adjust settings to tailor to your needs and operating system.
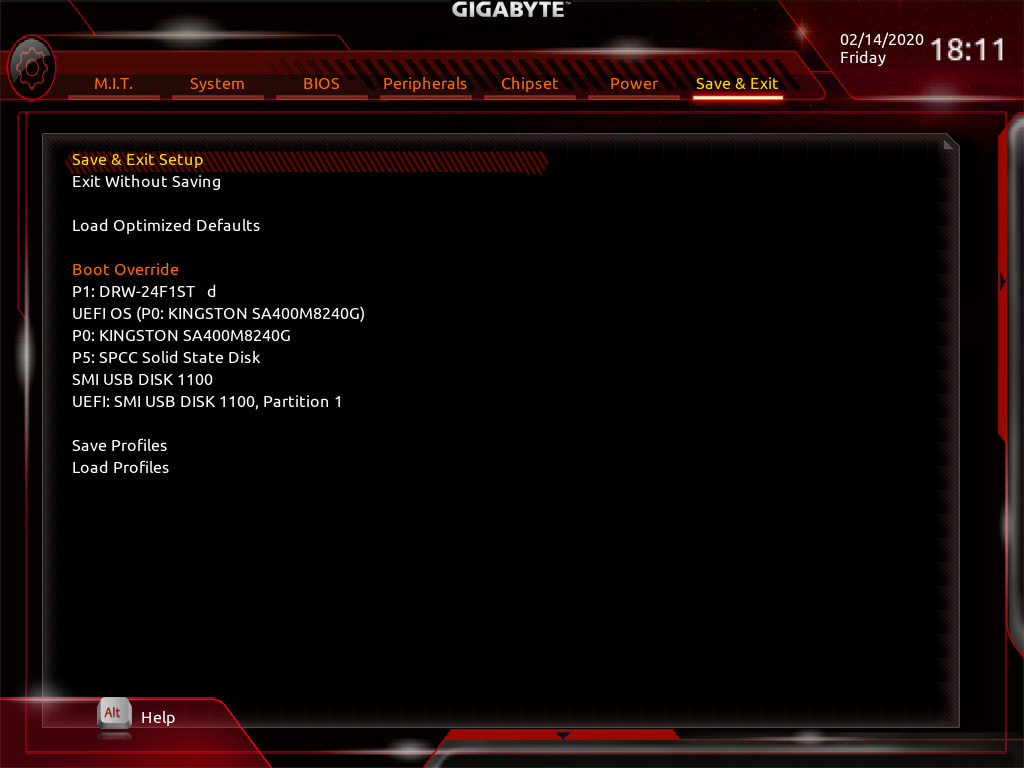
Throughout the process you can set a specific hard drive to boot into, then save the entire profile so you can recall it later. This screen, like the disk selection screen, lets you temporarily override the selected hard drive to boot into. We'll cover more of this later on.
Throughout the process you can set a specific hard drive to boot into, then save the entire profile so you can recall it later. This screen, like the disk selection screen, lets you temporarily override the selected hard drive to boot into. We'll cover more of this later on.
System Info
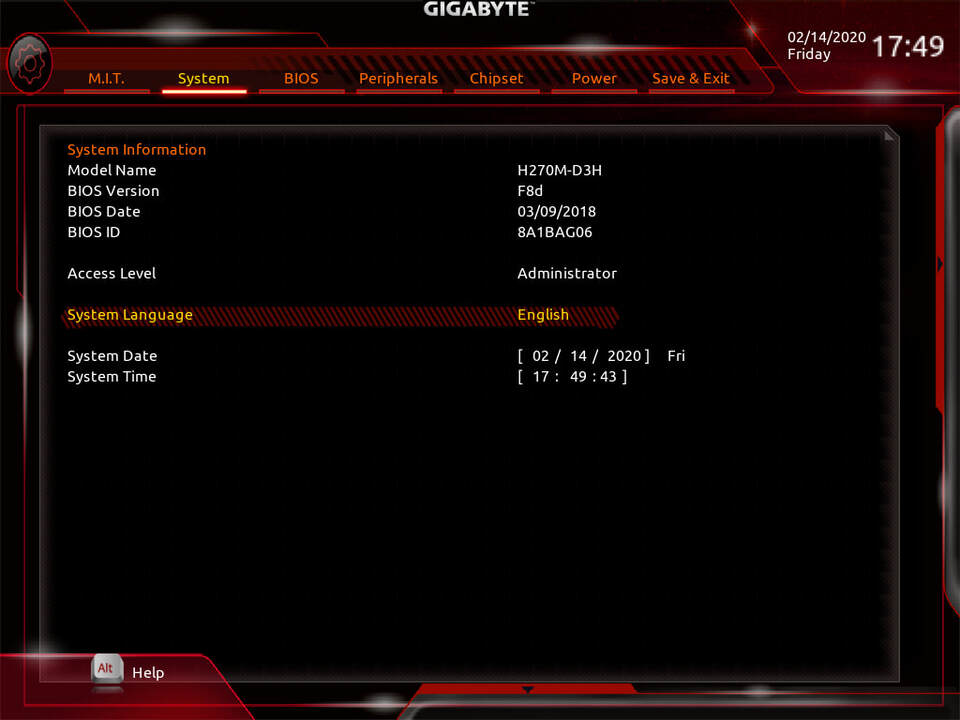
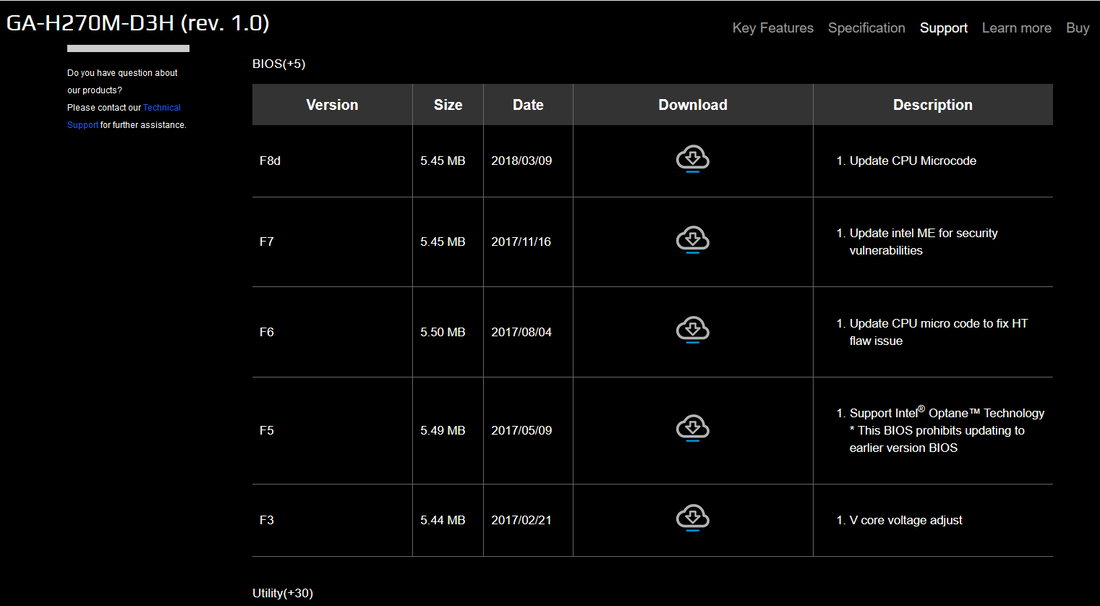
The System screen allows you to set the current date and time, and it provides info about the current BIOS. In the above example it is F8d. I can go to the manufacturer's web page under support and see the current version, which is currently the one I have:
BIOS
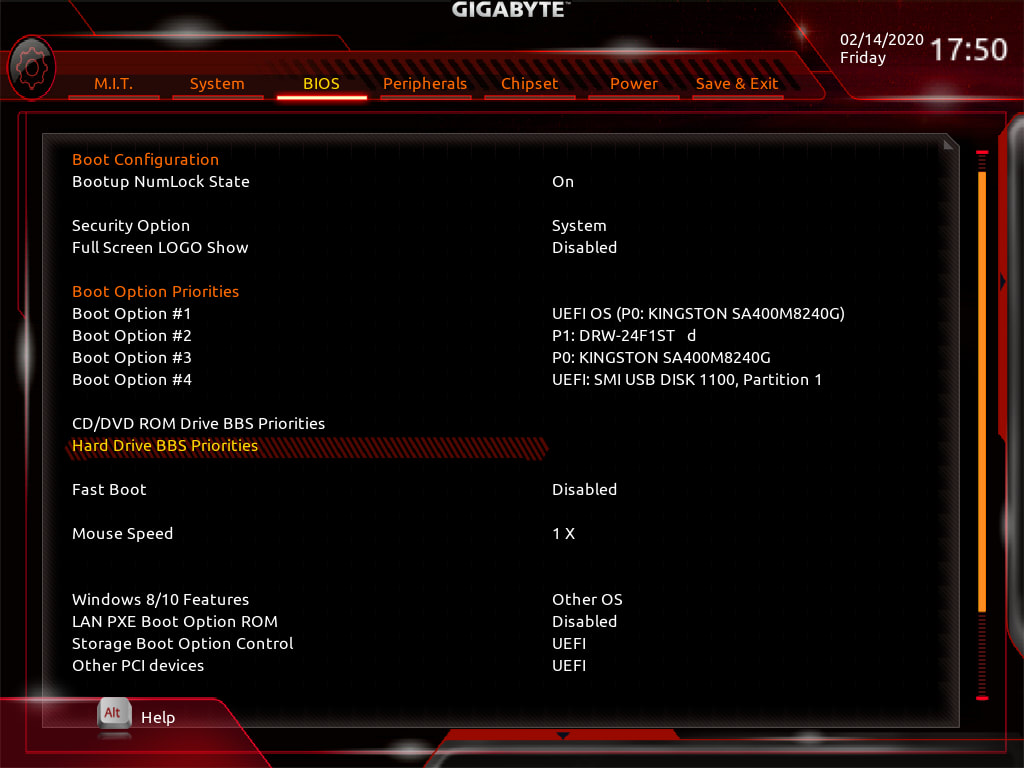
The boot order lets you assign the order of drives that the BIOS searches for when it looks for a drive containing an operating system. Some boards have an option known as CSM, and if this is set to Enabled, additional drives may appear.
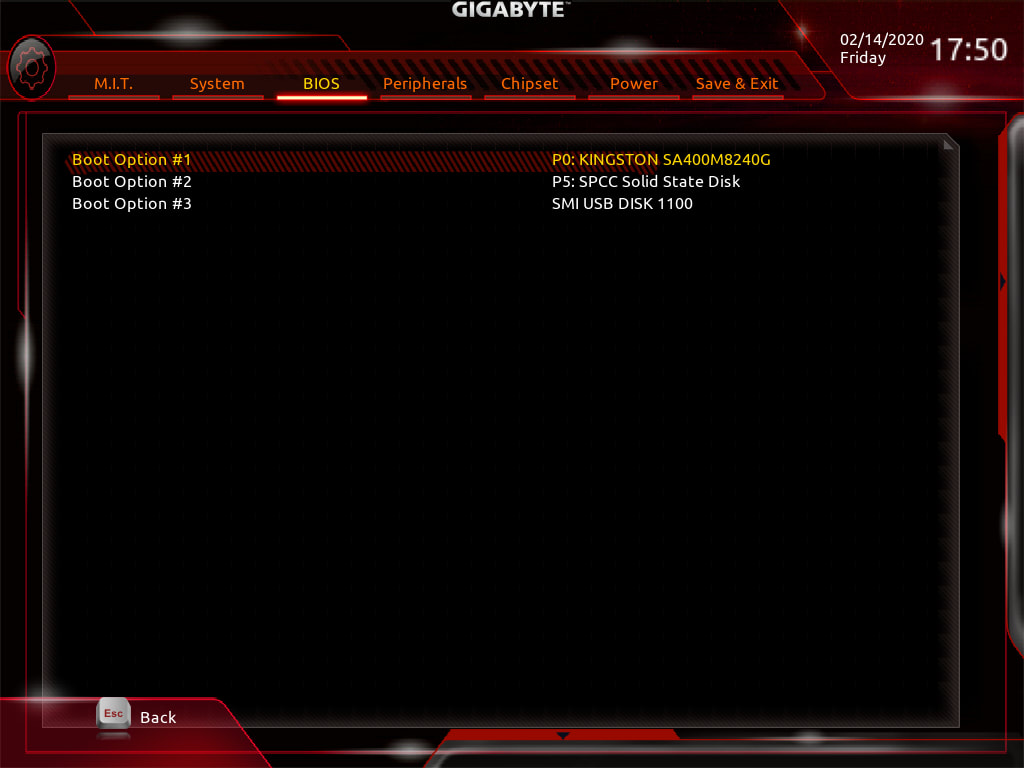
Boot Option Priorities
The list in this section shows all available partitions of a hard drive. In Boot Options #2 and #3, the "P" before the number stands for the SATA port that the current drive is connected to on the motherboard. After you have your drive for macOS formatted, you should see two entries for the same drive; one showing the "P:" and the SATA port number, the other showing "UEFI:". When macOS has been installed you'll want to set the boot drive to "UEFI OS:" and whatever the drive is.
The screenshot below shows this example. I have macOS Catalina stored on an m.2 drive, a Kingston-brand drive model SA400M8240G. There's no reason for you to memorize model numbers. I'm pointing this out to show that under Boot Override there are multiple entries for the different drives. You can see that the Kingston drive is listed as "P0: KINGSTON SA400M2240G" and as "UEFI OS (P0: KINGSTON SA400M2240G)". When you are building a machine for Windows you'll want to select the UEFI partition or the one listed as Windows Boot Manager, or for macOS you'll want to select the UEFI OS entry for your hard drive.
Hard Drive BBS Priorities
The section here shows only the hardware. You should still set the primary drive to the drive that you'll be installing the OS on to.
The section here shows only the hardware. You should still set the primary drive to the drive that you'll be installing the OS on to.
Hackintosh Setup: Ensure that the options for Full Screen Logo and Fast Boot are set to Disabled. Storage Boot Option Control and Other PCI Devices should be set to "UEFI" if possible. If your BIOS has the option for Windows 8/10 features, set this to "Other OS". You will still be able to boot to the Clover bootloader, then select a Windows 10 drive if you have it installed rather than booting to macOS.
Peripherals
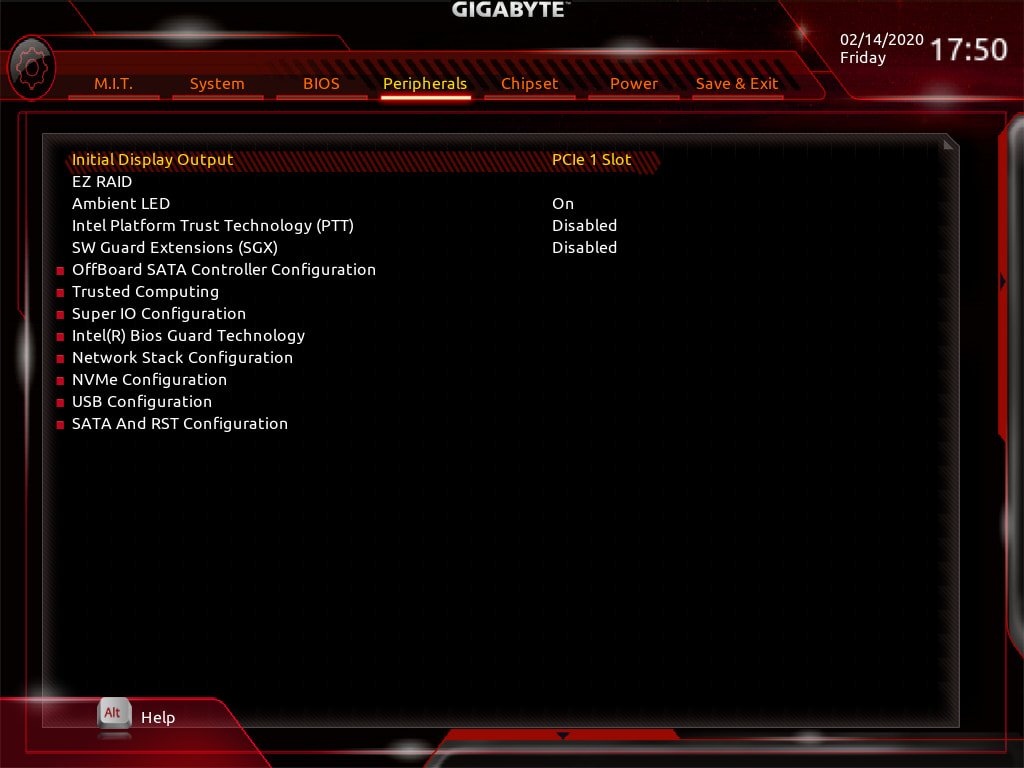
The entry here for Initial Display Output is what you'll need to change depending if you use a video card, or if you use a video port on the motherboard and your CPU has built-in graphics. Laptops will have this feature as well, but if setting up macOS you should be able to use either the built-in screen or an external monitor.
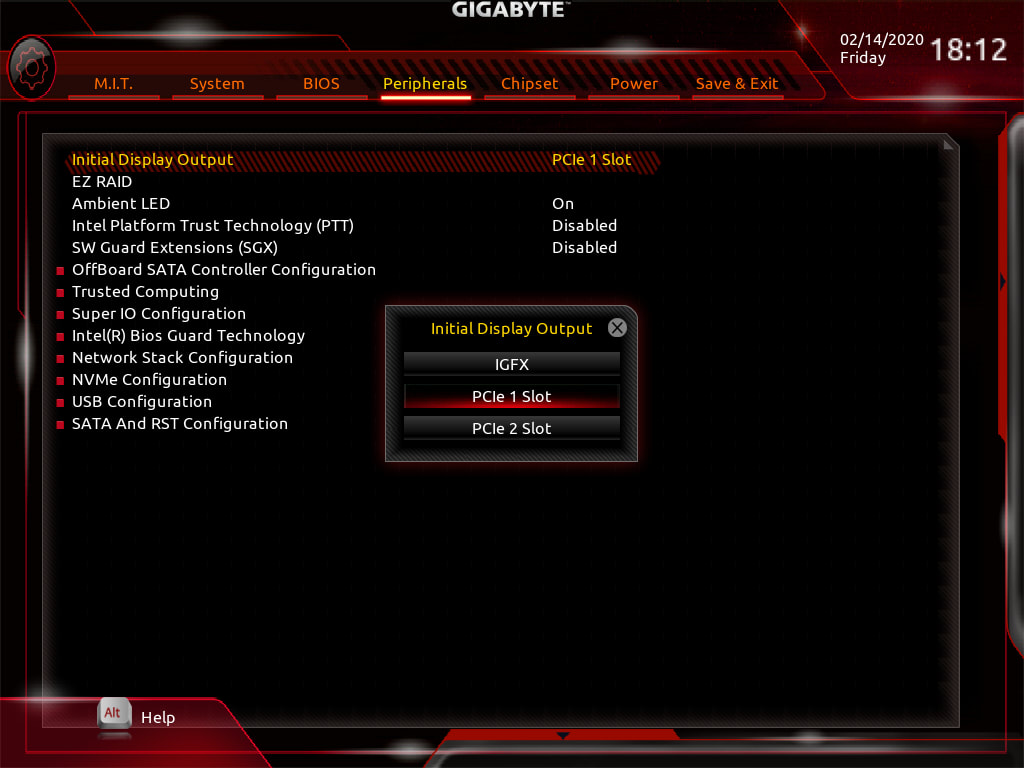
The Intel-based motherboard I'm using for the book has two PCIe slots, so this allows for up to two video cards to be added. Because of this feature, I have three options to choose from for the primary video output:
- Either the CPU's built-in graphics, which appears in the list as IGFX (for Integrated Graphics)
- PCIe 1 Slot
- PCIe 2 slot
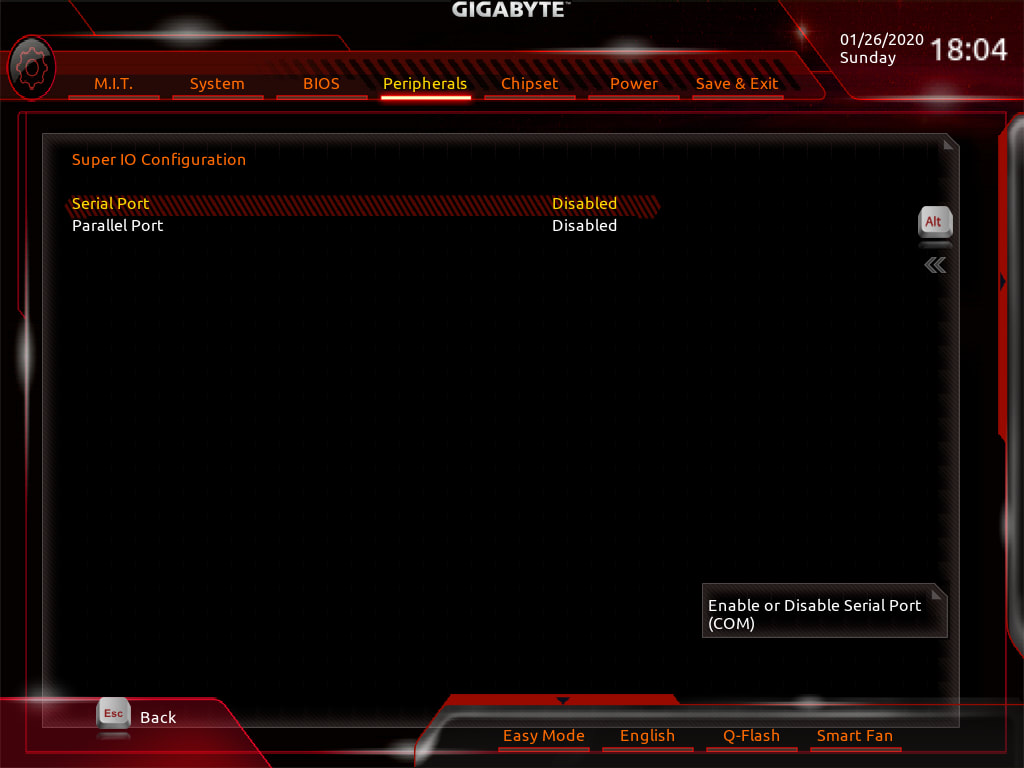
Super IO Configuration
This setting enables or disables any serial or parallel ports on the motherboard.
Hackintosh Setup: Disable both of these.
This setting enables or disables any serial or parallel ports on the motherboard.
Hackintosh Setup: Disable both of these.
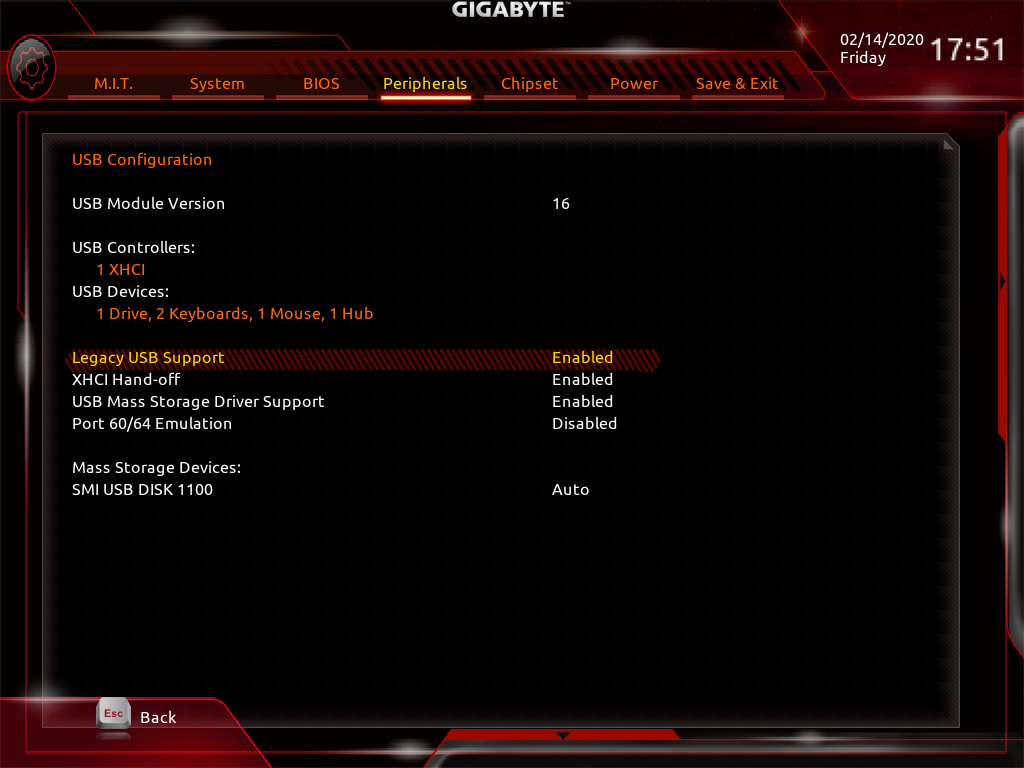
USB Configuration - Hackintosh Setup: Enable all items except for Port 60/64 emulation. That may not make a difference but I would disable it anyway.
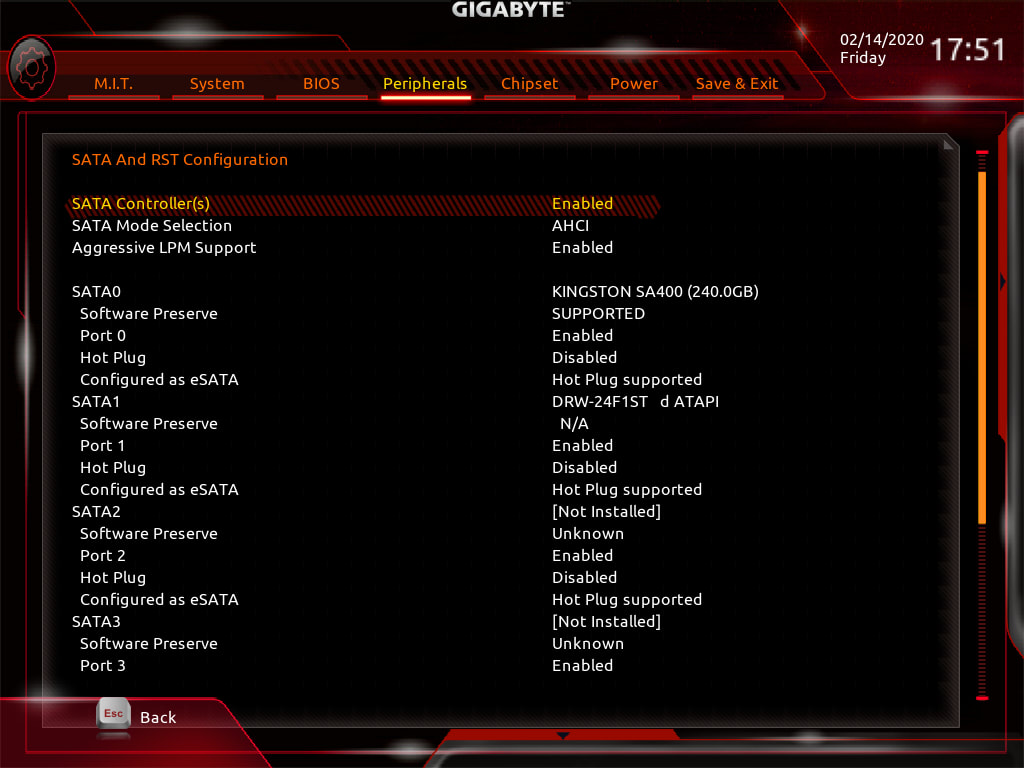
SATA and RST Configuration (or SATA)
Windows and macOS users will need to set SATA Mode Selection to AHCI. Typically the choices are AHCI and the older IDE standard, which use a physically different type of connector. Hot Plug support defines if the drive can be removed and reinserted with the computer up and running. If you have a slot for such a device you can enable this. Not having used one myself I don't know if this is supported in macOS, so I would leave it disabled.
This screen is an ideal way to identify whether or not a drive is connected. I had an issue with an mSATA drive connected to a PCIe card that could not be read, and this screen was able to help let me know.
Chipset
VT-d is a virtualization technology setting. Windows users can keep this to either setting. Under Windows I play emulators for older video game system with this setting to Disabled and have no issues.
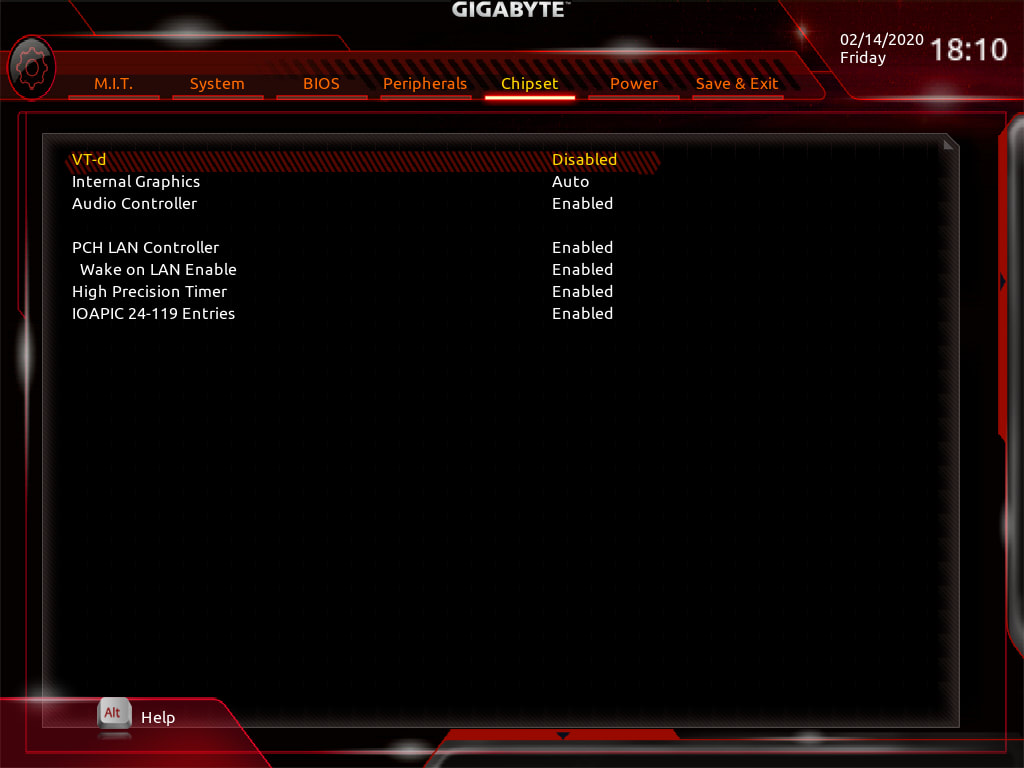
Hackintosh Setup: Set your BIOS Settings to the example above. Under High Precision Event Timer it may be abbreviated in your BIOS as HPET.
Power
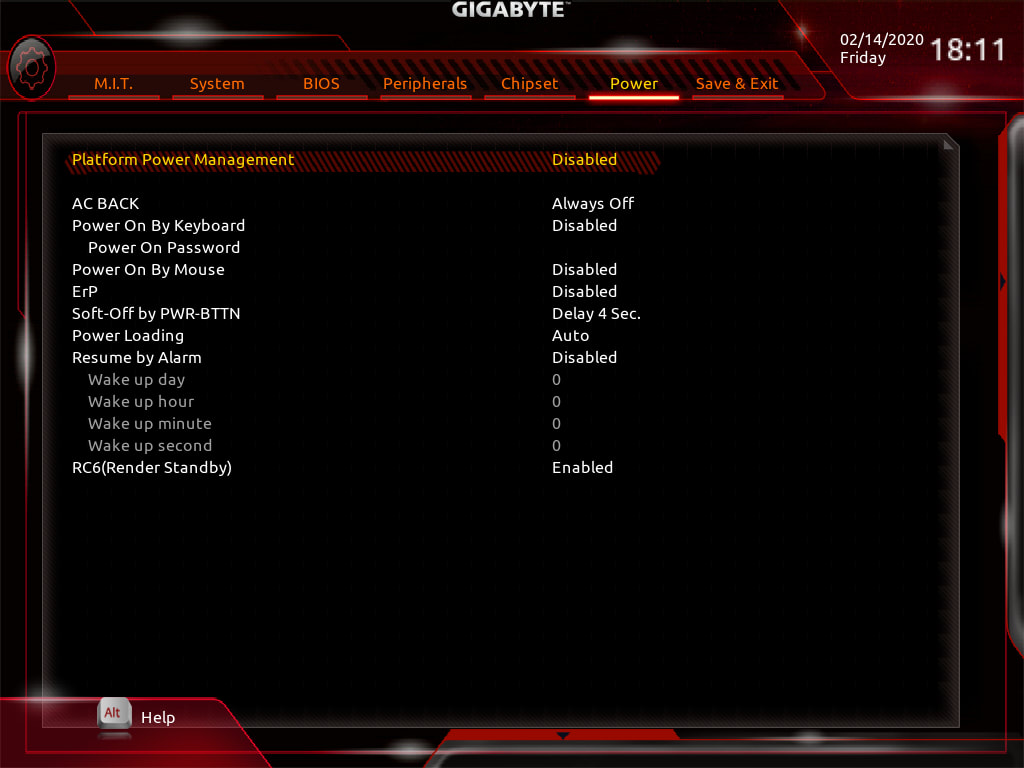
This screen allows you to select various power settings for the power supply. You can't control voltages for individual devices as you could on the CPU screen. Note that the entry Soft-Off by PWR-BTTN typically is either "Instant" or "Delay 4 sec". This means that when "Instant" is chosen and you press the power button, the computer will turn off immediately. Otherwise you will have to hold it down for four seconds for it to power off.
Profiles
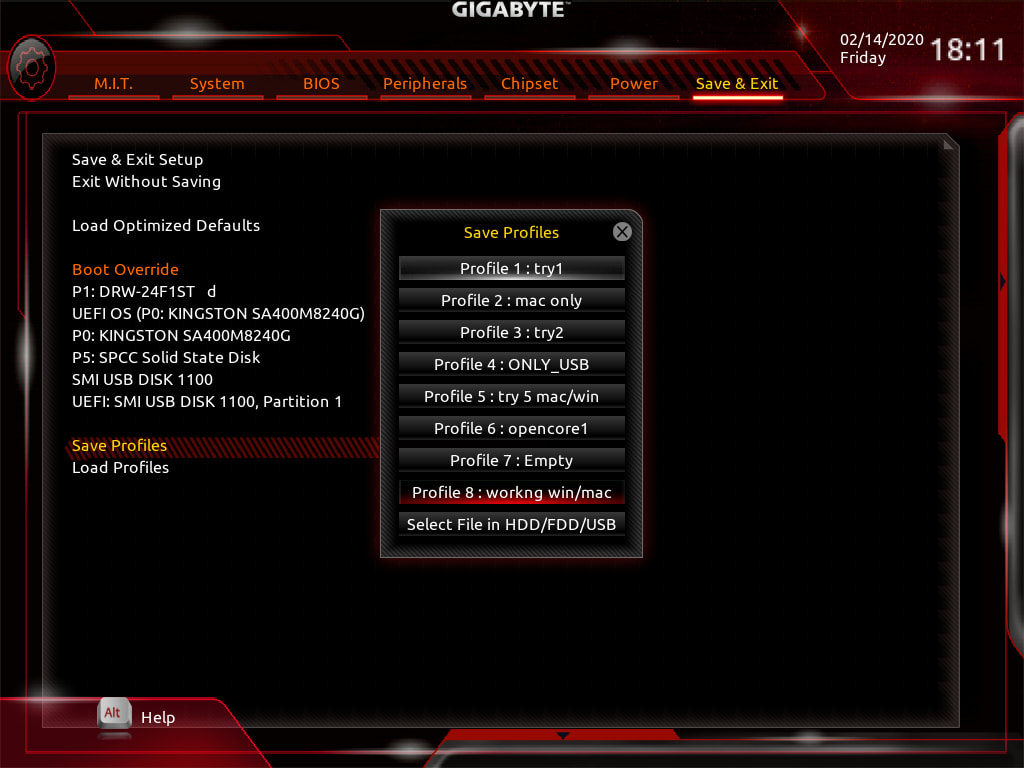
Consumer-grade desktops and laptops typically don't provide options for you to save different BIOS configurations to multiple profiles. Third-party motherboards usually provide this feature. In the screenshot above I have multiple profiles saved for testing purposes. This is great in that you can make adjustments, save it, then reboot and test. If you don't get the results you want you can go back into the BIOS, make more adjustments, save it under the same profile or a different profile, and try again. You can keep doing this until you get it working, then save it again and rename it to something like the highlighted entry above. When you change certain parameters from the different sections, sometimes you have to reboot in order for the changes to take effect. After the reboot you can hold down the key to get back into the BIOS and make further changes.
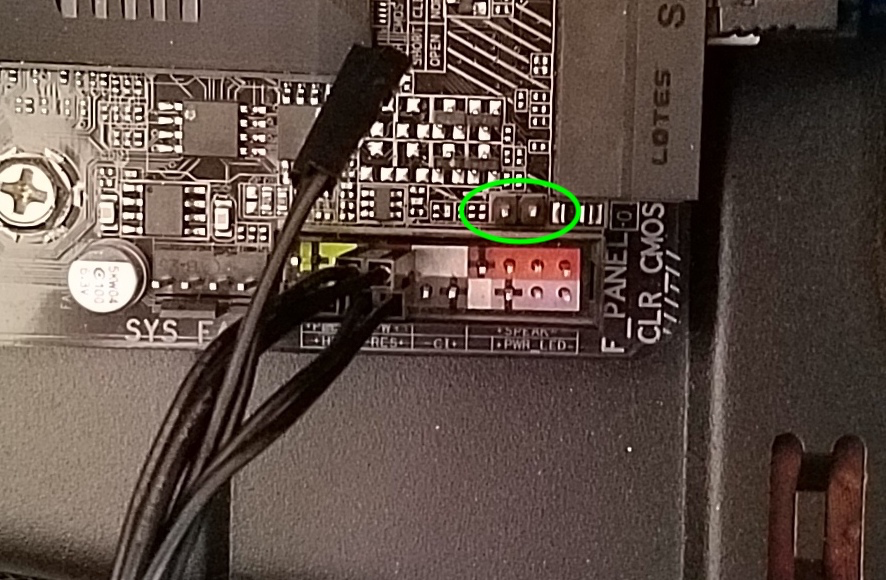
In the past when I've done troubleshooting on the same board, I've found that settings seem to have gotten corrupted after meddling with them. Even when I've gone back into the BIOS and selected ""Load Optimized Defaults" and reset, I never got the desired results. For those moments I've had to disconnect the main power cord and reset the CMOS. Like using a screwdriver to start the computer, you can use the same technique to reset the CMOS.
In the past when I've done troubleshooting on the same board, I've found that settings seem to have gotten corrupted after meddling with them. Even when I've gone back into the BIOS and selected ""Load Optimized Defaults" and reset, I never got the desired results. For those moments I've had to disconnect the main power cord and reset the CMOS. Like using a screwdriver to start the computer, you can use the same technique to reset the CMOS.
After you've got the BIOS set up the way you want, insert the USB flash drive and reboot. When your computer boots up, hold down the key for the boot selection screen:
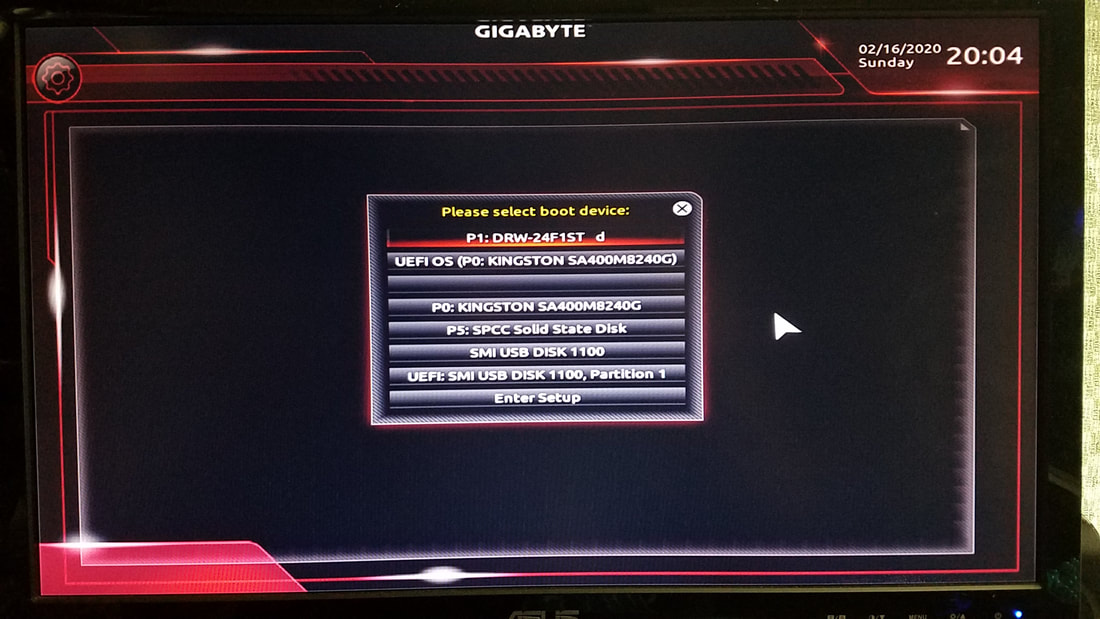
Now select the UEFI version of your USB flash drive and boot to the operating system launcher.
Hackintosh Setup: If you install macOS first with plans on installing Windows second, be sure to remove the power or data cable from the macOS drive before installing Windows. Once completed, shut down the machine, connect the removed cable from the macOS drive, then set the boot order to boot from the drive with macOS. The Clover bootloader (explained in the next few chapters) resides on the macOS drive and lets you choose between booting to macOS or Windows.
