
Chapter 1 - Overview
What is a Hackintosh?
A Hackintosh is a desktop or laptop computer with an Intel i-series processor or compatible AMD processor that runs the macOS operating system. Typically it's a computer that runs Windows, but Chromebooks that have the i-series processor are also compatible.
What You Will Need
In addition to a keyboard, mouse, and monitor for interaction, you will need the following:
Desktop or laptop with a compatible processor (CPU) - Compatible processors include the following:
AMD Graphics card (Desktop only) - If you choose not to use your Intel's built-in graphics or if your Intel CPU has no built-in graphics, you'll need an AMD video card to provide graphics. AMD cards, like Nvidia cards which are no longer supported after macOS Mojave, are made by different vendors such as MSI, Zotac, XFX, Gigabyte, PowerColor, Sapphire, and more.
Note that the video card will take up one PCI express slot (PCIe) on your motherboard. While a PCI slot supplies electricity to power the card, some graphics cards are designed for high-performance gaming and draw more power than what the PCIe slot can supply. Because of this, some cards require additional power from the computer’s power supply.
Hard Disk Drive (HDD) or Solid State Drive (SSD) – This could be a standard hard drive which has platters and moving parts, or a solid state drive (SSD) which has no moving parts and acts as a superfast flash drive. The hard drive can also be external and connected to your desktop or laptop via a USB port, but you’ll get better performance if it’s mounted internally. You can also remove a laptop’s DVD drive and replace it with a second internal hard drive. This way you’ll have a separate drive for Windows and one for macOS.
USB Flash Drive, 16 GB or Greater – This is used to load the installer which will then install macOS to your computer.
Download of macOS and Windows 10 – Where Windows has a numerical naming convention for their operating systems (Windows 7 → Windows 8 → Windows 8.1 → Windows 10), Apple uses names and numbers for their operating system. So the latest macOS version is Catalina or 10.15, the prior one is Mojave or 10.14, prior to that is High Sierra or 10.13, and so on.
In the past you needed access to a Macintosh computer to download the current version, but that’s no longer the case. Now there are multiple methods used to download the current and previous versions from a Windows PC. These steps will be discussed later.
It’s worth noting that there was a major transition from High Sierra to Mojave. High Sierra was the last Mac OS that supported the majority of various Nvidia graphics cards. Mojave and later operating systems supported the majority of AMD cards and dropped compatibility for the majority of Nvidia cards. However, Nvidia GTX 650 and GTX 750 cards are still natively supported. Even I have a 7-year-old EVGA brand GTX 650 graphics card in my second Hackintosh which runs Catalina.
The download of Windows 10 is covered in Chapter 5 - PC Assembly I.
A computer with at least 4 GB of memory – The more memory, the faster and more responsive your Hackintosh will run.
Time, Patience, and the Willingness to Learn and Research – This goes without saying to anyone new to a hobby. You'll be exposed to terms, procedures, and parts of your computer you may not have been aware of. No need to worry, as these will be explained throughout the procedures in getting a system up and running.
With Hackintoshes and Hackbooks, there’s no one-for-all solution, but many of the techniques for building them apply to both desktops and laptops and for hardware by different manufacturers. It’s similar to a Toyota Prius and Ford F150 in how they use different types of engines but both need oil to function.
If you have an existing desktop or laptop that fits the above criteria along with a spare hard drive fro macOS, you may already have everything needed to build a Hackintosh.
Desktop or laptop with a compatible processor (CPU) - Compatible processors include the following:
- Intel Core2Duo
- Intel Core2Quad
- Intel i-series (i3, i5, i7, i9)
- Intel Xeon
- AMD Ryzen
- AMD Threadripper
AMD Graphics card (Desktop only) - If you choose not to use your Intel's built-in graphics or if your Intel CPU has no built-in graphics, you'll need an AMD video card to provide graphics. AMD cards, like Nvidia cards which are no longer supported after macOS Mojave, are made by different vendors such as MSI, Zotac, XFX, Gigabyte, PowerColor, Sapphire, and more.
Note that the video card will take up one PCI express slot (PCIe) on your motherboard. While a PCI slot supplies electricity to power the card, some graphics cards are designed for high-performance gaming and draw more power than what the PCIe slot can supply. Because of this, some cards require additional power from the computer’s power supply.
Hard Disk Drive (HDD) or Solid State Drive (SSD) – This could be a standard hard drive which has platters and moving parts, or a solid state drive (SSD) which has no moving parts and acts as a superfast flash drive. The hard drive can also be external and connected to your desktop or laptop via a USB port, but you’ll get better performance if it’s mounted internally. You can also remove a laptop’s DVD drive and replace it with a second internal hard drive. This way you’ll have a separate drive for Windows and one for macOS.
USB Flash Drive, 16 GB or Greater – This is used to load the installer which will then install macOS to your computer.
Download of macOS and Windows 10 – Where Windows has a numerical naming convention for their operating systems (Windows 7 → Windows 8 → Windows 8.1 → Windows 10), Apple uses names and numbers for their operating system. So the latest macOS version is Catalina or 10.15, the prior one is Mojave or 10.14, prior to that is High Sierra or 10.13, and so on.
In the past you needed access to a Macintosh computer to download the current version, but that’s no longer the case. Now there are multiple methods used to download the current and previous versions from a Windows PC. These steps will be discussed later.
It’s worth noting that there was a major transition from High Sierra to Mojave. High Sierra was the last Mac OS that supported the majority of various Nvidia graphics cards. Mojave and later operating systems supported the majority of AMD cards and dropped compatibility for the majority of Nvidia cards. However, Nvidia GTX 650 and GTX 750 cards are still natively supported. Even I have a 7-year-old EVGA brand GTX 650 graphics card in my second Hackintosh which runs Catalina.
The download of Windows 10 is covered in Chapter 5 - PC Assembly I.
A computer with at least 4 GB of memory – The more memory, the faster and more responsive your Hackintosh will run.
Time, Patience, and the Willingness to Learn and Research – This goes without saying to anyone new to a hobby. You'll be exposed to terms, procedures, and parts of your computer you may not have been aware of. No need to worry, as these will be explained throughout the procedures in getting a system up and running.
With Hackintoshes and Hackbooks, there’s no one-for-all solution, but many of the techniques for building them apply to both desktops and laptops and for hardware by different manufacturers. It’s similar to a Toyota Prius and Ford F150 in how they use different types of engines but both need oil to function.
If you have an existing desktop or laptop that fits the above criteria along with a spare hard drive fro macOS, you may already have everything needed to build a Hackintosh.
Why MacOS?
If you primarily use Windows, you probably know how frustrating malware and spyware corrupts things and slows down productivity. MacOS is based off UNIX and provides a more secure, stable operating system. The System Preferences panel works similar to the Windows Control Panel, albeit in a more streamlined and eye-pleasing interface, requiring less clicks to change settings to your liking.
Microsoft Office is available for Mac, but you still must pay for it like the Windows version. Luckily the office suite of LibreOffice is both Mac- and PC-compatible, 100% free without ads nagging you to pay a price to unlock features, can write in its own format as well as Microsoft Office formats, and has the full suite of programs similar to Word, PowerPoint, Excel, and more.
Some of the more popular programs are available on both Mac and Windows platforms, but the majority of software available is primarily for Windows users. No worry, as you can either use your existing Windows desktop or laptop for Windows software or build a PC from scratch and install a second hard drive for the Windows operating system and software packages. You’ll have the best of both worlds!
When I used real Macs I was using the inexpensive software iMovie and iDVD to take photo slideshows and burn them to discs for playing them in a DVD player. I was also using GarageBand to record my piano playing and for general practice, using its built-in sounds as a synthesizer. A few years later I discovered MainStage 3; a live performance software synthesizer that allows you to play and control thousands of sounds from a musical keyboard or controller, in addition to programming your own rhythms and creating new ones from scratch. Like GarageBand, MainStage also has a library of recorded loops you can arrange into songs. While most single software synths for Windows were costing $100 or more; the power-packed, feature-laden MainStage 3 only cost $29.99 – QUITE the steal compared to what software synths were offering. You can even take it a step further and purchase Logic Pro X at nearly $200, a professional recording software suite used by thousands of recording studios worldwide. With anything, a product is only as good as its weakest link. So while Logic X is the software to make things happen, you’ll probably need good monitors and microphones to sound better.
As a longtime Mac user having never owned a strong PC, I could only envy Windows users having the ability to play any gaming titles not available on the Mac. When I bought my Mac Mini I could play Windows games, (still surprised my Need For Speed: Underground 2 discs play well), but still lacked the computing power to play certain titles and was hindered by those graphics restricted to lower settings. After having built my own Hackintosh I could add hard drives for more storage space, add more memory, and upgrade the graphics card at will to keep up with newer PC games; all played at higher settings for a more pleasing gaming experience.
Apple supports MacOS running on their own hardware for a surprisingly limited time. They want you to keep upgrading to the latest and greatest model. In all fairness the primary goal of a business is to make money, but this comes at a price to consumers that not everyone can afford so frequently, and those loyal to Apple for years are still seen as dollar signs. Running a Hackintosh will enable you to keep upgrading to the later operating systems when they become available without feeling left behind. Keep in mind that hardware has its limitations with software, and there will come a time when an aging computer no longer has the capability to run the latest operating system. A Hackintosh will double or triple the length of time your hardware can run Apple’s MacOS. At one point I was using an i5 processor from 2012 on a motherboard I purchased in 2011 and was still using it for my music production as of 2019.
Primarily it comes down to your own computing needs. Contrarily, you may end up successfully building a Hackintosh and discovering your preference of the MacOS over Windows. You may be curious about GarageBand and end up awakening musical talent or rediscovering music you gave up on long ago. A former friend presented me with an electric guitar years ago. While not a guitar player I was able to hook it up to GarageBand and try out the different guitar effects, which furthered my interest in playing the electric guitar. Sure I could have gone out and purchased a slew of pedals or an effects unit, but I already had a capable tool of showing me the sounds I could produce. All I needed was the talent. Having Windows 7 (at the time) installed enabled me to experiment, to learn more about Windows in general, and pick up tips and tricks that would be later exploited in my professional career.
So Why NOT MacOS?
Not everyone is technical-minded, so some of the instructions here may be difficult for some to understand or perform. There are no special tools needed, but users should have a few Phillips head screwdrivers for assembly (if starting from scratch) and the ability to follow instructions.
Apple's philosophy used to be "It Just Works", which is true, depending on what task you're trying to accomplish. In that sense buying a real Mac desktop or laptop means just that, that it just works. Of course, the primary benefit of a Mac over Windows is the more secure operating system, not to mention the gorgeous layout and behavior of the entire operating system.
Those features come at a cost, a cost I won't pay because Apple stops supporting their latest products so soon. Cost was the primary reason I switched, the others being the ease of upgrade-ability and the availability of PC parts. Typically I compare cars to computers which would be unfair in this case. Cars are mobile and typically don't gain an audience by sitting in the garage or driveway. But if you could have the handling and performance of a Ferrari, Lamborghini, or ZR1 Corvette with the cost and styling of a Camaro or Mustang; would you go for it? I can see you smiling at that...
Costs
The money you save from using unofficial hardware and not having to pay the “Apple Tax” (the extra fees for the overall security, graphical design, and user interface) adds up to quite a lot of savings. If you’re using an existing desktop or laptop that fits the requirements listed in the “What You’ll Need” section; you can get a setup for under $50. You can pick up a 120 GB Solid State Drive for $25 or less, an external hard drive enclosure for those smaller drives for $10, and a 16 GB-32 GB flash drive for $10 or less. Granted these are online prices from vendors such as NewEgg.com and Amazon.com, so local prices may be slightly higher.
If you’d rather skip the assembly of a complete desktop and buy a laptop instead, you can find good deals on eBay and Craigslist for varying prices. I bought a used Dell i5 dual-core laptop with 8 GB of RAM and no hard drive for $74 on eBay, installed a spare 120 GB SSD, and turned it into a MacBook Pro I used for live music until I sold it last year for under $200.
If you plan on building a PC from scratch, the costs will be significantly higher, but your mileage may vary. If you plan on building a PC from scratch you’ll need to factor in the costs of the case, motherboard, processor, power supply, video card if needed, drive(s), and cables. If you have older programs on CD/DVD that are not available for download, you’ll also need a DVD drive ($10+ for external, $20+ for internal).
Various components have different features which add to the cost of each piece. Some video cards for high-end gaming cost as much as $500, and that’s only for the card itself! Some cases may be taller or wider to accommodate larger boards and more hard drives, while power supplies have different power ratings. These differences will be pointed out later. Consider that you can buy a higher-priced item today (compared to items in the mainstream priced lower), and a year or two from now it should sell for higher than what a mainstream item may sell for. No matter what though, all computer equipment becomes obsolete and devalued at some point.
Glossary
A lot of people reading this probably have a good grasp on the majority of terms used in this book. However, I also understand that we only know what we’re exposed to. The following is a list of terms and explanations used in this guide:
- BIOS – Basic Input Output System. This is the software on your computer’s motherboard that enables control over the boot process and running process and is accessible between turning the power on to the computer and getting to the operating system. It shows what memory is installed, the date and time, shows what drives are connected, shows the video card(s) connected, enables control over power options, lets you choose the boot order of drives, and more. Name-brand motherboards sold separately allow more control over things like voltages, which let you speed up or “overclock” your processor to faster-than-advertised speeds. Other parameters include individual timing settings for RAM, fan control, LED lighting if equipped, Power button behavior, and more parameters. BIOS has been superseded by UEFI. In this eBook, the word BIOS will mean UEFI unless mentioned otherwise.
- Clover – This is the bootloader that enables you to choose an operating system and make temporary changes to the config.plist file that lets you boot macOS. Clover appears after you power on your computer and goes through its BIOS steps.
- CPU/Processor – This is the primary component of a computer. In some schools of thoughts, CPU is meant to represent the computer itself; the case, motherboard, processor, RAM, power supply, etc. In this eBook both the word “processor” and acronym “CPU” will be used interchangeably, but “CPU” is referring the main processor and not the entire computer case.
- Graphics Card / Video Card – This is a separate card that fits into an empty PCIe slot on your motherboard to provide better, more powerful graphics capabilities, typically more than the graphics capabilities a CPU can provide. These cards can take up one or two slots in a case, and more powerful cards can require one or mower connectors from the power supply. Essential if you want to use multiple monitors.
- HDD – Hard Disk Drive, also known as a Hard Drive or Hard Disk. These are typically 3.5” wide for desktops and 2.5” wide for laptops, have multiple platters and moving parts, and store the data and operating system for the computer.
- kext – Kernel Extension. These are software extensions used to run macOS on a computer. The most important kext is FakeSMC.kext, or its most recent alternative VirtualSMC.kext. Without it, your computer will not boot to macOS . Other important kexts are Lilu.kext which fix a variety of compatibility issues, and WhateverGreen.kext which fixes various graphics compatibility issues.
- Motherboard – The main board, or “mobo” that resides in the computer case and holds the CPU, RAM, drives, and connectors.
- PCIe – Peripheral Component Interconnect Express – This is a slot located on a motherboard that allows you to connect a graphics card or other card to expand the computer’s capabilities. These come in different lengths and are rated by data lanes (x16, x8, x4, x2, x1). The larger the card, the more lanes it uses, and this is important if installing an m.2 solid state drive.
- PSU – Power Supply Unit, or just “Power Supply”. This component goes inside of the computer case and has various appendages to connect to the motherboard, drives, and sometimes a video card. Laptops use an external power supply, sometimes called a “Power Brick”.
- RAM / Memory – The component used to hold programs and data when loaded from the operating system. Typically installed in pairs for better performance and measured in gigabytes, these come in the form of sticks that are installed on the motherboard.
- SATA – Serial ATA. One of the modern interfaces used for hard drives, solid state drives, and optical (CD/DVD) drives. SATA drives have a connector for data and another connector for power. The data connector utilizes a SATA data cable that gets connected between the drive itself and the motherboard, while the power connector attaches to a cable connected to the power supply.
- SMBIOS – This is an identifier that helps Clover match the computer hardware with that of an actual Mac model, consisting of the name of the Mac model without spaces, then two numbers separated by a comma.
- SSD – Solid State Drive. These are 2.5” in size (the size of a laptop hard drive) and have no moving parts. Instead they contain microchips similar to RAM but transfer and receive data much faster than a standard USB flash drive, and transfer data much much faster than a standard hard drive.
- UEFI – Unified Extensible Firmware Interface. This is basically BIOS 2.0 and is designed for better compatibility and control between the hardware and software of the computer. Where a BIOS has an aging DOS-like interface, UEFI has a more refined appearance and allows for mouse control. There are computers out there that have UEFI but still have a BIOS-type appearance.
How Does It Work?
Here’s a quick overview without getting into too much technical detail (yet). A typical computer gets powered on by the user pressing the power button. From there it does an internal hardware check to ensure that memory is inserted and that a keyboard is attached. It then checks its BIOS (Basic Input Output Settings) and applies the settings, finds the boot drive next, then attempts to load the operating system from that drive. The drive looks for the operating system, applies the settings set by the user, then loads the operating system.
Sounds pretty simple, right? In the big picture, Yes! Getting there involves lots of hurdles; some easy, some difficult. If you already have a working computer ready to go, you’re steps ahead of the game. But in the future if you ever attempt to boot and get stuck at some point, this section may assist you in determining where a problem lies if you can’t boot to the desktop.
With a Hackintosh, getting there involves the USB flash drive installer, your computer hardware, little pieces of software called kexts (kernel extensions), and modifications to a file (config.plist) by the bootloader program (Clover) to help get macOS get recognized by your computer hardware.
The required computer hardware can vary depending on a number of personal factors. First off, if you already have compatible hardware it will cost little to no money if you have an extra hard drive and flash drive to install and boot macOS. If you have incompatible hardware, you’ll need to spend a few bucks here and there depending on what parts you need. Of course, if you start from scratch and are buying everything new/used, the sky’s the limit. If anything you’ll have a fully functional Windows machine. But I’m betting you’re not reading this just to learn how to build a Windows machine. For those of you who like outlines, here’s a structured breakdown of the process:
- Build the installer to the USB flash drive
- Restart the computer and boot from the same flash drive to macOS Installer
- Install macOS to a hard drive
- Reboot using the same flash drive but select the freshly-installed macOS drive
- Install the Clover bootloader, kexts, and additional software to stabilize the system
- (Optional) Install to a second internal or external hard drive
Finding the Right Path
Because of my (lack of) experience and PC knowledge, I had to learn how to build a computer from the ground up. In the event that others want a fresh start, are interested in learning how to build their own machine, or who only worked on Macs and nothing else; a large portion of the book is dedicated to building a desktop computer from scratch. But maybe you don’t have the desire or curiosity to do the same and instead prefer to use an existing desktop or laptop. No worries there, as various methods will be discussed in depth showing how to build a Hackintosh from what you have, even if you have nothing at all. Read the following sample questions to see where you may fit in.
“I want to see if I can install macOS without losing what I have.” - You can install macOS to an external USB hard drive using one of two methods: 1. Simply buy an external USB hard drive and attach it to one of your computer’s available USB ports, or 2. Purchase an external USB hard drive enclosure, insert a hard drive, then attach it to one of your computer’s available USB ports. You will need two available USB ports for this; one for the flash drive to boot from, and another for the destination hard drive where macOS will be installed. Consider buying a powered USB hub for more USB devices if your desktop or laptop computer is limited on USB ports.
“I want to continue playing PC games but also use macOS” - As long as you have a compatible AMD card, you’re in the clear and should have no issues continuing to play games.
If you have an Nvidia card that’s not a GTX 650 or GTX 750, you’ll be restricted to running High Sierra using the same card, or using the Intel chip’s built-in graphics for macOS. When you want to play games with the same card you’ll simply choose the Windows drive from the boot menu.
The following scenario is rare but worth mentioning: If you use the Intel graphics on your desktop computer you will need to either set up a separate profile in the BIOS menu on your computer (if it has this feature) or change the video output from the video card to the video output on the motherboard (if available), and create an entry for booting to the Mac and a separate entry for booting to Windows. Every time you want to switch from Windows to Mac or vice-versa, you’ll have to go into the BIOS and select the other profile or change the video output, similar to switching inputs on the TV to go between watching Cable TV or watching a Blu-Ray movie.
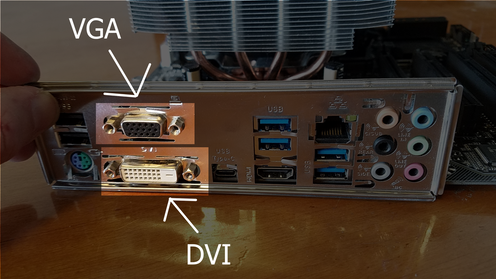
There are important things to consider when having to switch between a video card and built-in graphics, specifically the video outputs on the motherboard, the video card, and the monitor input jacks. With my current Hackintosh I have an AMD video card with a DisplayPort cable going between the DisplayPort jack on the card and the DisplayPort jack on the monitor. Let’s say I want to use my CPU’s built-in graphics, and my motherboard has an HDMI jack. I can keep the video card the way it is with the DisplayPort cable, but run another cable from the HDMI port on the motherboard to the HDMI input on my monitor. When I want to boot to Windows I’ll have the UEFI set to output the primary video from the video card, but when I want to boot to MacOS I’ll have the BIOS set the primary video from the CPU instead, which then gets carried to the monitor from the motherboard’s HDMI port. So now when I want to switch I have to do two things: 1. Go into the BIOS and change the profile or video output, and 2: change the input on the monitor to either HDMI or DisplayPort depending on what operating system I’m booting to. It sounds simple but can be tiresome after a short time. Here's a shot of the back of one of my machines. Since VGA cannot be used on any Mac, I would have to use the DVI port if I wanted to use the Intel's on-board graphics.
“I want to see if I can install macOS without losing what I have.” - You can install macOS to an external USB hard drive using one of two methods: 1. Simply buy an external USB hard drive and attach it to one of your computer’s available USB ports, or 2. Purchase an external USB hard drive enclosure, insert a hard drive, then attach it to one of your computer’s available USB ports. You will need two available USB ports for this; one for the flash drive to boot from, and another for the destination hard drive where macOS will be installed. Consider buying a powered USB hub for more USB devices if your desktop or laptop computer is limited on USB ports.
“I want to continue playing PC games but also use macOS” - As long as you have a compatible AMD card, you’re in the clear and should have no issues continuing to play games.
If you have an Nvidia card that’s not a GTX 650 or GTX 750, you’ll be restricted to running High Sierra using the same card, or using the Intel chip’s built-in graphics for macOS. When you want to play games with the same card you’ll simply choose the Windows drive from the boot menu.
The following scenario is rare but worth mentioning: If you use the Intel graphics on your desktop computer you will need to either set up a separate profile in the BIOS menu on your computer (if it has this feature) or change the video output from the video card to the video output on the motherboard (if available), and create an entry for booting to the Mac and a separate entry for booting to Windows. Every time you want to switch from Windows to Mac or vice-versa, you’ll have to go into the BIOS and select the other profile or change the video output, similar to switching inputs on the TV to go between watching Cable TV or watching a Blu-Ray movie.
There are important things to consider when having to switch between a video card and built-in graphics, specifically the video outputs on the motherboard, the video card, and the monitor input jacks. With my current Hackintosh I have an AMD video card with a DisplayPort cable going between the DisplayPort jack on the card and the DisplayPort jack on the monitor. Let’s say I want to use my CPU’s built-in graphics, and my motherboard has an HDMI jack. I can keep the video card the way it is with the DisplayPort cable, but run another cable from the HDMI port on the motherboard to the HDMI input on my monitor. When I want to boot to Windows I’ll have the UEFI set to output the primary video from the video card, but when I want to boot to MacOS I’ll have the BIOS set the primary video from the CPU instead, which then gets carried to the monitor from the motherboard’s HDMI port. So now when I want to switch I have to do two things: 1. Go into the BIOS and change the profile or video output, and 2: change the input on the monitor to either HDMI or DisplayPort depending on what operating system I’m booting to. It sounds simple but can be tiresome after a short time. Here's a shot of the back of one of my machines. Since VGA cannot be used on any Mac, I would have to use the DVI port if I wanted to use the Intel's on-board graphics.
“I have a high-performance gaming laptop.” - One caveat about using a Hackintosh laptop or “Hackbook” is that you’re always restricted to using the CPU’s built-in graphics. Some laptops, even mainstream ones, have dedicated graphics by Nvidia or AMD. Unfortunately there’s never been a workaround for macOS to use Nvidia or AMD graphics on laptops, only the Intel’s built-in graphics. Like the scenario above, you’ll have to go into the BIOS menu to change the video output from the Nvidia or AMD graphics to the Intel graphics. There’s not really a downside to using Intel’s graphics, but you don’t get as much of a performance boost by having a separate graphics chip on your board.
“I have a desktop or laptop with a Pentium or Centrino processor and need to replace it with an Intel i-series processor.” - Desktop computers are larger and have larger components, so they are easier to work on when replacing parts and components. Because of their portability convenience, laptops have smaller parts and are trickier to work on and have components replaced. They can be upgraded to a faster processor, but the disassembly and reassembly processes may be intimidating to those who haven’t worked on a laptop before.
In both cases, it’s not possible to simply swap out whatever processor you have for something faster. CPUs are dependent on two things, socket types and bus speeds. A socket is the physical seat on the motherboard in which the processor sits, and each socket type has a different number of pins that make contact with the processor. The bus speed is the speed at which data is transferred on the motherboard. You may have an i5 processor that runs at 600 MHz, but a faster i5 processor with the same socket type that runs at 800 MHz, (but don’t worry about this book getting into numbers). It might be possible to upgrade the slower processor to the faster one, but the faster processor will run at the slower 600 MHz bus speed. So the tradeofff is that I twill work, but not to its fullest potential.
In the past when I’ve wanted to upgrade a computer’s processor I did a search for the computer’s service manual and/or user manual along with a search for it on TomsHardware.com. The forums on Tom’s Hardware are filled with questions and answers, some with users posting inquiries as to if one processor will work well in their computer. A computer’s service manual, (and sometimes the user manual), may show what other configurations the computer was sold under. So while your laptop may have a non-compatible Centrino processor, either manual may indicate that it was sold with a Pentium or i-series processor. It’s best to stick with the specific processors shown in the manual
“I am on a limited budget and am not sure if I want to invest a lot of time and money.” - If you already have compatible equipment, you won’t need to spend much more, just enough for a spare hard drive and USB flash drive. Consider purchasing a used laptop or desktop as well. If you buy used from a retail outlet, there’s a good chance that computer may come with an extended warranty. Otherwise buying used on Craigslist and eBay limit any length of a warranty. If you know someone who’s well-versed with computer technology, ask them if they can spare one for you in case they have a few old units lying around.
Buying cheap is a double-edge sword. Obviously you’re not having to invest a lot of money in something you may not want, but if it you can get macOS running on a limited machine you may be turned off by it’s slower speed or lack of responsiveness if it has 2 GB or less of RAM. In that case you may end up wanting to purchase more RAM which will add a small amount to the overall cost.
I’m not advocating for always buying new or having the latest and greatest. My cheapest investment was the $74 Dell as it already had 8 GB of RAM (typically $30 used) and a 4th generation i5 processor, but the chassis of the laptop was scuffed in places. I wasn’t going to take it anywhere, and had no need to show it off, plus I already had spares of 120 GB solid state drives. I wasn’t using the laptop for video editing or similar tasks for which a powerful processor was necessary. After installing macOS for MainStage 3 and GarageBand and testing said programs, I found that what I had was quite enough for my needs, and felt so lucky for getting that laptop in the first place.
“I want to build my Hackintosh starting from scratch.” - This option provides the most opportunities for expansion. You can use this new machine strictly for macOS, or have a dual-booting PC for both macOS and Windows. You’re only limited by your budget, and the major components (processor, video card) that are compatible with macOS.
The base installation of macOS typically takes up less than 16 GB of storage space when completed. A 120 GB or more drive should be adequate for storing files and programs along with macOS. Don’t forget to accommodate room for your music or mp3 collection. As a good practice it’s better to fit all of your music, videos, and photos on a separate drive. If catastrophe hits your hard drive with your operating system, no matter which OS you use, your saved media should remain untouched and intact. GarageBand and MainStage 3 allow you to download specific genres of sounds and loops which take up around 51 GB of space, but even with all of that downloaded you’ll still have space to work with.
Guide Information
Throughout the process there will be roadblocks where it may be difficult to progress from that point on until a solution is found. In some cases these may seem innocuous at first, but further down the line they may prove to be the catalyst causing the issue. One such example is the memory drivers AptioMemoryFix.efi vs OsxAptioFix3Drv.efi, where the correct one will let you progress to the next set of instructions. I will simply label these with ROADBLOCK! in their own paragraphs.
Any hyperlinks to other sites and pages will always open up in their own tabs. This will prevent you from having to view the page, download any files if needed, then hitting the back button to resume. Don't forget to press Control + D (Windows) or Command + D (Mac) to bookmark these pages for future reference.
Any hyperlinks to other sites and pages will always open up in their own tabs. This will prevent you from having to view the page, download any files if needed, then hitting the back button to resume. Don't forget to press Control + D (Windows) or Command + D (Mac) to bookmark these pages for future reference.
