
Chapter 3 - Buying Advice
Despite this chapter focusing on buying advice, some research carries over to this section as well. Let's say that the computer you have seems Hackintosh-compatible. Eventually you may want to upgrade parts to stay somewhat current. Despite what parts you may have already, this chapter will introduce new concepts of what you may need and what else you can use.
If you've come to this section straight from the PC Assembly Chapters, note that this Buying Advice chapter is written to assist those in parts and concepts for macOS compatibility. Even if you have no desire to use macOS and are somewhat new to PC parts, this section can help you choose the right parts for your machine without going overboard.
I mentioned before that your needs determine any costs in building your Hackintosh. If you're going to game on the Windows side, you'll want a compatible video card for both operating systems and powerful enough to handle current and future games. If you want the latest and greatest so as to be future-proof for at least a few years, you'll want a brand new processor and motherboard. What about your existing drives and new drives for MacOS? If your board doesn't have an adequate number of SATA ports, you'll have to either add a SATA PCIe card if you have a free slot, or buy a whole new motherboard to stay current and be able to use Windows and MacOS.
Even if you have all the parts you need on your existing system, I recommend reading through this to familiarize yourself with the names and parts of peripherals if you require upgrading down the line.
CPU/Processor
The CPU is the heart of the system. Experienced builders may have a preference of Intel over AMD or vice-versa, or no preference at all. For the past few years, Hackintosh users have been able to use AMD chips in their builds, and AMD has been aggressive in their products surpassing the price/performance ratio over Intel. Intel is a bit easier to work with as their are no compatibility issues with Intel and Adobe Pro apps, and the general installation guides out there are written for Intel users. The only differences between installing for an AMD systems instead of Intel involve an extra few scripts and kexts to help MacOS and the AMD processor communicate better. But because AMD chips are a bit newer than Intel chips, Intel has better compatibility overall.
Each processor has a number of cores and threads, typically one thread per core. So a four core / four thread processor can do four things at once. AMD is leading the pack by having two threads per core, so a four core / eight thread AMD processor can do eight things at once. There's also the term "Hyperthreading" which doubles the speed per thread. So the same four core / eight thread with hyperthreading equates to sixteen things at once.
When shopping for a CPU, be aware of specific details about the product:
If you choose to upgrade your CPU to one that is Hackintosh-compatible, you're limited to the same socket type as your motherboard. You won't find a modern Intel i9-9900K processor, one that uses an FCLGA1151 socket (it's not important to memorize all of the different types), to fit in an LGA775 socket designed for a Core2Duo processor. Again, check your service manual to see what CPU options came with your original machine and choose the right upgrade path based on your budget.
Also note that CPUs and RAM for laptops will not fit desktop motherboards, nor will desktop CPUs and RAM fit laptop motherboards.
Each processor has a number of cores and threads, typically one thread per core. So a four core / four thread processor can do four things at once. AMD is leading the pack by having two threads per core, so a four core / eight thread AMD processor can do eight things at once. There's also the term "Hyperthreading" which doubles the speed per thread. So the same four core / eight thread with hyperthreading equates to sixteen things at once.
When shopping for a CPU, be aware of specific details about the product:
- Speed - The processing speed of the CPU
- Cores - All Intel i-series and AMD Ryzen series CPUs have at least two cores. The more cores, the more processing units on the chip.
- Threads - Think of each core as a body, and a thread being a robotic arm. At the minimum each core has at least one thread, but for better performance look for a CPU that has two threads per core.
- Socket type - The processor you want to buy will determine the motherboard you buy as well. You can find current and previous generation processors still sold new on multiple sites such as NewEgg.com and Amazon.com; but the earlier generation chip you choose the less choices you have for compatible motherboards, unless you go on eBay and find something used
If you choose to upgrade your CPU to one that is Hackintosh-compatible, you're limited to the same socket type as your motherboard. You won't find a modern Intel i9-9900K processor, one that uses an FCLGA1151 socket (it's not important to memorize all of the different types), to fit in an LGA775 socket designed for a Core2Duo processor. Again, check your service manual to see what CPU options came with your original machine and choose the right upgrade path based on your budget.
Also note that CPUs and RAM for laptops will not fit desktop motherboards, nor will desktop CPUs and RAM fit laptop motherboards.
Motherboard
The motherboard is the second most important component in the system as it not only determines the range of CPUs that can be used, but determines the number of SATA ports for drives, the number of RAM slots, PCIe slots for additional cards, and on-board USB ports. Other factors include the number of fan connectors, number of front panel connections, chipset, and power connectors. There aren't specific motherboards that are Hackintosh compatible, but in aside from the CPU being an Intel Core2Dup or compatible AMD CPU, two other important factors to consider are the audio and networking.
Regarding wired networking, there are five different kexts to choose from:
Regarding wired networking, there are five different kexts to choose from:
- AppleIntelE1000 - Works with older Intel LAN chipsets, but be warned that it can crash using newer chipsets
- AtherosE2200Ethernet - this works for most Atheros or Killer networking chipsets
- IntelMausiEthernet - Works with most newer Intel LAN chipsets
- RealtekRTL8111 - Works with most gigabit Realtek LAN chipsets
- RealtekRTL8100 - for 10/100 Gbs Realtek LAN chipsets

In the section for LAN, the chip is listed as Realtek GbE LAN chip. Not very descriptive here, obviously. However, doing a search for it along with B450 Gaming X, I saw that someone else had the same board used for a Hackintosh, and had posted the correct kext to use for it.
HELPFUL HINT: I also tested my board using a SyncWire USB 3.0-to-Ethernet adapter instead of my built-in Ethernet port. What I did was open my EFI folder and move my Ethernet kext out of the kexts folder, shut down my machine, detached the Ethernet cable from my Hackintosh's Ethernet port (going through two switches to the back of my computer), connected it to the USB-to-Ethernet adapter, then plug it into an available USB 3.0 port on the back of my computer. I then booted up to MacOS, tested Firefox, and could still load pages and media quickly. So if you're set on a specific motherboard that just doesn't have the networking chip that's compatible with macOS, you can pick up a USB-to-Ethernet adapter for $10-$20 (get a higher-quality one with LED indicators) and save yourself some potential headaches at the expense of the piece itself, and sacrificing a USB port.
However, be aware that you may run into an issue. I tried this initially on my Ryzentosh and it worked fine, but when I tried it on my i5 system it would not work at first. I tried USB 3.0 and 2.0 ports on the back of the motherboard with no success. I then tried it on the case's top front USB port and also by plugging it in to a powered USB hub connected to the i5 Hackintosh, and the last two ports worked. To ensure it was not a port issue I plugged in a USB flash drive ot the inital USB 3.0 and 2.0 ports that wouldn't recognize the USB Ethernet adapter and the flash drive mounted immediately. So if you purchase an adapter and it doesn't work on the first try, try other USB ports.
The same applies for audio. In the screenshot above, the audio chip is listed as ALC892, a pretty popular chip for the motherboards that I've seen. Handling audio is a bit different than just adding the audio kext to the proper folder. There's an entire page listed on how to get it working on this Reddit page, but a separate page listing the Hackintosh-compatible audio codecs can be found on this github page. If you plan on using USB audio, you may be able to simply forego having to worry about audio compatibility, especially if you are using USB.
In terms of compatibility, Gigabyte-brand motherboards have a reputation as being the most compatible, while ASUS comes in a close second. Some users have reported issues in the past with AsRock (a division of ASUS) motherboards that can be fixed with a few easy techniques, and some have reported memory issues with MSI motherboards. I've used an MSI board a few years back but had no memory issues.
Let's take a look at my boards consisting of a Gigabyte H270M-D3H and a Gigabyte B450 Gaming X;
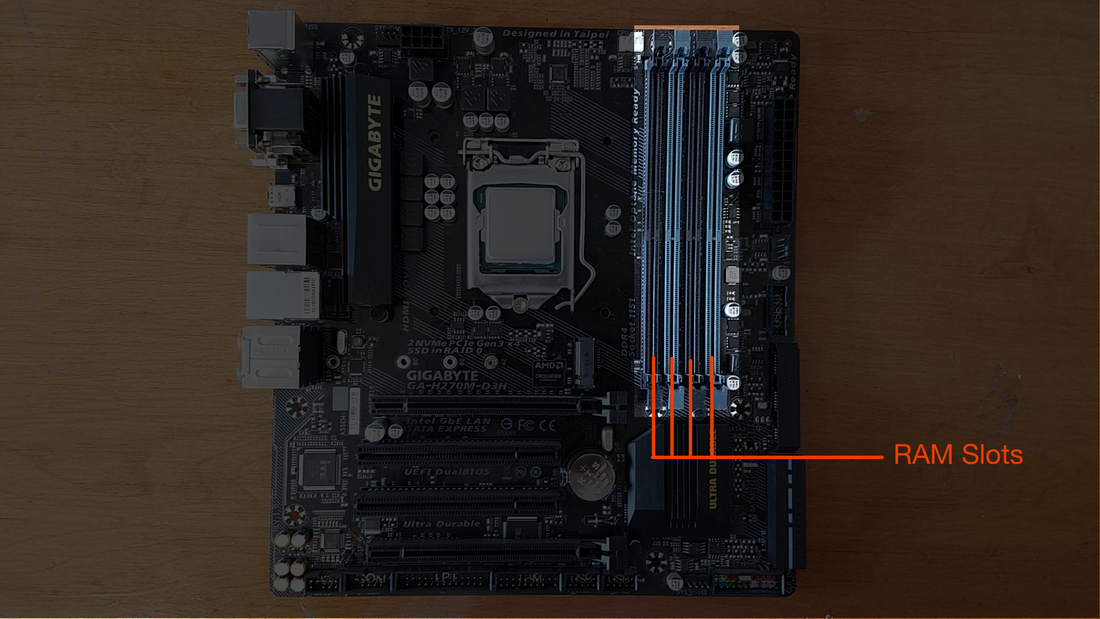
RAM Slots: This board has four slots for RAM, with two currently occupied. If I add more RAM later I simply add a second set of matching pairs rather than replace both RAM modules if I were limited to only two slots.
There's no need to max out the slots, but consider future upgrades. If you add two sticks now and only have two slots, you'll have to replace them with two sticks of higher capacity RAM later or replace it with one larger-capacity module. Of course, you can always sell your originals to offset the cost.
If you're upgrading an existing board, make sure the type of RAM you have (DDR2, DDR3, DDR4) matches the RAM type on the board. There's a notch in the module in a different place for each type of RAM, so a DDR3 module will not fit into a DDR4 slot.

PCI Express slots: This board has two PCI Express slots, and two older PCI slots (unused). The PCIe slots are also labeled by speed
Motherboards have at least one large PCIe slot to accommodate a video card, and most will have at least one smaller-sized PCIe slot for cards with smaller connectors. This allows for a 4-port SATA card, a network card, sound cards, and cards that will hold a solid state drive. Be aware that not all PCI and PCIe cards will be Mac-compatible, such as internal sound cards. Some motherboards still use legacy PCI slots for older cards, which may no longer be supported in Windows 10.
Motherboards have at least one large PCIe slot to accommodate a video card, and most will have at least one smaller-sized PCIe slot for cards with smaller connectors. This allows for a 4-port SATA card, a network card, sound cards, and cards that will hold a solid state drive. Be aware that not all PCI and PCIe cards will be Mac-compatible, such as internal sound cards. Some motherboards still use legacy PCI slots for older cards, which may no longer be supported in Windows 10.
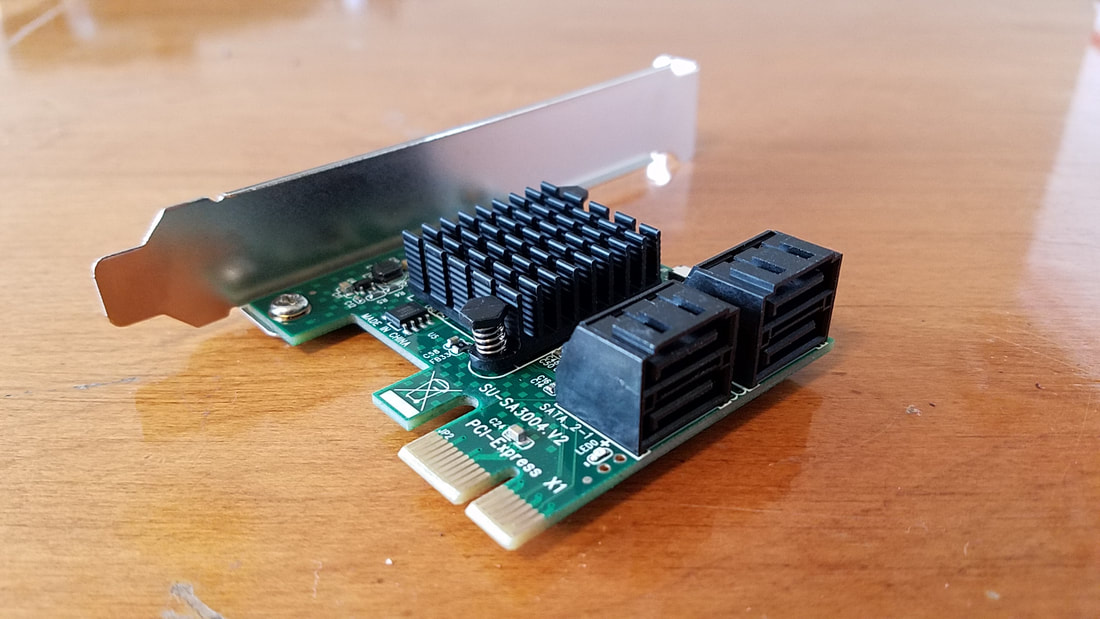
Note that if your motherboard only has longer PCIe slots but you have a smaller PCIe card, you can plug the smaller card into the longer slot and it will work without issues. I have a 4-port SATA card (right) with a connector matching the same width as the smaller slots in the bottom photo, but using it with the H270M-D3H motherboard above I placed in the wider PCIe slot at the bottom and it worked without issues.

PCI Express on the B450 Gaming X: The wide slot at the top holds my graphics card.
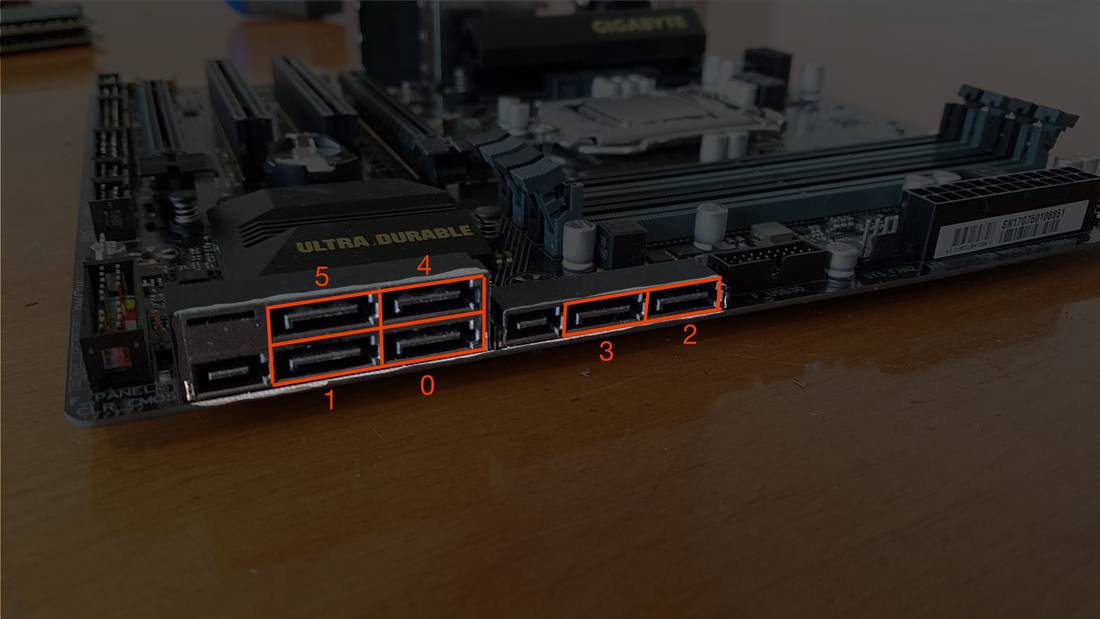
The wide slot below holds a card that contains a small solid state drive known as an m.2 drive. The Gaming X board also has 6 SATA pots for 6 SATA drives, but if an m.2 card is placed in the slot, the two white SATA ports to the right of the board are disabled.
Since it didn't work right from the start I simply purchased a PCIe card that holds an m.2 drive (two of them, actually) and placed it in the bottom wide PCIe slot. So not only do I have the m.2 drive, but all 6 SATA ports are functional.
Be sure to look into purchasing a board that will accommodate any PCIe cards you may already have, but possible PCIe cards in the future. If you're looking into buying a video card for gaming, consider that some cards are so wide due to the heatsink and fan that they occupy two slot spaces
SATA ports: Motherboards typically have a minimum of four SATA ports. While it is possible to have Windows and Mac on the same drive, it's safer and easier to have them on separate drives, thus requiring two ports. As I mentioned previously, it's also a good practice to have all of your saved media such as music and videos on a separate drive. This way if the hard drive with MacOS fails, all of your media should remain uncompromised.
Personally I have my primary 240 GB Mac drive, a large 1 TB drive for my Mac media, my primary 240 GB Windows drive, three additional Windows drives for games and backup files (almost 2 TB total), and an additional 32 GB drive I use with MacOS on it in case something happens to my primary Mac drive. My setup is more elaborate, but I try to make the most of hard drives that have a lower capacity than today's drives and plan accordingly. I also have the 4-port SATA PCIe card, but don't have all the drives plugged in there, mainly because I don't have enough connectors on my SATA power cables to support all of them. If I need more I'll have to buy one larger hard drive and consolidate my data, which would then free up SATA data and power connectors.
Do you still use media such as DVDs and CDs? You'll need a free SATA port for that, sort of. Most software these days is downloaded from the Internet, so CDs and DVDs aren't used as much. In addition, some computer cases do not have any slots in the front to accommodate a DVD writer. An alternative is to buy an external USB DVD drive for $10 to $20. Simply plug it in to one of the USB ports on the front panel of your case when needed. You'll free up a SATA port in the process which can be used instead for an internal drive.
Motherboard Chipset: The chipset is the architecture that regulates the bus speed and number of internal and external (USB) devices that can be connected. If you have a small number of devices and don't plan on expanding much beyond a few hard drives and devices, any choice you make should be okay. The chipsets are based on CPU type and are not universal. My Intel board is a Gigabyte brand H270M-D3H. With third-party motherboards, they use the chipset type in the name. So in that example the Intel board uses an H270 chipset. My AMD board is a Gigabyte-brand B450-Gaming X, so the B450 notates the chipset used.
That's just Gigabyte's brand way of labeling some of their products, but other motherboard manufacturer's may do the same. If you have a brand-name desktop or laptop, you'll have to go on the manufacturer's product support page or download one of the manuals if you wish to find the type of chipset. Here are links to Wikipdia's list for Intel-based and AMD-based chipsets.
Intel Chipset list
AMD Chipset list
It's unnecessary to memorize the details for each chipset, but I'm providing the links in the event you want ot see the limitations of your existing hardware, to show how far you can go with said hardware, and make you aware of what to look for in a chipset based on your current and possible future needs.
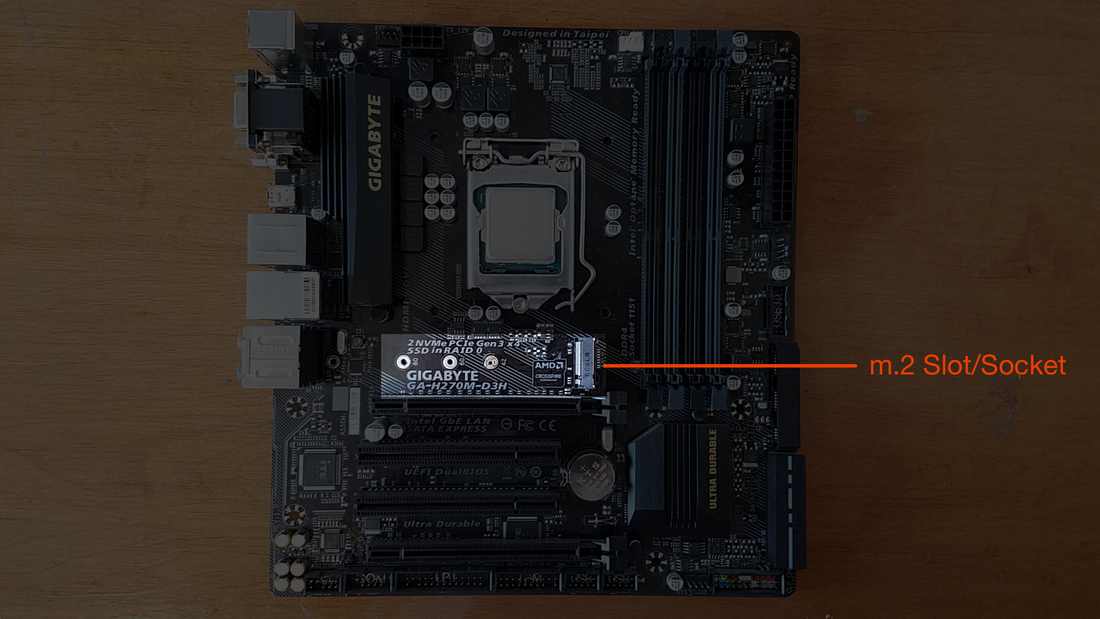
m.2 slot: These work much faster than an SSD to where modern motherboards are starting to include them. They work like any other storage device, only much faster. If you use it as a boot drive, your boot times will be much faster than before.
The m.2 slot uses up lanes on the motherboard for data transmission. What this equates to is that if you install an m.2 drive on the board itself, it will disable one or two SATA ports as it reserves the lanes specifically for the m.2 drive. Checking the motherboard manual ahead of time should inform you of any limitations there.
The m.2 slot uses up lanes on the motherboard for data transmission. What this equates to is that if you install an m.2 drive on the board itself, it will disable one or two SATA ports as it reserves the lanes specifically for the m.2 drive. Checking the motherboard manual ahead of time should inform you of any limitations there.

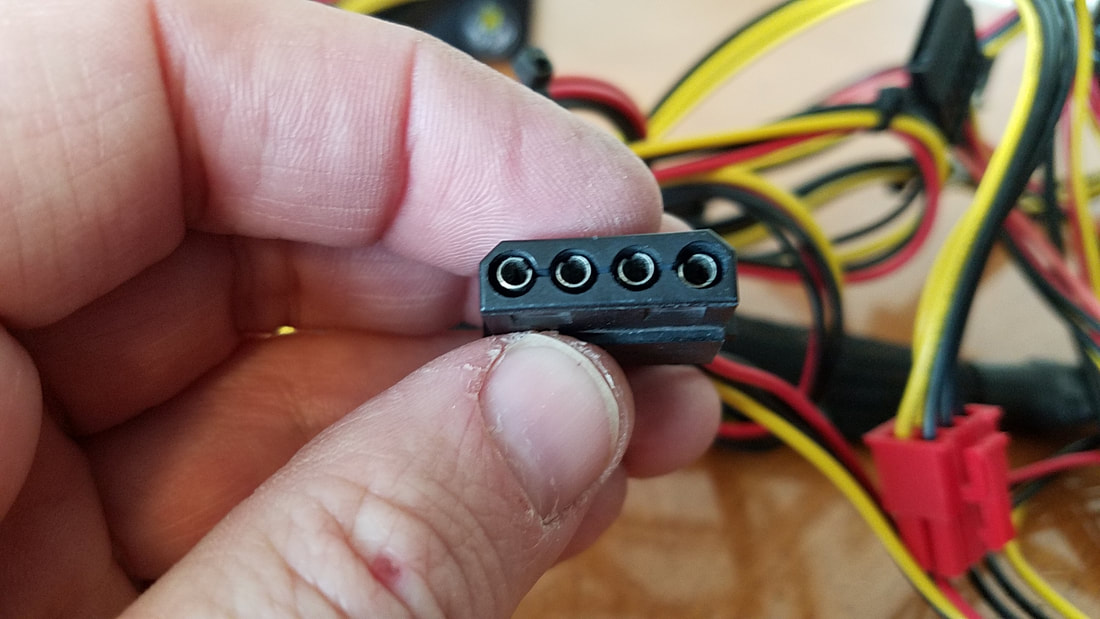
Fan Connectors: Fans are essential to keeping your system cool. There will be at least one 3- or 4-pin connector for the CPU cooler, but most boards will have two or more fan connectors for additional fans. Cases have a vent on the back for an exhaust fan, some have space on top for two fans, while others also have a vent on the bottom for exhaust or intake. Others still have fans in the front for intake. Not all fans have to be connected to the motherboard, only the CPU fan at a minimum. For this reason some fans are sold with a large Molex plug (right connector in photo) that attaches to a Molex connector (left connector in photo) on a power supply cable. I don't know which one is considered female or male with Molex connectors.

If the number of fans you prefer to have outnumber the connectors on the motherboard, you may be able to get a front panel fan controller if your case has slots for 5.25" drives, the same size as DVD drives. Here's a Kingwin brand controller with five fan controls below my DVD drive on my old case.
P4 & Power connector: (Primarily for those using existing equipment) The PSU Mains connect to the 24-pin port above the white SATA ports, but older PSUs on consumer machines have a 20- or 24-pin connector. Motherboards also have an 8- or 4-pin P4 connector near the top. Both of these connectors get plugged in using cables attached to the power supply. If your motherboard has an 8-pin P4 connector but your power supply only has a 4-pin P4 connector, you will need to change your power supply to one that has an 8-pin P4 connector.

Rear Panel Connectors: Previously mentioned, not all motherboards have a video output. If you plan on using on-board graphics but no video card, you'll need to purchase a board that has video outputs. This photo show a board with all three. 2nd from the left at the top is VGA (not supported in MacOS), blow that is DVI, and in the center below the two USB 3.0 ports in blue is an HDMI port.
Other ports shown are two USB 2.0 ports (far left) and a PS/2 port below that (purple/green), USB 3.1 (between DVI and HDMI), blue USB 3.0 ports, Ethernet, and multiple audio input/output jacks.
Other ports shown are two USB 2.0 ports (far left) and a PS/2 port below that (purple/green), USB 3.1 (between DVI and HDMI), blue USB 3.0 ports, Ethernet, and multiple audio input/output jacks.

Front Panel Headers: Cases come with different configurations of connections on the front panel or top panel. Most have a few USB 2.0 and/or faster USB 3.0 ports, and audio input and output; but all will come with a power button connector. Most cases will have a reset button and have LED lights to signify hard disk activity and power. All of these wires get attached to the motherboard.
If you choose a specific motherboard, ensure that the case you choose has the proper connectors to go to the motherboard. A hard drive lights and power light shouldn't make a different, but ensure you at least have addition front panel USB ports.
If you choose a specific motherboard, ensure that the case you choose has the proper connectors to go to the motherboard. A hard drive lights and power light shouldn't make a different, but ensure you at least have addition front panel USB ports.
Sizes: Motherboards come in sizes ranging from (largest to smallest) Extended ATX (eATX), ATX, Micro-ATX, and Mini-ITX. The sizes you'll most likely use art ATX and Micro-ATX, which is only slightly smaller than ATX. The larger the board, generally the more slots will be on there whether they're memory slots or PCIe slots. Extended ATX boards are for enthusiasts who use physically larger and more powerful CPUs such as the AMD Threadripper, and these boards also have a higher number of RAM slots. Mini-ITX boards are much smaller and used typically for Home Theater PC (HTPC) setups, but there's no rule for what they can be used for.
It's important to consider that the size of the motherboard will dictate what case size you'll need as well. A case that is designed to hold ATX motherboards will also hold Micro-ATX boards and Mini-ITX boards. The opposite does not ring true though, as a Micro-ATX board is physically not large enough to accompany a standard ATX or Extended ATX motherboard.
It's important to consider that the size of the motherboard will dictate what case size you'll need as well. A case that is designed to hold ATX motherboards will also hold Micro-ATX boards and Mini-ITX boards. The opposite does not ring true though, as a Micro-ATX board is physically not large enough to accompany a standard ATX or Extended ATX motherboard.
Again, it comes down to your needs as well. This is especially important when buying new when you want to consider future expansion. Of course, if all you want is a cool case, then your motherboard size and it's features are limited by the size of the case. I HIGHLY recommend PCPartPicker.com
This comprehensive website lets you pick everything out from scratch, provides a list of popular online vendors and their prices for each product, and narrows down your list of available parts depending on the parts you chose first. For example, if you chose a motherboard for Intel chips, the CPU section would only list Intel CPUs available for that motherboard's socket. If you decided on an AMD CPU first, the choice of motherboards would only show AMD-based motherboards with the socket that accommodates that CPU. Based on your motherboard choice, the site would then display only cases the same size or larger to fit your board.
Another helpful hint I highly recommend is to go to the product page on the manufacturer's website, then download the manual for that motherboard. You'll get a heads up on what goes where, how things get connected, what works when you plug part A into part B (like how both SATA ports would be disabled when I connected an m.2 drive in the m.2 slot), etc. The same website will also provide a CPU compatibility list. The lists for these are pretty accurate, although I once bought a CPU not listed on a motherboard's compatibility list (same socket, same bus speed), and got it to work without any issues at all.
BIOS or UEFI: Brand new motherboards should use a UEFI-based system which is more compatible and future-forward than older BIOS-based systems, some of which are still MacOS compatible. Go to the manufacturer's product page for your motherboard and see if it has a BIOS-based system or a UEFI-based system. If you're using an older or used board, please note that some older boards started with a BIOS setup but may have free updates to UEFI.
Video Card
If you're a gamer, you know the importance of a video card. It's really the source of your system. Sure, the CPU is important for certain game requirements, but it's the graphics card that makes those games look their best. There are far too many aspects to go over when it comes to video cards, but for a quick rundown of compatible cards, read the Catalina GPU Buyer's Guide. "GPU" is an acronym for Graphics Processor Unit, a fancy name for a graphics card). Avoid using XFX-brand of graphics cards, as they have an odd BIOS issue. I've seen examples where some users could "flash" them; that is, use a small utility to reprogram them so that they appear to be rebranded from a different company, and therefore gain Hackintosh compatibility. I've tried this a few times with an XFX card but could never get it to work. I got fed up and simply bought a Sapphire brand RX 580 Nitro+ as various forum threads including Reddit noted that it was compatible out of the box (OOB) without any special drivers, hacks, or kexts needed (below right)
If you're unfamiliar with the ranking of video cards, not to worry. Some products have a number scheme where the lower number designates the higher-ranked product, while others follow a typical scheme where the lower number designates the lower-ranked product. For example, when I got into keyboards and synths in the 80's, I knew that the Yamaha DX7 was one of the most used synths, The DX5 and DX1 had more features than the DX7, but the DX21, DX27, and DX100 had less features going up the scale. On the opposite end were Roland keyboards and synths. Their D50 was the standard synth at the time. The D-20 had an on-board sequencer (digital recorder) but could not combine sounds like the D50. Lower end models included the D10 and D5 with less features while higher end models included the D70 with more keys.
Nvidia and AMD cards are different. Nvidia made cards such as the GT 8600 with numbers in the thousands, then changed their scheme to numbers in the hundreds with the GT 200-series, GT 400-series, and so fourth. Currently they have the GT 1000 and GT 2000 series. AMD cards started with (when I got into the hobby) the HD XXXX series such as the HD 4500 and HD 5450, then moved upwards to HD7990. Shortly afterwards they came out with the R6 XXX, R7 XXX and more where the number after the "R" was the series, and the three numbers that followed designated the card, with the higher numbers noting more powerful cards.

Any modern graphics card will fit in a PCIe slot, but one minor issue may be the size of the case you choose. This is a simple step of the research part for your machine. More than likely the card you choose will fit your case, but it helps to go on the product website and get the dimensions for each part.
Since any internal card gets power from the PCIe slot it's plugged into, there's a limit to how much power is supplied from the slot. This becomes a minor issue when you have a graphics card with one or more sockets for external power that need connected in order to fully power on. I state "fully" because I have reconnected a graphics card and forgot to plug in the external power, turned on my machine, and heard the graphics card's fans running at full speed without it providing any video output. The remedy for this is to replace your computer's PSU/Power Supply. This requires a bit of research first. If you have a graphics card in mind based on its specs, go to the manufacturer's product site for the specs and see how much power the graphics card requires. This will be one of the factors that goes into the consideration of what power supply you will need.
Since any internal card gets power from the PCIe slot it's plugged into, there's a limit to how much power is supplied from the slot. This becomes a minor issue when you have a graphics card with one or more sockets for external power that need connected in order to fully power on. I state "fully" because I have reconnected a graphics card and forgot to plug in the external power, turned on my machine, and heard the graphics card's fans running at full speed without it providing any video output. The remedy for this is to replace your computer's PSU/Power Supply. This requires a bit of research first. If you have a graphics card in mind based on its specs, go to the manufacturer's product site for the specs and see how much power the graphics card requires. This will be one of the factors that goes into the consideration of what power supply you will need.
Power Supply
Ah, yes. The Power Supply. Power supplies are slightly rectangular boxes and have a multitude of cables to channel power to those devices. Some are semi-modular which means that the primary cables to the motherboard are permanent, but the cables to drives and other devices can be connected to the PSU and devices as needed. Some are not modular which means all the cables included are permanently attached to the PSU, and some are completely modular which equates to all plugs having the option to be connected between the device and the PSU including the motherboard. The benefit of standard, non-modular PSUs are that since all the cables are permanently attached there's no chance of misplacing them outside of the case. The downside is that your case must have additional space somewhere to route or store those extra unneeded cables. Modular PSUs have the benefit of the user attaching only the cables that are needed, therefore having a cleaner cable layout and possibly better airflow for cooling.
PSUs are also primarily ranked by their wattage output. The higher the wattage, the more juice it can supply. You need not worry about buying a power supply that's too high for your needs. It's a good investment to purchase one that exceeds your demands, not just for current use but future use. You won't need a 1000W PSU if you plan on using integrated graphics and light web browsing, but if you choose to purchase a midrange graphics card down the line you'll be prepared. Check out and bookmark the Extreme Power Supply Calculator. You select your system and peripherals, click on "Calculate", and it shows the result of the wattage your system will use. It's crucial that you exceed this by 100 or 200 watts. MY parents had an eMachines desktop at one time. Whenever I would plug in a USB flash drive to the front panel, the machine would shut off. I tried the rear USB ports and got the same result. What was happening was that the computer was running at about the maximum speed and drawing the most power, so plugging in one more device was too much and the computer shut down. A better power supply resolved that issue.
A new power supply will consist of at least a 20/24-pin connector and a 4/8-pin P4 connector. They typically have a few cables with SATA power connectors for your drives, one or two cables with older-style Molex connectors for fans and such, and better ones will have one or two

20/24-pin connector: This is sometimes known as the PSU Mains and is the largest of the connectors from the power supply. The primary plug consists of two rows of ten pins, as consumer brand PCs (HP, Dell, Compaq, etc) have computers with 20-pin connectors. This makes it easy for existing users to adapt a more powerful, compatible power supply to output more juice if needed.

The mains also have an optional 4-pin attachment that snaps on and off to the 20-pin connector so that it can be easily adapted to modern 24-pin sockets on a motherboard. If being used for a 20-pin mains socket, the extra 4 pins can be moved out of the way.
P4 Connector: Motherboards also have a 4- or 8-pin P4 connector, typically at the upper left hand corner. PSUs also have this same connector to accommodate motherboards with either type of socket.
The P4 cable can be used like this for 4-pin P4 sockets...
The P4 cable can be used like this for 4-pin P4 sockets...
...and attached for use with 8-pin P4 sockets.
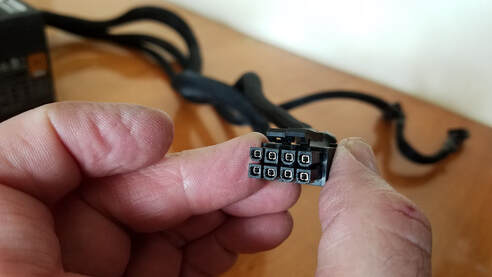
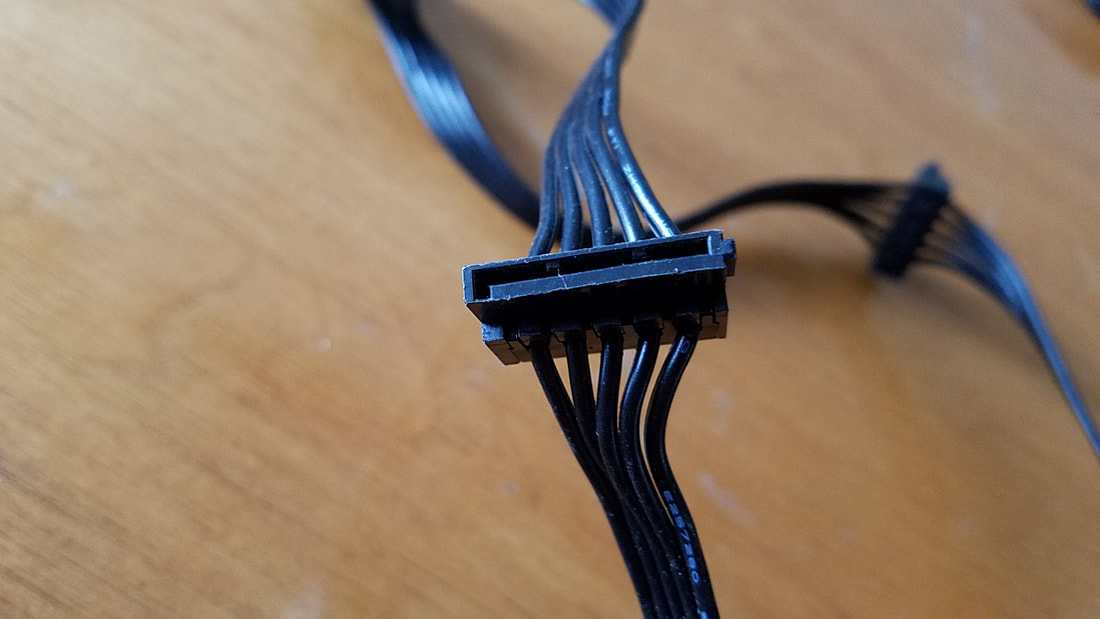
The power supply will also come with cables for SATA power connectors (left) and may include cables for Molex connectors (right).
|
|

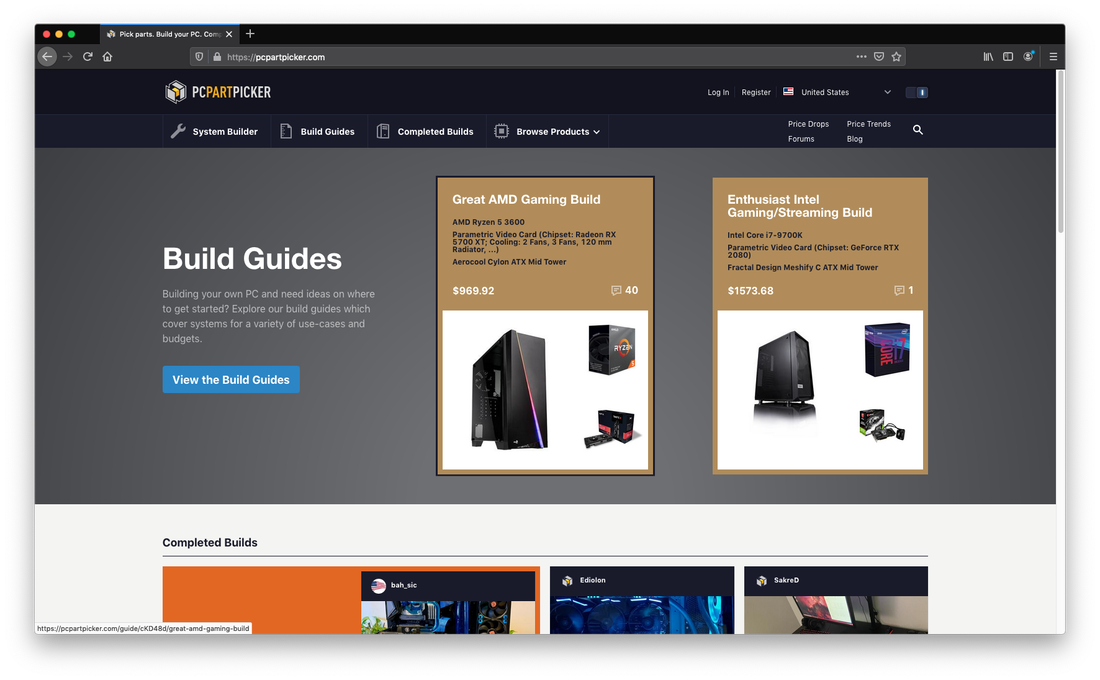
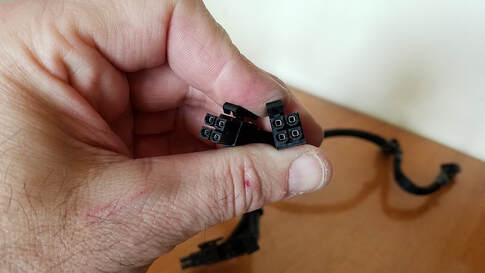
I mentioned that a good power supply will come with an additional cable or two necessary to provide power to certain video cards. The cable from my EVGA brand power supply has a 6/8pin connector and an addition 6-pin connector. Like the previous connectors the 6-pin connector (right) has an option two pins that snap in to the side of it and make it an 8-pin connector. Some cards have a 6-pin, some an 8-pin, so the connector on the right will work for either of those cards.
Other cards require even more power, and that's where the additional 6-pin connector comes in (left). Other cards are so powerful that they require an additional 8-pin connector instead of the additional 6-pin connector.
Other cards require even more power, and that's where the additional 6-pin connector comes in (left). Other cards are so powerful that they require an additional 8-pin connector instead of the additional 6-pin connector.
Many new builders (including myself at one point), have thought to just get what power supply seemed adequate for their needs and leave it at that. That's not a bad idea, but you need to consider the current and future needs. If you have to replace the power supply later, you may be able to resell the original to offset the cost of the new one or use it as a spare.
RAM
Overall there's no specific memory to use MacOS. Memory is required to run the operating system itself and any other programs you run. Any operating system will display the minimum RAM needed to run it, but the specs don't take into account any other programs to run. Therefore you'll need enough RAM to go beyond the needs of the OS, specifically the programs you would like to run and more. MacOS requires a minimum of 4 GB of RAM to operate. 8 GB is an okay start, but I recommend 16 GB as it doesn't cost much more and gives you plenty more overhead.
The current type of RAM used in computers is DDR4 (Double Data Rate 4). If you search for used RAM you'll want to use DDR4 and DDR3, but the type is limited by what your motherboard uses. Some older motherboards let you use DDR2 or DDR3 as they have two pairs of slots for each kind, but you may not see these as much.
Your laptop will also use the same DDR4 or DDR3 RAM, but the user/service manual should inform you which type it uses if the type isn't already noted on the RAM module itself. Laptop memory costs more than desktop memory as more circuits are crammed on to each module for its compactness, but it will operate in the same manner.
Hard Drive / Solid State Drive
The MacOS uses standard SATA hard disk drives (HDs or HDDs) and solid state drives (SSDs), but they'll also utilize smaller-sized drives such as m.2 and mSATA drives. Hard drives are rated by speed, typically 5400RPM or 7200 RPM or higher, referring to the rotation speed of the disc platters. SSDs surpass HDs because they have no moving parts and act as very fast flash drives, so boot times and shutdown times are drastically reduced. SSDs are generally preferred in laptops as they require less power than HDDs since HDDs require extra power to move the discs and other moving parts inside.
If your existing laptop has a DVD drive, and you no longer have a need for a DVD drive; it's possible to replace that drive with a caddy to hold a second 2.5" drive for MacOS. This allows you to use the primary drive for Windows and the secondary for MacOS. You can even purchase an external case to hold the laptop's original DVD drive and connect it to the laptop via USB. There are step-by-step instructions for this shown later on.
If your existing laptop has a DVD drive, and you no longer have a need for a DVD drive; it's possible to replace that drive with a caddy to hold a second 2.5" drive for MacOS. This allows you to use the primary drive for Windows and the secondary for MacOS. You can even purchase an external case to hold the laptop's original DVD drive and connect it to the laptop via USB. There are step-by-step instructions for this shown later on.
Case
The desktop case is the enclosure for the internal components. Mac Pro cases and Apple products in general are known for their design, and while PC cases generally don't have the same aesthetic there are various cases out there to suit your tastes and needs, and limitations if any.
Lighting: I love lighting on cases. It adds an aura or mood to things. However, too much lighting might be a bad thing. When you're using a computer, most of the time your eyes are focused on the monitor. Outside lighting can be a distraction from that. The same applies for fans. Obviously you'll want to do what's necessary to help keep your system cool, but too many lighted fans can be visually distracting, while too many fans in general may cause a distraction with background noise. All cases have fans and extra space to add and remove fans, and some have controls to alter the fan speed or turn them off entirely.
Size: If your primary choice is the case, this determines the size of what motherboard you can use. If you choose a full-size ATX case, you can use an ATX motherboard or smaller. If you choose a mid-size ATX, you may or may not be able to use a full size ATX board, and that's where you have to check the page for the product specs. If your choice is a Micro-ATX case, you can use a Micro-ATX motherboard or smaller. Consider that the smaller the case, the less space you may have available to work with when it comes to wiring internal cables and creating a good path for airflow. A modular PSU is a wise choice for those who want a smaller case. What if you want a full size ATX case or larger? Consider your existing workspace. Would it fit in the nook of your computer desk, or would it have to be placed outside of the desk are and out of reach? Do you need to access the DVD drive frequently? If so, would you be okay having it out of reach, or would you prefer a bigger desk or different case?
PSU Location: Would you be keeping your existing MacOS-compatible motherboard and using a newer case? What about the power supply? Some cases are designed so that the power supply can only be at the top, only at the bottom, or either. I recall buying a case where the power supply could only be mounted at the bottom while the Micro-ATX board as put in its place at the top. The trouble was that the P4 connector from an older power supply could not reach the P4 socket on the board. At that point I settled on buying a cheap P4 extension cable from eBay until I could get a better power supply.
Front Panel Ports: I previously mentioned these in the section for the motherboard. You'll always have permanently attached wires for the front panel power and reset buttons (although one of my cases doesn't have a reset button), in addition to indicator lights if any. Most cases will give you a second audio input and output, and one or more pairs of USB 2.0 / USB 3.0 ports. It's not required to have all the front panel inputs and outputs connected, but can help you in a pinch if you need to attach a flash drive or headphones.
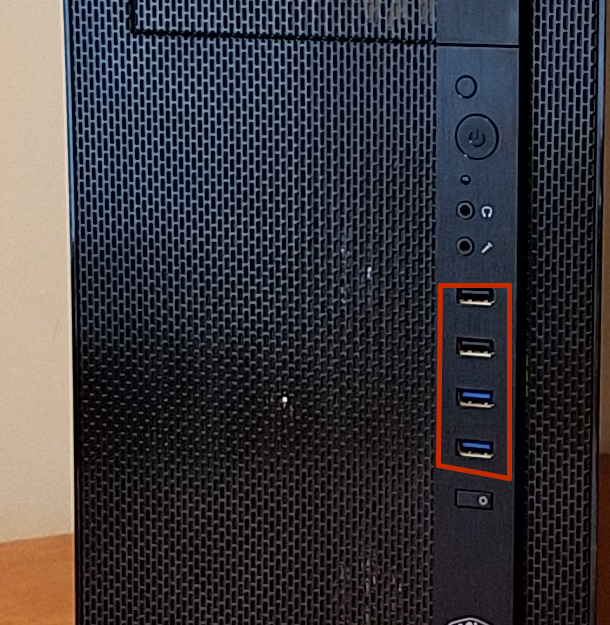
The cropped photo below is from my old Cooler Master N600 case. From top to bottom is the reset button, power button, headphone/audio out port, and a microphone/audio in port. Highlighted in red are two USB 2.0 ports (top) and two USB 3.0 ports (bottom), followed by a button to turn off internal lights that may be connected to the case wires:
Lighting: I love lighting on cases. It adds an aura or mood to things. However, too much lighting might be a bad thing. When you're using a computer, most of the time your eyes are focused on the monitor. Outside lighting can be a distraction from that. The same applies for fans. Obviously you'll want to do what's necessary to help keep your system cool, but too many lighted fans can be visually distracting, while too many fans in general may cause a distraction with background noise. All cases have fans and extra space to add and remove fans, and some have controls to alter the fan speed or turn them off entirely.
Size: If your primary choice is the case, this determines the size of what motherboard you can use. If you choose a full-size ATX case, you can use an ATX motherboard or smaller. If you choose a mid-size ATX, you may or may not be able to use a full size ATX board, and that's where you have to check the page for the product specs. If your choice is a Micro-ATX case, you can use a Micro-ATX motherboard or smaller. Consider that the smaller the case, the less space you may have available to work with when it comes to wiring internal cables and creating a good path for airflow. A modular PSU is a wise choice for those who want a smaller case. What if you want a full size ATX case or larger? Consider your existing workspace. Would it fit in the nook of your computer desk, or would it have to be placed outside of the desk are and out of reach? Do you need to access the DVD drive frequently? If so, would you be okay having it out of reach, or would you prefer a bigger desk or different case?
PSU Location: Would you be keeping your existing MacOS-compatible motherboard and using a newer case? What about the power supply? Some cases are designed so that the power supply can only be at the top, only at the bottom, or either. I recall buying a case where the power supply could only be mounted at the bottom while the Micro-ATX board as put in its place at the top. The trouble was that the P4 connector from an older power supply could not reach the P4 socket on the board. At that point I settled on buying a cheap P4 extension cable from eBay until I could get a better power supply.
Front Panel Ports: I previously mentioned these in the section for the motherboard. You'll always have permanently attached wires for the front panel power and reset buttons (although one of my cases doesn't have a reset button), in addition to indicator lights if any. Most cases will give you a second audio input and output, and one or more pairs of USB 2.0 / USB 3.0 ports. It's not required to have all the front panel inputs and outputs connected, but can help you in a pinch if you need to attach a flash drive or headphones.
The cropped photo below is from my old Cooler Master N600 case. From top to bottom is the reset button, power button, headphone/audio out port, and a microphone/audio in port. Highlighted in red are two USB 2.0 ports (top) and two USB 3.0 ports (bottom), followed by a button to turn off internal lights that may be connected to the case wires:
Drive Slots: All cases let you connect a multitude of drives. If migrating from an existing case to another, your new case should have enough slots to hold at least all of your existing drives, hopefully more if the need arises later on. My recent case purchase was a Rosewill case from NewEgg, and this case has a bay below for the power supply and hard drives. One of the features I like is that there are two panels on top of this bay that can be removed and have hard drives fitted to them, which is what I did.
Front Panel Slots: My previous cases like the N600 below had multiple 5.25" bays at the top for DVD drives and fitting peripherals. I purchased a 5.25" metal enclosure that held three 2.5" drives, which was perfect for my SSDs.
Front Panel Slots: My previous cases like the N600 below had multiple 5.25" bays at the top for DVD drives and fitting peripherals. I purchased a 5.25" metal enclosure that held three 2.5" drives, which was perfect for my SSDs.
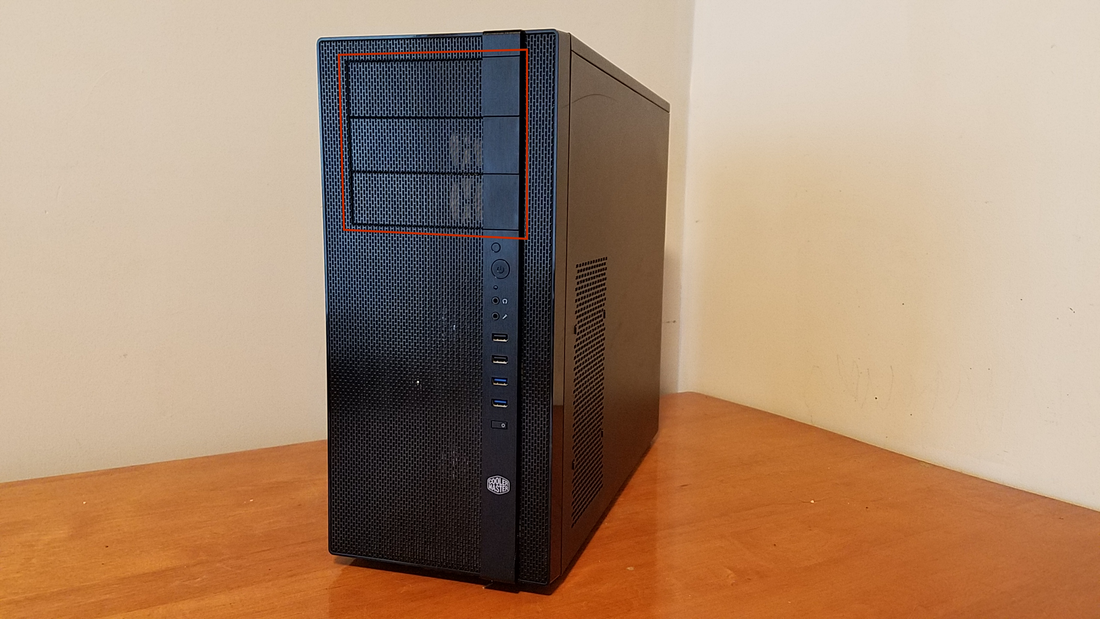
The case I'm using now has no front 5.25" bays but rather a large pane of glass covering three fans, so there's no way to internally mount a DVD drive. It seems this seems to be the trend now, having no 5.25" bays to accommodate DVD drives since optical media is becoming a thing of the past. If you're set on a similar case but still want to use a DVD drive; consider ditching your old drive for a slimmer, USB DVD drive. You can place it on top of the drive or nearby, and plug it in to a USB port when needed.
