
Chapter 6 Changes
Under "Using MultiBeast":

|
UEFI Boot Mode is for desktops and laptops that have or can utilize UEFI mode. If you've established that you can access UEFI or can switch between Legacy and UEFI mode, select this option. If you're using an older system that uses the standard BIOS, select Legacy Boot Mode. These differences are explained in Chapter 3.
If you select UEFI Boot Mode, the information in the top field says, “Recommended for 7/8/9/100 Series CustoMac desktops and all UEFI capable systems.” The 7/8/9/100 series” is referring to the chipset series of the motherboard. Some manufacturers make this easy to distinguish while others do not, but it may depend on the specific model. For example, Gigabyte models have the chipset number in the model name. A Gigabyte GA-H55M-UD2H motherboard has an H55 chipset, so this puts it in the 5-series. An ASUS P5W-DH motherboard houses an LGA775 socket. Upon closer inspection on their website, the chipset is revealed to be in the 975x chipset. While the number itself is 975, it does not fall into the category of the 9-series and has an LGA775 socket for older Core2Duo processors. Therefore users of this board would select the Legacy Boot Mode. An H170 motherboard by MSI has an LGA1151 socket. Looking up the chipset types on the Wikipedia page https://en.wikipedia.org/wiki/List_of_Intel_chipsets, the chipset type is H170. Therefore this would fall under the 100-series chipsets and be treated to the UEFI Boot Mode selection. |
Note: Some older models from the 600-series can be upgraded to UEFI. I was able to get my existing Gigabyte GA-Z68-AP-D3 board running OS X when it had its regular BIOS and after I upgraded it to UEFI. Check the manufacturer's page in the downloads section and see if a UEFI upgrade is available.
Selecting either one will include a preset list of parameters including the type of bootloader and System Definition, also known as an SMBIOS.
The disk section shows general hard drive options. Check the “3rd Party SATA” for internal SATA drives, or “3rd Party eSATA” if you're using an external eSATA drive.
The section for miscellaneous allows you to install extra kexts. Earlier I selected the UEFI Boot Mode, so the first checkbox for the FakeSMC entry is already selected. Other options are there for additional plug-ins such as a hardware temperature monitor.
|
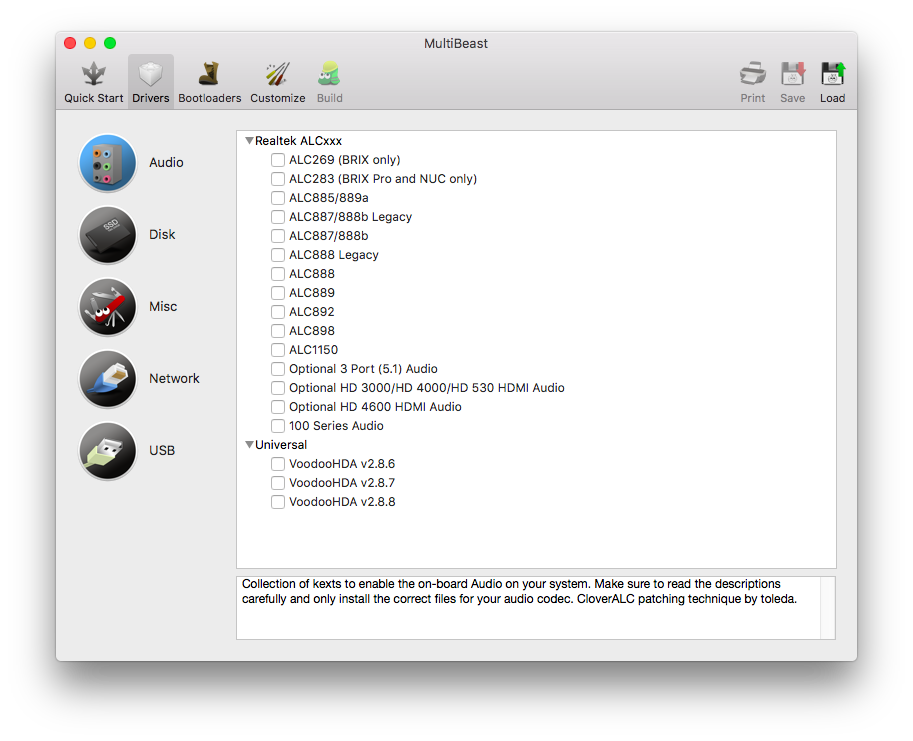
The Drivers section of MultiBeast allows you to select kexts based on your internal hardware applicable to audio, disks, networking, and more. The first section is for audio. If you're unsure what audio chipset you have, check your motherboard owner's manual or visit the manufacturer's website for specifications, then select the appropriate audio chipset in the list for your board. If there's no indication of your audio and you're not using a USB interface for audio, choose one of the audio chipsets in the Universal section.
|
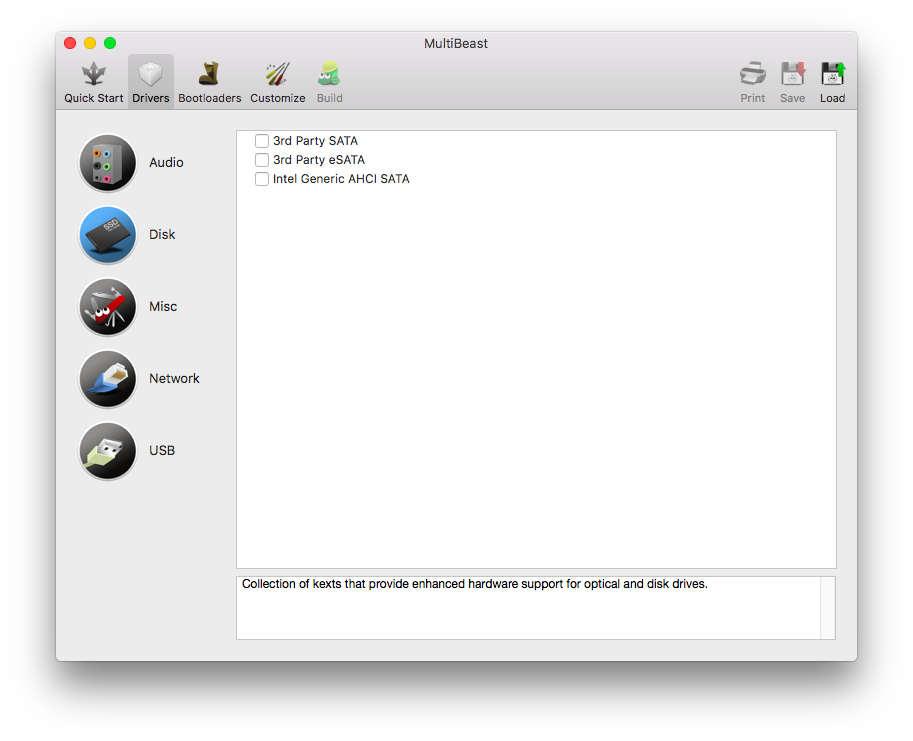
The disk section shows general hard drive options. Check the “3rd Party SATA” for internal SATA drives, or “3rd Party eSATA” if you're using an external eSATA drive.

The section for miscellaneous allows you to install extra kexts. Earlier I selected the UEFI Boot Mode, so the first checkbox for the FakeSMC entry is already selected. Other options are there for additional plug-ins such as a hardware temperature monitor.
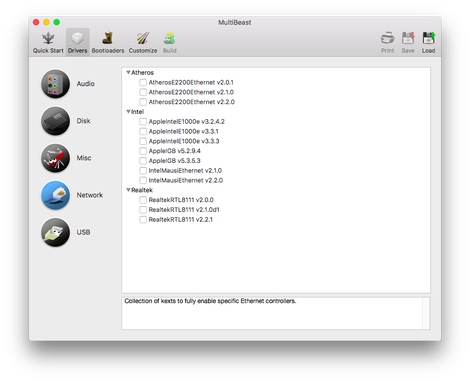
Networking kexts can be installed here. Just like the audio kexts, check your motherboard owner's manual or manufacturers support page for the right networking chipset, then check off the appropriate box for the networking chipset it has. Even if you connect using only WiFi, it's crucial to get a network kext to download anything from the App Store. For more instructions on setting up networking kexts including a fake Ethernet kext for networking chipsets not shown in the list, jump ahead to Adding Network Kexts.
|
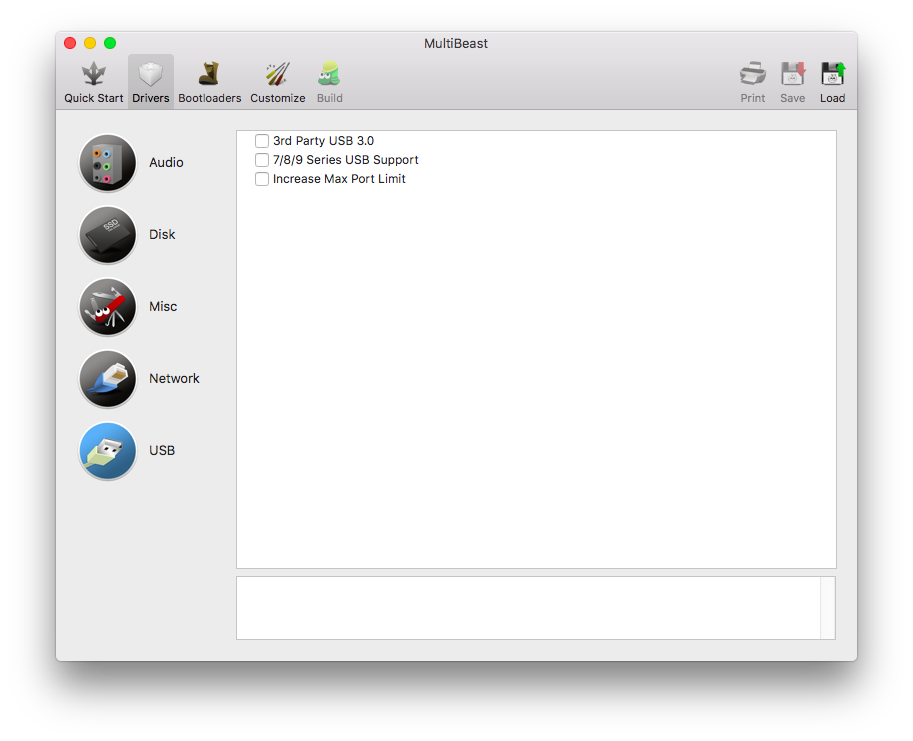
The last option here allows you to select additional kexts for USB based on your motherboard. If your motherboard has USB 3.0, be sure to select 3rd Party USB 3.0.
|

The Customize page presents you with various customization options for graphics, under-the-hood settings for Sandy Bridge processors, and System Definitions or SMBIOS. The Graphics Configuration allows you to select integrated Intel HD3000 or HD530 graphics if you do not use or are not using a graphics card.
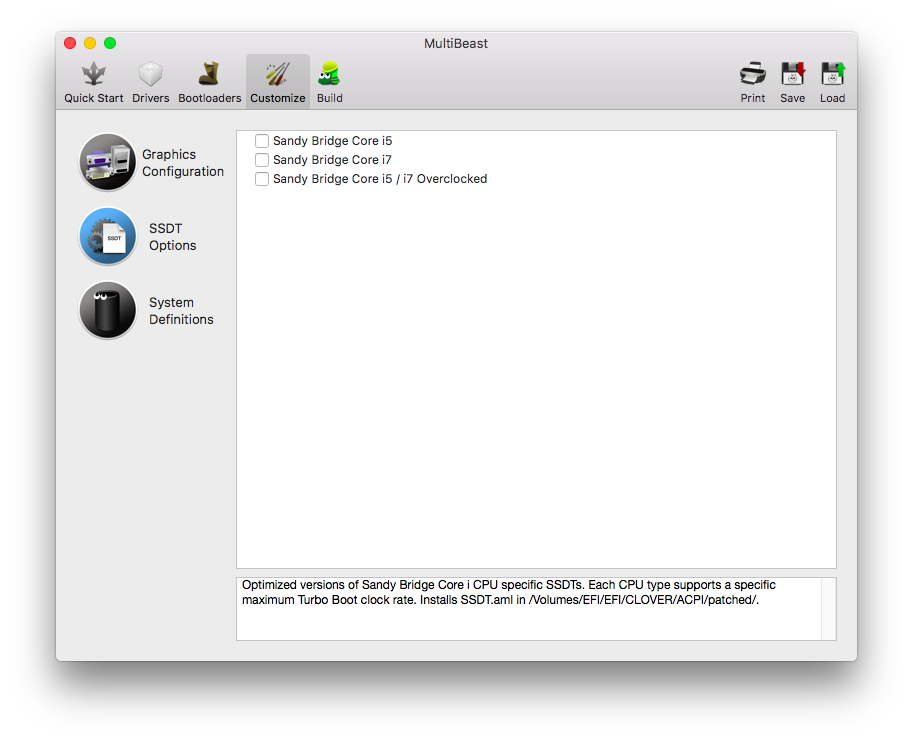
SSDT options allow you to have MultiBeast insert an SSDT file to a folder where Clover gets installed to. This allows you to experiment with CPU speed stepping, power optimization, and is the basis for using the Null Ethernet Kext. For a detailed look at how SSDTs work and how to use them, check out the page “Customizing SSDT”;
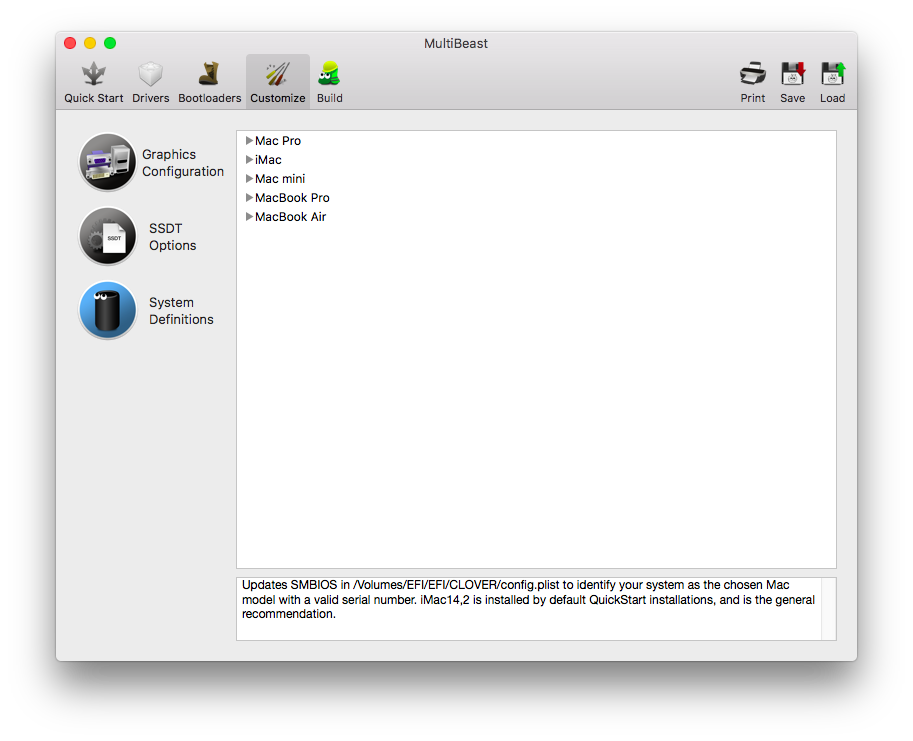
Please re-read Chapter 5: Boot Flags and Setting the SMBIOS for a recap if necessary regarding the system definitions.

The last page is for the build itself. The Current Configuration window gives you a preview of the files you'll be installing and allows you to select the hard drive to apply those files. When you're ready, click the Install icon on the lower right portion of the window and it will begin installing the files. When it's finished you'll see a confirmation screen notifying you that it has .
The three icons in the upper right hand corner allow you to print, save, and load the list as well. If you have a working list of MultiBeast choices, save this as a preset to your hard drive or bootable flash drive. If something happens and you need to start over, use an emergency boot disk to load the MultiBeast preset and save time by not having to go through page by page and select the necessary settings.
The three icons in the upper right hand corner allow you to print, save, and load the list as well. If you have a working list of MultiBeast choices, save this as a preset to your hard drive or bootable flash drive. If something happens and you need to start over, use an emergency boot disk to load the MultiBeast preset and save time by not having to go through page by page and select the necessary settings.
Under "Installing Nvidia Video Drivers":
Near the end of chapter 5 I pointed out how you can get information about your system by going to the Apple menu at the far upper left-hand corner and selecting “About This Mac”. To determine the correct video driver set needed, click on the version number below the OS X Title (OS X Yosemite version shown):
Near the end of chapter 5 I pointed out how you can get information about your system by going to the Apple menu at the far upper left-hand corner and selecting “About This Mac”. To determine the correct video driver set needed, click on the version number below the OS X Title (OS X Yosemite version shown):
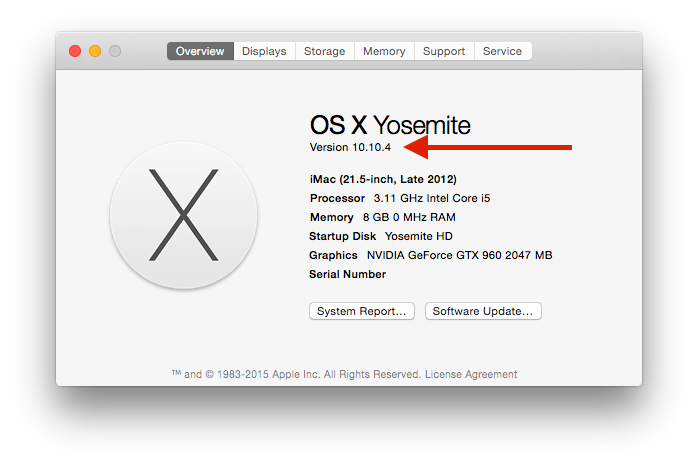
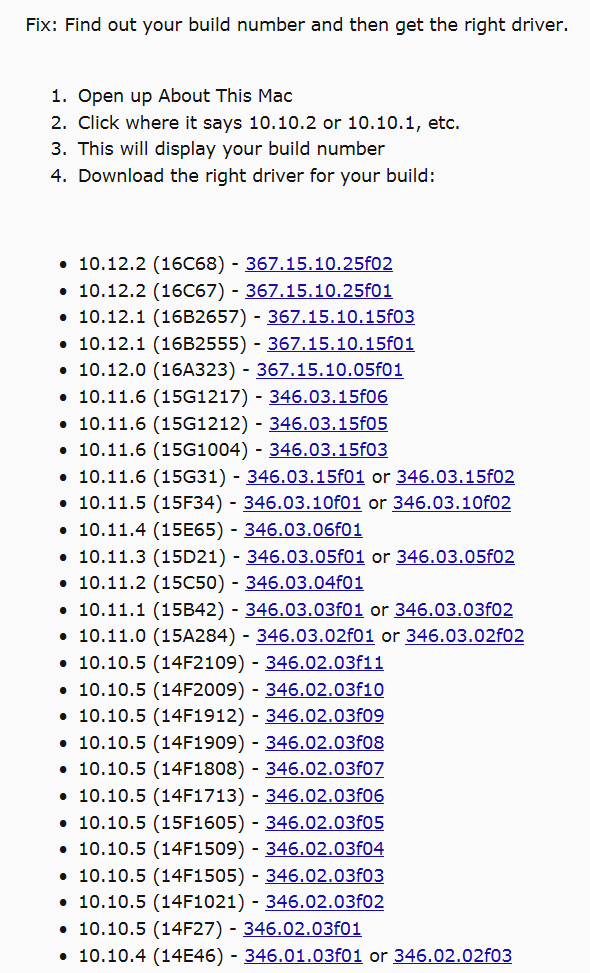
The number that now appears shows the build number:
At this point you have the choice to get the latest drivers for your video card via the tonymacx86.com thread Solving NVIDIA driver install problems (which provides additional information regarding customizing the driver installer if you have more issues) or from the InsanelyMac.com thread Nvidia Web Driver updates for Yosemite.
Each page here lists all of the current versions of Nvidia drivers for OS X. The screen shot below is from the TonyMacx86.com site:
Each page here lists all of the current versions of Nvidia drivers for OS X. The screen shot below is from the TonyMacx86.com site:
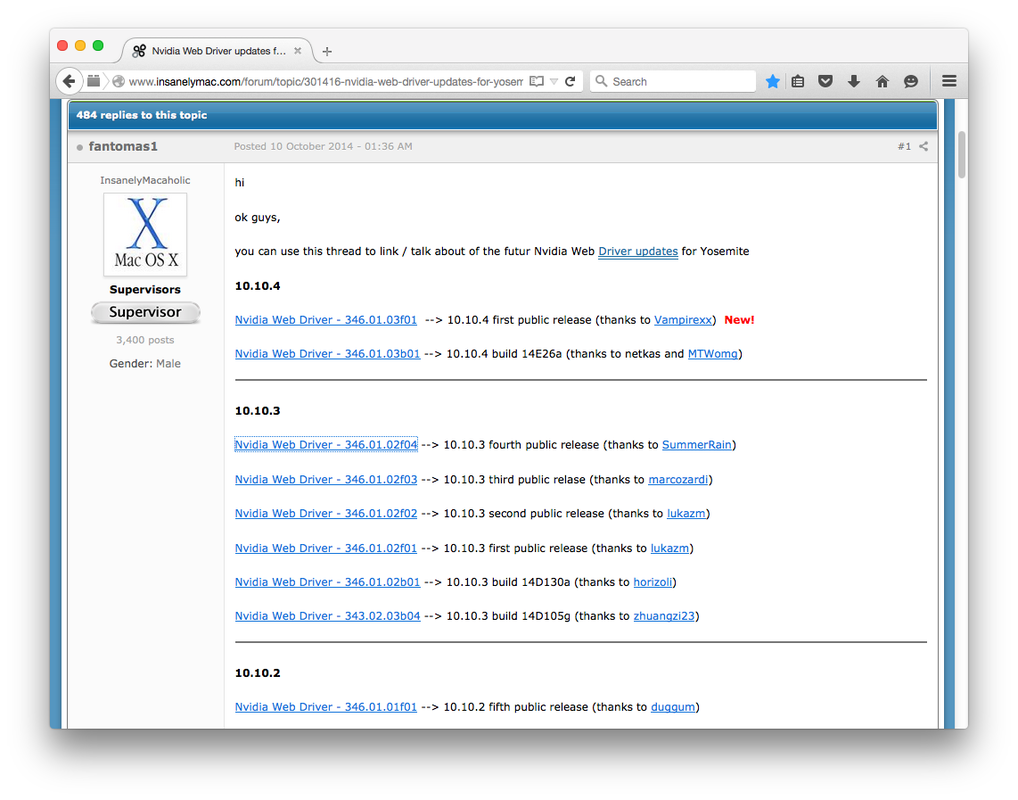
The photo below shows a screen shot from InsanelyMac:
Note: Both links are subject to change without notice but there should be future similar links for the future OS X updates. MacOS Sierra does not use the nv_disable=1 flag.
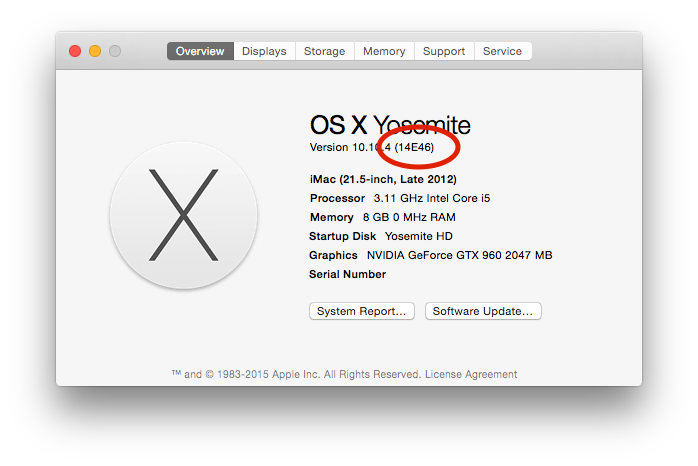
An earlier screen shot for "About This Mac" displayed information for my old Yosemite system showing the version as "14E46".
An earlier screen shot for "About This Mac" displayed information for my old Yosemite system showing the version as "14E46".
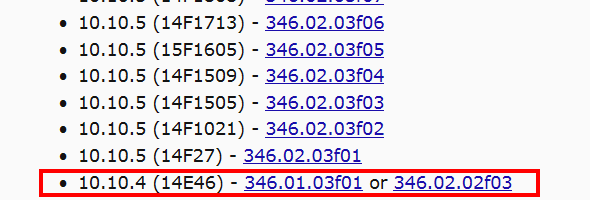
In this case I would scroll near the bottom where I find "14E46" listed along with two versions of the driver, then download both versions. If one doesn't work, the other will.
Once you have the drivers for the existing OS X version on your hard drive, download additional web drivers for the most recent versions as well to save time from downloading them again later on. Don't forget to copy the same drivers to your bootable flash drive for future OS X installations of the same OS version.
Go to the Downloads folder, double-click the downloaded file, then click Continue → Continue → Continue → Agree, select your OS X hard drive, then proceed. After a minute or two the drivers will be installed and you'll need to reboot your system, but it doesn't end there.
If you require the use of the “nv_disable=1 -x” flags for older versions, type those in again to reach the Finder. Don't be discouraged because the drivers do not work initially. There are only a few more simple steps. At the upper right hand corner of your screen are the menulets, only now there's one with the Nvidia logo. Click the Nvidia icon and a drop-down menu will appear:
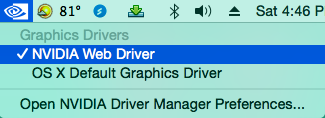
The default OS X Graphics Driver will have a check mark next to it. Click on Nvidia Web Driver, type in your password at the pop-up box to authorize the change, then click on Restart to restart your Hackintosh. This time do not enter any flags (for graphics) and let the machine boot up normally. With any luck the startup time will decrease and you'll arrive at the Finder much faster with no cursor lagging nor general sluggishness.
The System Preferences will get a new pane added for the Nvidia Driver Manager. It's possible to make the same change there or from the menulet, but the pane lets you check and download updates automatically when they become available.
The System Preferences will get a new pane added for the Nvidia Driver Manager. It's possible to make the same change there or from the menulet, but the pane lets you check and download updates automatically when they become available.
NEW SECTION:
Using Clover Configurator
If you're using the the Clover bootloader with Yosemite and newer OS X versions, you can use Clover Configurator to simply the booting process. Head over to http://mackie100projects.altervista.org/download-clover-configurator/ to download the latest version. Be sure to install it in your Applications folder and a separate folder in your bootable flash drive for OS X.
Under OS versions prior to El Capitan, Hackintosh configuration files were stored in a separate folder named “Extras”. Here you could simply double-click a config.plist file and make changes to your system. While the file itself still exists (hidden) and can be double-clicked, the modern method of changing parameters is done using Clover Configurator.
Launch Clover Configurator and it will indicate that the .plist file can't be found:
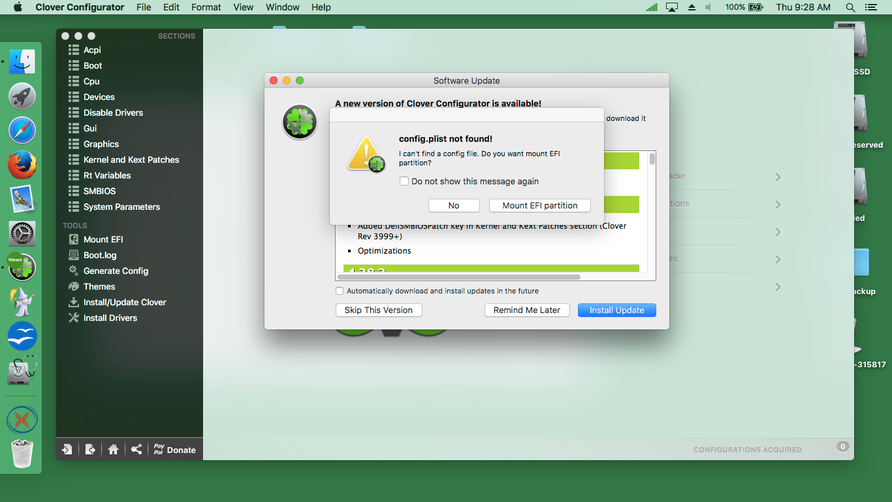
In the pop-up box click on “Mount EFI partition”. This will bring up a window from the Mount EFI selection from the left pane. Now click on “Check Partition”:
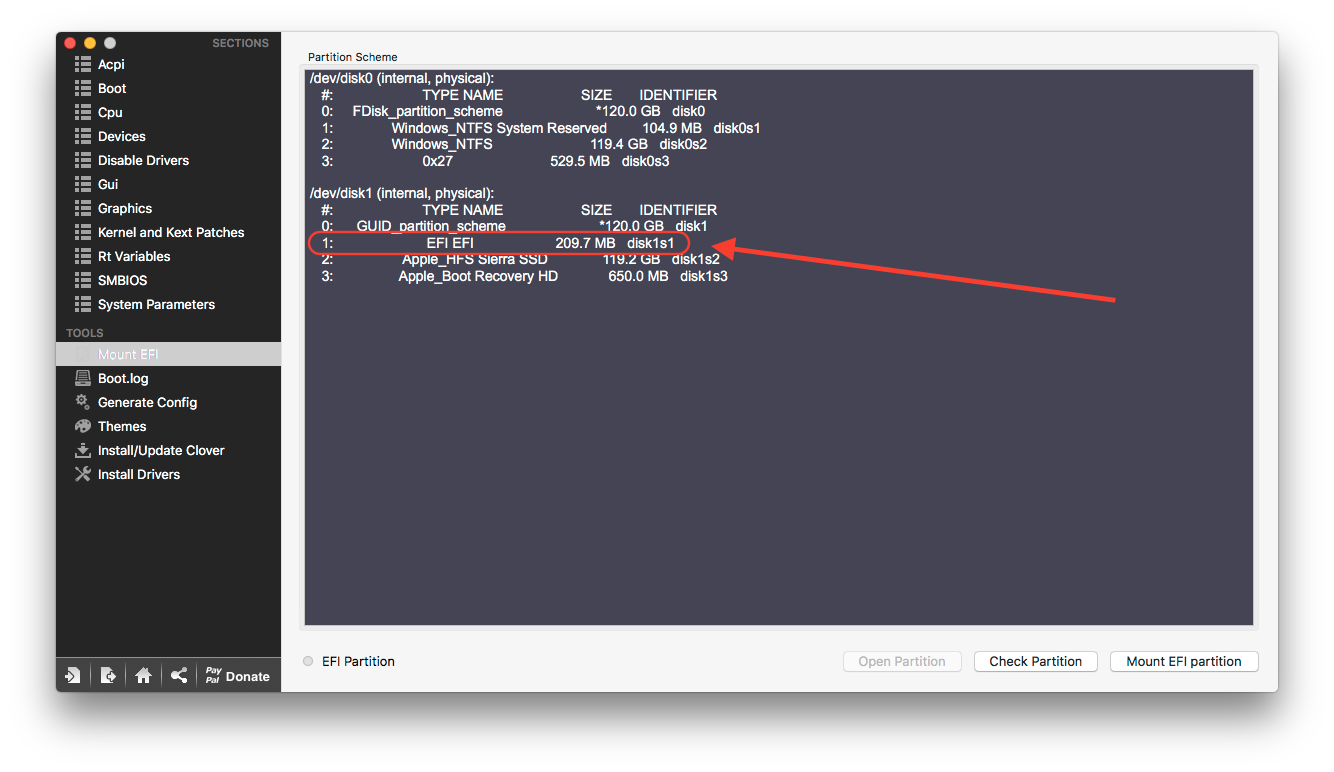
This will bring up a window with all of your connected disk drivers and help you locate the correct EFI partition. In the example above only one disk is shown having an EFI partition (highlighted in red) on my Hackbook. In the same example above it is “disk1s2”. On the same disk the name of the hard drive is also listed, which is labeled as “Apple_HFS Sierra SSD”, or more commonly seen on the Desktop as “Sierra SSD”. On your system, find your hard drive with the EFI partition. If your flash drive is still attached, it will be shown among the drives as well. Ensure that you do not select this (yet) but instead select your hard drive with the fresh install of OS X on it, then click on the bottom right button “Mount EFI partition.
- If you only have one drive attached that has an EFI partition on it, you will be prompted to enter your password.
- If you have two or more drives with EFI partitions, you will see a pop-up box prompting you to choose the disk from which to expose the EFI partition and file.
Here we can start selecting the parameters so that you can boot right from the hard drive instead of booting from the bootable flash drive. First select the SMBIOS from the left hand pane:
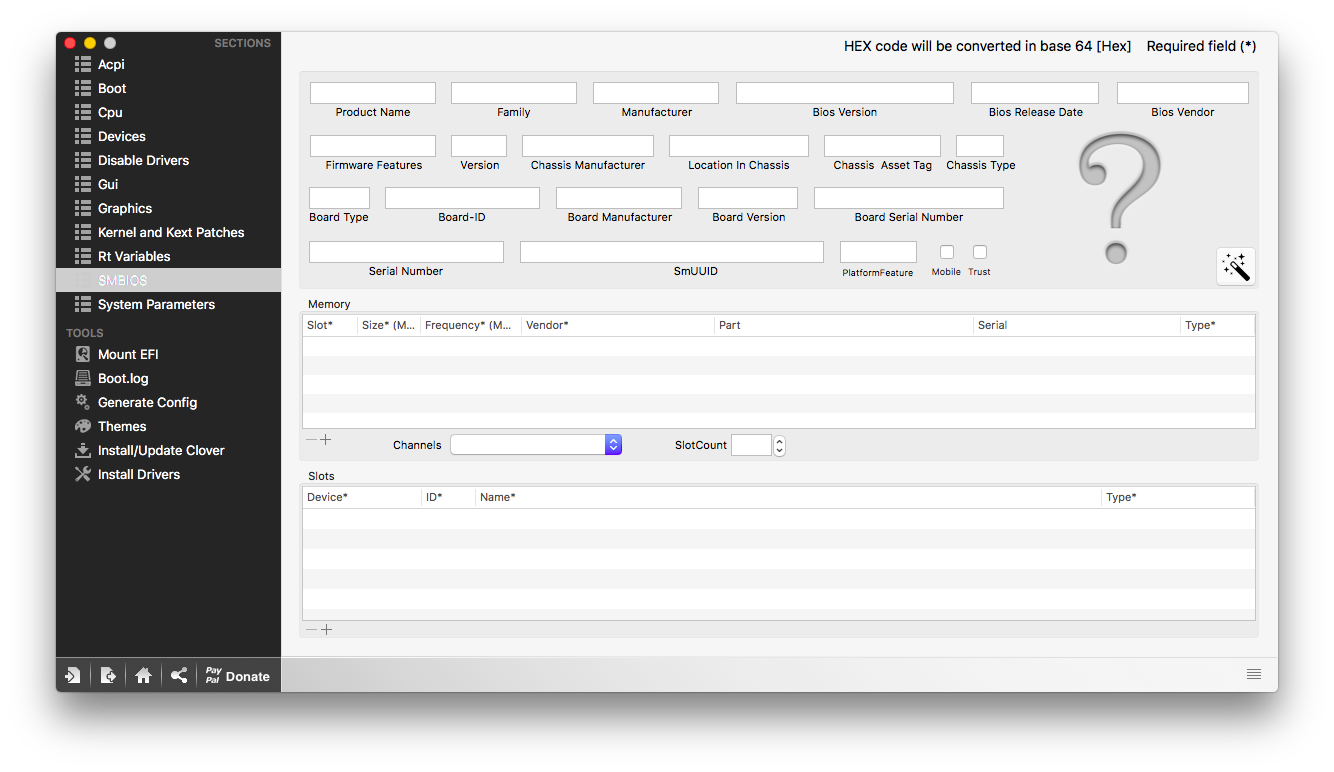
On this page, start by clicking the small magic wand icon in the middle right of the window. This will present an iconic overview of the Mac models:
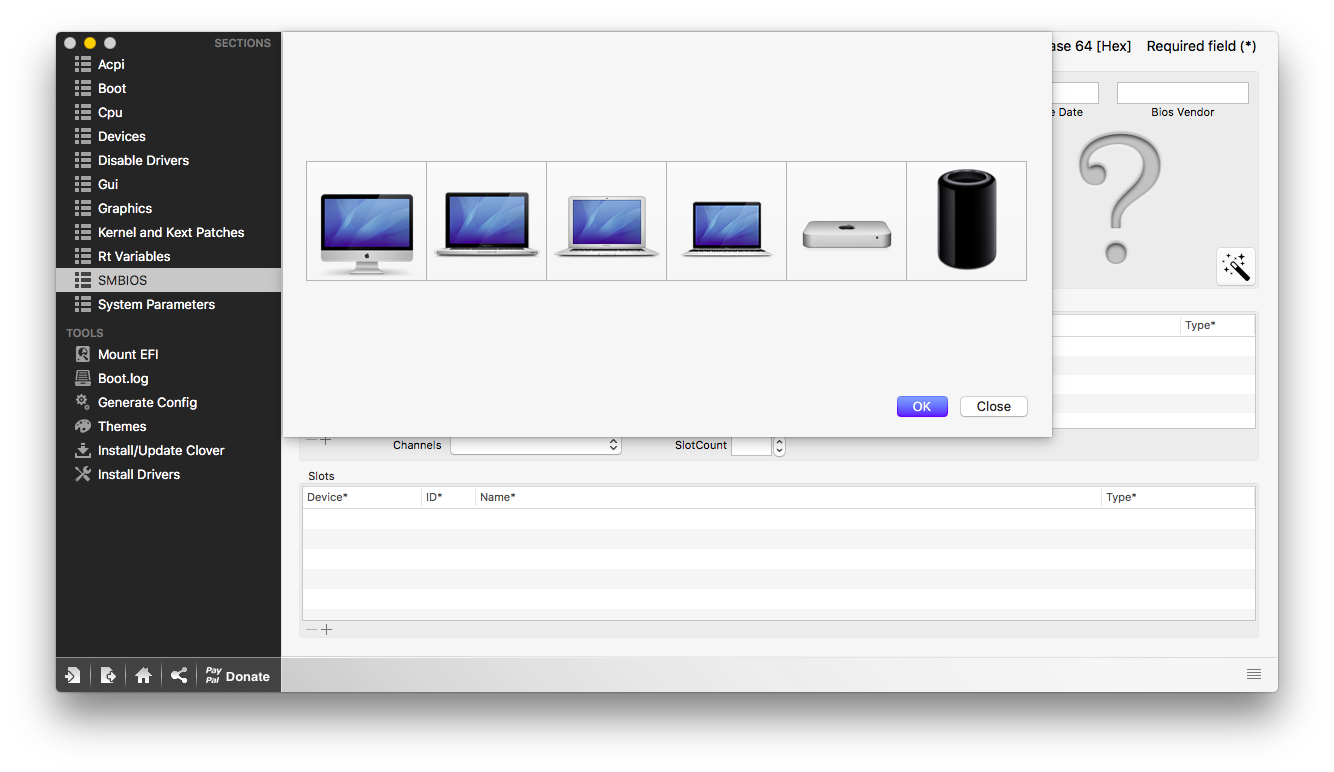
Select the model based on your SMBIOS. If you're not sure which model is which based strictly on appearance, click one and see if it shows up properly in the next screen:

If you select the wrong one, hit the small arrow to the lower left of the pop-up window (next to “Generate Config” in the left pane). This will take you back to the icons where you can select a different model.
Once you've selected the model best-fitting for your machine, click the drop-down menu in the upper left of Clover Configurator that begins with the name of the model you've selected.
Once you've selected the model best-fitting for your machine, click the drop-down menu in the upper left of Clover Configurator that begins with the name of the model you've selected.
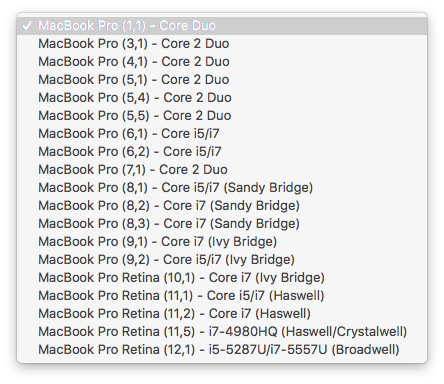
Now select your model from the list based on the SMBIOS information you researched earlier.

When you're finished, click on OK. Some of the information will be pre-filled in for you. Now select “Rt Variables” from the left pane, and click the Calculate button. The same information from the SMBIOS will be filled in.
If you'd like to be able to preset boot flags, click on “Boot” from the left pane:
If you'd like to be able to preset boot flags, click on “Boot” from the left pane:
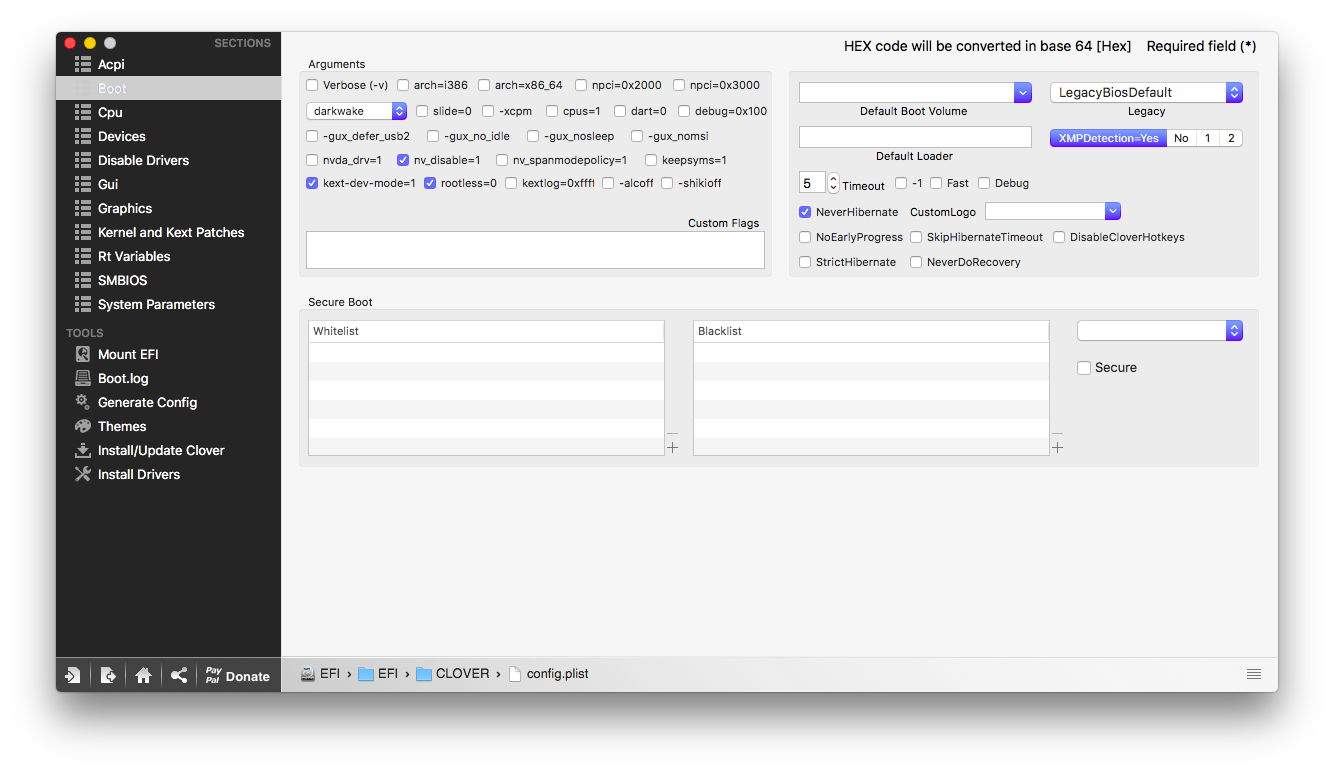
In the middle left of the window you'll see the various boot flags. Click these on and off to enable or disable them when booting. If you'd prefer to see things load up line by line, for example, click the “Verbose (-v)” box.
Note: Graphics are a hot button with Hackintoshes because getting them to run properly can be tricky for some people. Take a look at the screenshot of my config.plist from my Hackbook:
Note: Graphics are a hot button with Hackintoshes because getting them to run properly can be tricky for some people. Take a look at the screenshot of my config.plist from my Hackbook:
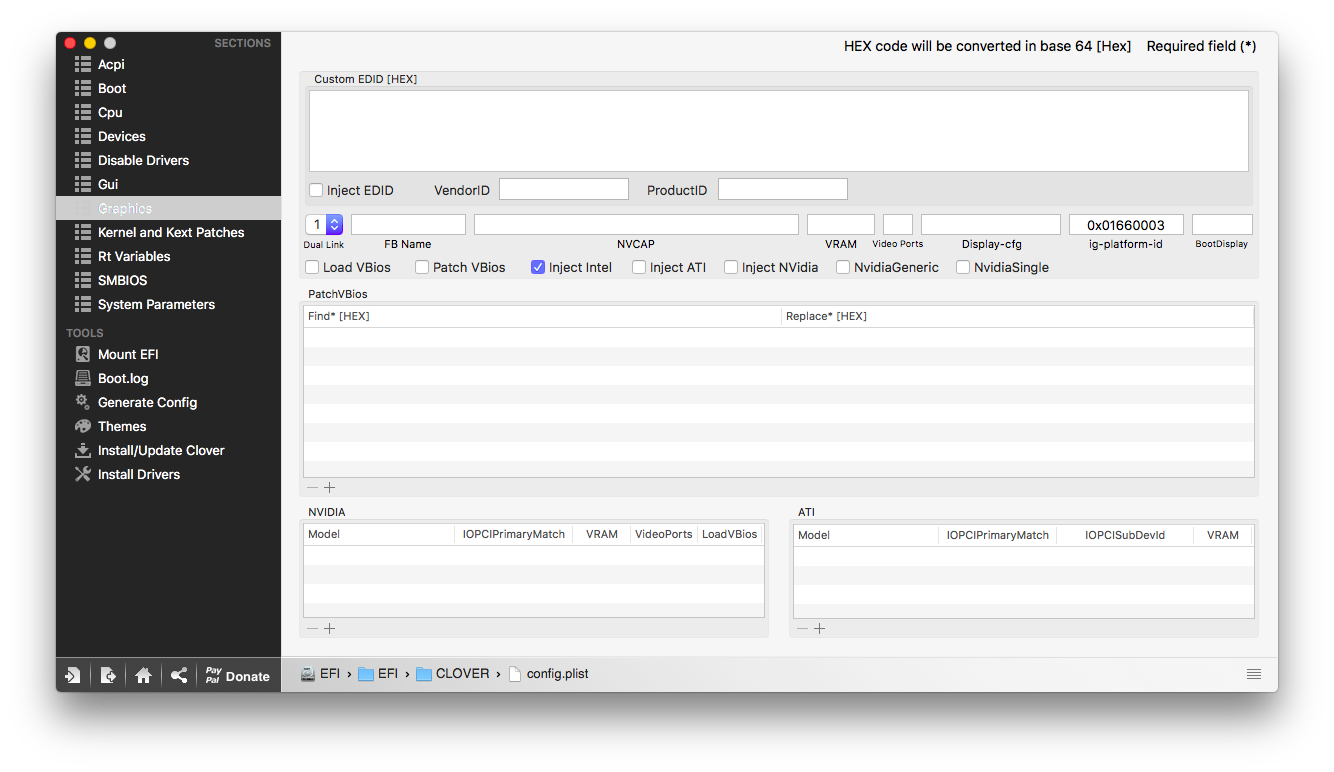
Here the “Inject Intel” was already checked off, but to get the graphics working correctly I've had to modify the parameters from the bootable flash drive to even see OS X being loaded. With an Nvidia card it's a bit simpler since I had a modern card and graphics appeared stretched (as seen in previous screen shots here), which was easily fixed with Nvidia updates. On a hackbook though with Intel Graphics built into the processor, there's more work to be done.
I knew when I purchased the laptop from eBay that it had an i5-3210m processor which has Intel HD Graphics 4000. More research showed where in Clover I would have to edit the paramters to let the graphics appear. The article here (https://www.tonymacx86.com/threads/chimera-hd-graphics-bootflags-igpenabler-igplatformid-and-igpdeviceid.131937/) instructed me to go to the “platform-id” field and use “01660003” for the parameter. When I tried it, it worked! So I wrote down that number and knew to use that number for the platform-id to enter later in Clover Configurator.
When you've finished making changes, go to File → Save. You'll receive a prompt stating that files can't be saved to the EFI location, but this is false. Now you can test out your Hackintosh by removing the bootable flash drive, selecting the hard drive with OS X on it, and attempt to boot from that. If it fails, you can still get back in by reconnecting the bootable flash drive, booting from that, and making more changes to the config.plist file.
NOTE: Making a backup of your config.plist file by copying it and saving it elsewhere may not always work. I was experimenting with flags, screwed up, then copied my original config file over the modified config file. When I went to boot again using the original config.plist file the Hackintosh was still reverting to the one I made changes to when experimenting. I ended up having to take out the hard drive, connect it to another working Hackintosh, and reinstall Clover over my old version to get it to boot again.
If you plan on using the bootable flash drive for solely one machine, you can save the config.plist file to that flash drive as well. You'll have to click on “Mount EFI” from the left hand pane, but this time select the EFI partition from the bootable flash drive. Once you have it loaded (or visible, rather), go to File → Duplicate. This will create a second window in Clover Configurator. Now you can apply a different theme if you'd like to this copied file (which is a handy indicator letting you know which drive loaded when booting your machine), then save the config.plist file to the same directory of the bootable flash drive.
